Downloading an installation of NetBeans (Java SE, Java EE, or All) is achieved by selecting the bundle to download and then clicking on the Download button for that bundle, as shown in the preceding screenshot.
All of the examples and screenshots in this book have been created with the Java EE bundle of NetBeans. It is recommended that you use the Java EE download bundle of NetBeans to adhere as closely as possible to the examples in this book.
Note
To install any version of NetBeans 8, the Java JDK Version 7 Update 10 or later, or Java JDK 8 or later, is required. These can be downloaded, if not already installed on your target system, from http://www.oracle.com/technetwork/java/javase/downloads.
Having downloaded the appropriate NetBeans bundle installer for your operating system, you can install NetBeans on your development system. The installation procedure differs slightly for the three main operating systems NetBeans is available for.
For Windows, simply launch the NetBeans installer by double-clicking on the file, netbeans-<xxx>-windows.exe (the exact filename differs depending upon the version and bundle downloaded).
For Mac OS X, double-click on the downloaded file, netbeans-<xxx>-macosx.dmg, to mount the installation device. From there, double-click on the included NetBeans xxx.mpkg file to start the installation (the exact names of the .dmg and .mpkg files vary, depending upon the version and bundle downloaded).
For Linux, NetBeans is installed via a command-line script, so first we must change the permissions of the downloaded file to be executable. From a terminal window, execute the following command:
chmod +x netbeans-<xxx>-linux.sh
Tip
Downloading the example code
You can download the example code files from your account at http://www.packtpub.com for all the Packt Publishing books you have purchased. If you purchased this book elsewhere, you can visit http://www.packtpub.com/support and register to have the files e-mailed directly to you. You can also download the code samples from https://github.com/doobrie/masteringnb.
To continue with the installation on Linux, we must now execute the downloaded installer. From a terminal window, execute the following command:
./netbeans-xxx-linux.sh
Tip
The installation of the JDK can sometimes be complex on some Linux distributions. Fortunately, NetBeans can be easily executed with an unpacked JDK. If installation of the JDK is complex, simply unpack the JDK files into a <jdk_folder> folder and then execute the installer with the –javahome argument passing in the JDK folder, for example, /netbeans-xxx-linux.sh –javahome <jdk_folder>.
On all of the major operating systems (Windows, Mac OS X, and Linux), the procedure for installing NetBeans is now very similar. After launching the setup procedure, the installer takes you through the several steps in a wizard style to install NetBeans.
Having agreed to the NetBeans license and selected a folder for installation, the installer displays the Installation Type window:
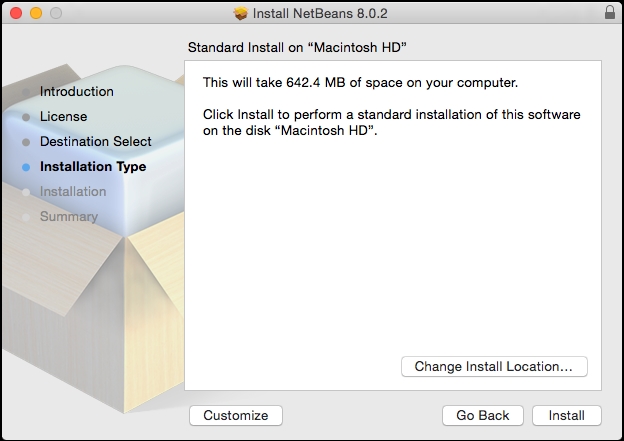
From here, we can customize NetBeans by clicking on the Customize button.
Note
On Windows and Linux, the preceding screenshot will differ slightly, showing the different application servers that can be installed with NetBeans.
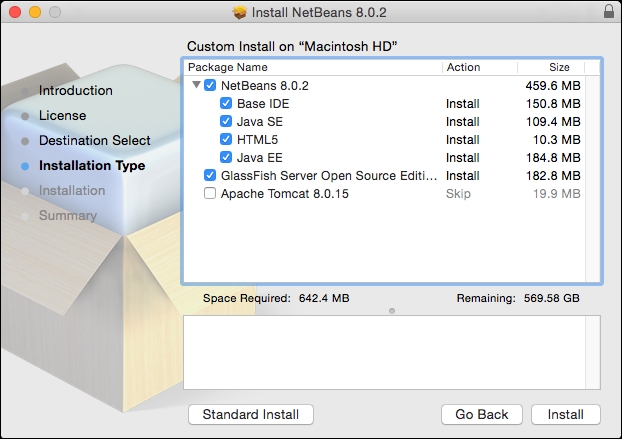
The next screenshot shows the customization options for the Java EE bundle. The options may differ depending upon which bundle you choose to download. For the Java EE bundle, different base components of the NetBeans Platform can be installed, namely Base IDE, Java SE, HTML5, and Java EE.
The Java EE bundle (and also the All bundle) gives the option of installing GlassFish Open Source Edition and Tomcat 8. If either GlassFish or Tomcat is chosen for installation, NetBeans will automatically configure them as servers within the IDE.
Usually, installing the latest released version of NetBeans is the best course of action. With NetBeans, however, it is possible to download and install the previous versions or even daily builds.
Tip
Be careful with daily builds; they have not been through the rigorous testing procedure that the full release builds had, and may contain bugs!
To download the previous released versions of NetBeans, browse to the NetBeans download page at http://www.netbeans.org/downloads and click on the Archive link in the top-right corner of the page, as shown in the following screenshot:

Tip
For easy access, the previous version of NetBeans is available for downloading by clicking on the appropriate link at the top of the page (version 8.0.1 in the preceding screenshot) rather than clicking on the Archive link and manually selecting a version to install.
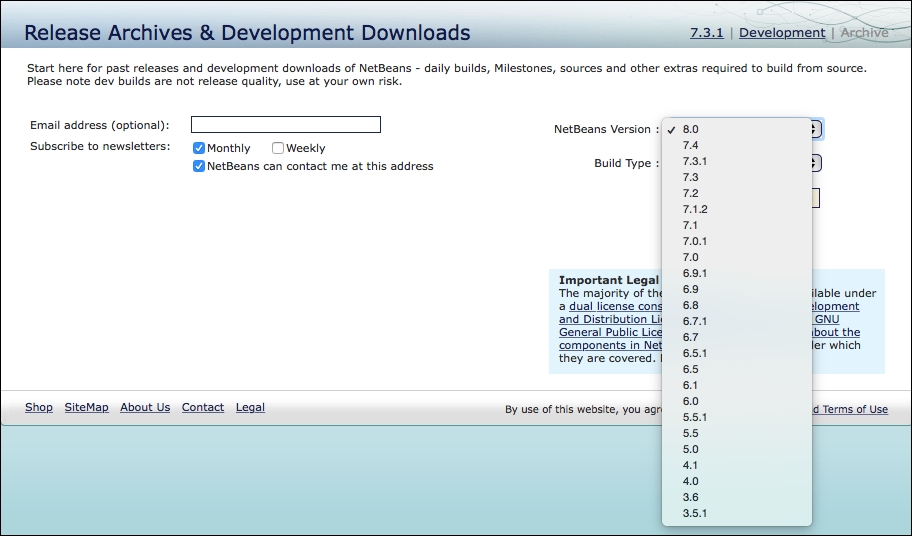
From the resultant page, select the previous release you wish to download (for example, NetBeans 7.3) and then click on the Continue button. From here, you can choose whether to download the Java SE, Java EE, or All distributions of NetBeans. The following screenshot shows the previous versions of NetBeans that are currently available for download:
To download the latest daily build of NetBeans, simply click on the Development link in the top-right corner of the NetBeans download page. Again, from the resulting page, select the download bundle (Java SE, Java EE, or All) you require and follow the standard NetBeans installation procedure for your operating system, as outlined previously.
When installing NetBeans, a special directory is created on your computer that stores all the user configuration data for NetBeans; this folder is referred to as a userdir or user directory. This folder contains information on what plugins you have activated in NetBeans, what editor settings you've configured, and much more data. In fact, everything that makes your instance of NetBeans unique to you is stored in this folder.
On Mac OS X, the user directory is located at ~/Library/Application Support/NetBeans.
On Windows, it is located at c:\Users\<user>\AppData\Roaming\NetBeans.
On Linux, the user directory is located at ~/.netbeans.
In the user directory are the separate directories for each different version of NetBeans that you have installed. With this technique, it is therefore possible to have different configurations for different versions of NetBeans that are installed.
In addition to a user directory, NetBeans also makes use of a hidden cache directory, often referred to as a cachedir. The cache directory contains large amount of cache data and thus, it can become a large directory. Due to the information that's written into the cache directory, it must be stored in a different location to the user directory. The contents of the cache directory can be deleted without any settings being lost; it will be recreated the next time NetBeans is executed.
On Mac OS X, the cache directory is located at ~/Library/Caches/NetBeans.
On Windows, the cache directory is located at c:\Users\<user>\AppData\Local\NetBeans\Cache.
On Linux, the cache directory is located at ~/.cache/netbeans.
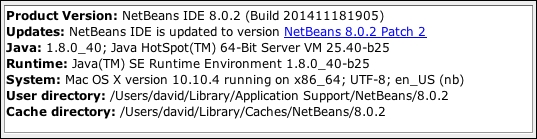
An easy way to find out the location of the user and cache directories is to display the NetBeans About dialog. In this dialog, the location of these directories is given along with the information about the version of NetBeans and Java that are in use: