Book Image

Git Essentials - Second Edition

By : Ferdinando Santacroce
Book Image

Git Essentials - Second Edition

By: Ferdinando Santacroce

Overview of this book

Since its inception, Git has attracted skilled developers due to its robust, powerful, and reliable features. Its incredibly fast branching ability transformed a piece of code from a niche tool for Linux Kernel developers into a mainstream distributed versioning system. Like most powerful tools, Git can be hard to approach since it has a lot of commands, subcommands, and options that easily confuse newcomers. The 2nd edition of this very successful book will help you overcome this fear and become adept in all the basic tasks in Git. Building upon the success of the first book, we start with a brief step-by-step installation guide; after this, you'll delve into the essentials of Git. For those of you who have bought the first edition, this time we go into internals in far greater depth, talking less about theory and using much more practical examples. The book serves as a primer for topics to follow, such as branching and merging, creating and managing a GitHub personal repository, and fork and pull requests. You’ll then learn the art of cherry-picking, taking only the commits you want, followed by Git blame. Finally, we'll see how to interoperate with a Subversion server, covering the concepts and commands needed to convert an SVN repository into a Git repository. To conclude, this is a collection of resources, links, and appendices to satisfy even the most curious.
Table of Contents (8 chapters)

Running our first Git command

From now on, as a matter of convenience, we will use Windows as our platform of reference. Our screenshots will always refer to that platform. In any case, all the Git main commands we will use will work on the platforms we have previously mentioned anyway.

It's time to test our installation. Is Git ready to rock? Let's find out!

Using shell integration, right-click on an empty place on the desktop and choose the new menu item Git Bash Here. It will appear as a new MinTTY shell, providing you a Git-ready bash for Windows:

This is a typical Bash prompt: we can see the user, nando, and the host, computer. Then there's a MINGW64 string, which refers to the actual platform we are using, called Minimalist GNU for Windows (see http://www.mingw.org), and at the end we find the actual path, in a more *nix fashion, /c/Users/nando. Later, we will look at this argument in more detail.

Now that we have a new, shiny Bash prompt, simply type git (or the equivalent, git --help), as shown in the following screenshot:


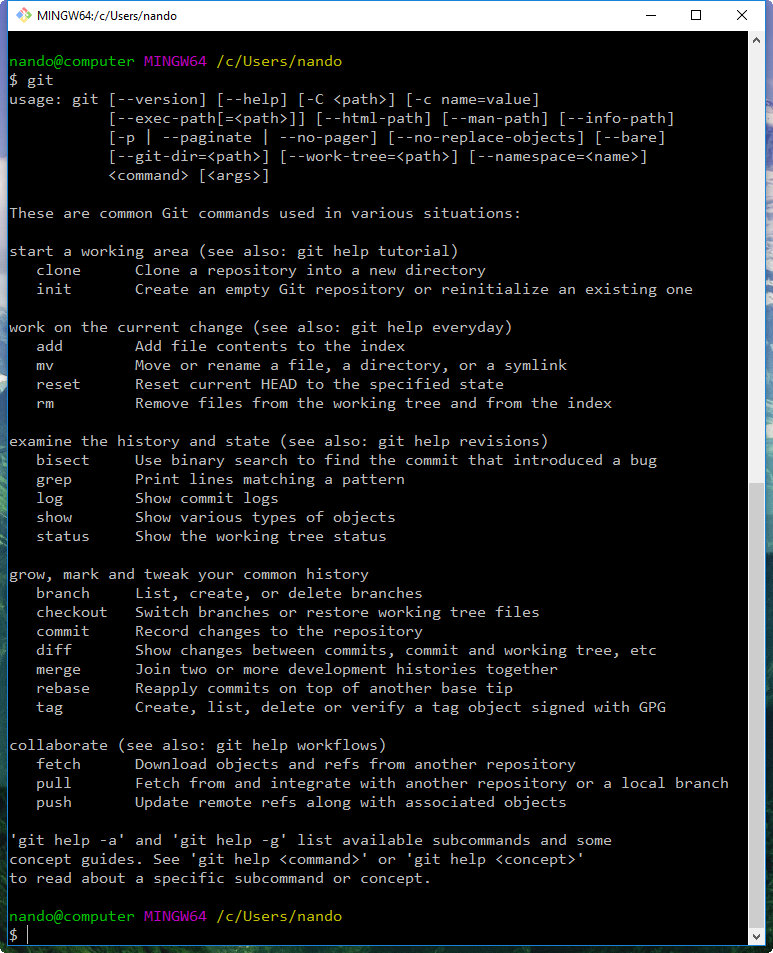
If Git has been installed correctly, typing git without specifying anything else will result in a short help page, with a list of common commands (if not, try reinstalling Git).

So, we have Git up and running! Are you excited? Let's begin to type!

Making presentations

Git needs to know who you are. This is because in Git, every modification you make in a repository has to be signed with the name and email of the author. So, before doing anything else, we have to tell Git this information.

Type these two commands:

Using the git config command, we set up two configuration variables-user.name and user.email. Starting from now, Git will use them to sign your commits in all your repositories. Do not worry about it for now; in the next few chapters, we will explore the Git configuration system in more detail.

Setting up a new repository

The first step is to set up a new repository. A repository is a container for your entire project; every file or subfolder within it belongs to that repository, in a consistent manner. Physically, a repository is nothing other than a folder that contains a special .git folder, the folder where the magic happens.

Let's try to make our first repository. Choose a folder you like (for example, C:\Repos\MyFirstRepo), and type the git init command, as shown here:

As you can see, I slightly modified the default Git Bash prompt to better fit the need of the demoing commands; I removed the user and host, and added an incremental number to every command we type so that it will be simpler for me to refer to it while explaining, and for you to refer to it while reading.

Let's get back on topic. What just happened inside the MyFirstRepo folder? Git created a .git subfolder. The subfolder (normally hidden in Windows) contains some other files and folders, as shown in the next screenshot:

At this point in time, it is not important for us to understand what is inside this folder. The only thing you have to know is that you do not have to touch it, ever! If you delete it or if you modify the files inside by hand, you could get into trouble. Have I frightened you enough?

Now that we have a repository, we can start to put files inside it. Git can trace the history of any type of file, text-based or binary, small or large, with the same efficiency (more or less; large files are always a problem).

Adding a file

Let's create a text file, just to give it a try:

And now what? Is that all? No! We have to tell Git to put this file in your repository, explicitly. Git doesn't do anything that you don't want it to do. If you have some spare or temp files in your repository, Git will not take care of them, but will only remind you that there are some files in your repository that are not under version control (in the next chapter, we will see how to instruct Git to ignore them when necessary).

Okay, back to the topic. I want file.txt under the control of Git, so let's add it, as shown here:

The git add command tells Git that we want it to take care of that file and check it for future modifications.

In response to this command, it could happen that you will see this response message from Git:

warning: LF will be replaced by CRLF in file.txt.

The file will have its original line endings in your working directory.

This is because of the option that we selected when installing Git: Checkout Windows-style, commit Unix-style line endings. Don't worry about it for the moment; we will deal with it later.

Now, let us see if Git obeyed us.

Using the git status command, we can check the status of the repository, as shown in this screenshot:

As we can see, Git has accomplished its work as expected. In this image, we can read words such as branch, master, commit, and unstage. We will look at them briefly, but for the moment, let's ignore them: The purpose of this first experiment is overcome our fear and start playing with Git commands; after all, we have an entire book in which to learn the significant details.

Committing the added file

At this point, Git knows about file.txt, but we have to perform another step to fix the snapshot of its content. We have to commit it using the appropriate git commit command. This time, we will add some flavor to our command, using the --message (or -m) subcommand, as shown here:

With the commit of file.txt, we have finally fired up our repository. Having done the first commit (also known as the root-commit, as you can see in the screenshot), the repository now has a master branch with a commit inside it. We will play with branches in the forthcoming chapters. Right now, think of it as a path of our repository, and keep in mind that a repository can have multiple paths that often cross each other.

Modifying a committed file

Now, we can try to make some modifications to the file and see how to deal with it, as shown in the following screenshot:

As you can see, the Bash shell warns us that there are some modifications painting the name of the modified files in red. Here, the git status command informs us that there is a file with some modifications, and that we need to commit it if we want to save this modification step in the repository history.

However, what does no changes added to commit mean? It is simple. Git makes you take a second look at what you want to include in the next commit. If you have touched two files but you want to commit only one, you can add only that one.

If you try to commit by skipping the add step, nothing will happen (see the following screenshot). We will analyze this behavior in depth in the next chapter.

So, let's add the file again for the purpose of getting things ready for the next commit:

Okay, let's make another commit, this time, avoiding the --message subcommand. Type git commit and hit the Enter key:

Fasten your seatbelts! You are now entering in a piece of code history!

What is that? It's Vim (Vi IMproved), an ancient and powerful text editor, used even today by millions of people. You can configure Git to use your own preferred editor, but if you don't do it, this is what you have to deal with. Vim is powerful, but for newcomers, it can be a pain to use. It has a strange way of dealing with text. To start typing, you have to press I for inserting text, as shown in the following screenshot:

Once you have typed your commit message, you can press Esc to get out of editing mode. Then, you can type the :w command to write changes and the :q command to quit. You can also type the command in pairs as :wq, as we do in this screenshot, or use the equivalent :x command:

After that, press Enter and another commit is done, as shown here:

Note that when you exit from Vim, Git automatically dispatches the commit, as you can see in the preceding screenshot.

Well done! Now, it's time to recap.