

"A user interface is like a joke. If you have to explain it, it's not that good." | ||
| --Martin LeBlanc | ||
In this chapter, we're going to work on a project together. We're going to prepare a very simple HTML page with a few images, and then we're going to scrape it, in order to save those images.
We're going to write a script to do this, which will allow us to talk about a few concepts that I'd like to run by you. We're also going to add a few options to save images based on their format, and to choose the way we save them. And, when we're done with the script, we're going to write a GUI application that does basically the same thing, thus killing two birds with one stone. Having only one project to explain will allow me to show a wider range of topics in this chapter.
Note
A graphical user interface (GUI) is a type of interface that allows the user to interact with an electronic device through graphical icons, buttons and widgets, as opposed to text-based or command-line interfaces, which require commands or text to be typed on the keyboard. In a nutshell, any browser, any office suite such as LibreOffice, and, in general, anything that pops up when you click on an icon, is a GUI application.
So, if you haven't already done so, this would be the perfect time to start a console and position yourself in a folder called ch8 in the root of your project for this book. Within that folder, we'll create two Python modules (scrape.py and guiscrape.py) and one standard folder (simple_server). Within simple_server, we'll write our HTML page (index.html) in simple_server. Images will be stored in ch8/simple_server/img. The structure in ch8 should look like this:
$ tree -A . ├── guiscrape.py ├── scrape.py └── simple_server ├── img │ ├── owl-alcohol.png │ ├── owl-book.png │ ├── owl-books.png │ ├── owl-ebook.jpg │ └── owl-rose.jpeg ├── index.html └── serve.sh
If you're using either Linux or Mac, you can do what I do and put the code to start the HTTP server in a serve.sh file. On Windows, you'll probably want to use a batch file.
The HTML page we're going to scrape has the following structure:
simple_server/index.html
<!DOCTYPE html>
<html lang="en">
<head><title>Cool Owls!</title></head>
<body>
<h1>Welcome to my owl gallery</h1>
<div>
<img src="img/owl-alcohol.png" height="128" />
<img src="img/owl-book.png" height="128" />
<img src="img/owl-books.png" height="128" />
<img src="img/owl-ebook.jpg" height="128" />
<img src="img/owl-rose.jpeg" height="128" />
</div>
<p>Do you like my owls?</p>
</body>
</html>It's an extremely simple page, so let's just note that we have five images, three of which are PNGs and two are JPGs (note that even though they are both JPGs, one ends with .jpg and the other with .jpeg, which are both valid extensions for this format).
So, Python gives you a very simple HTTP server for free that you can start with the following command (in the simple_server folder):
$ python -m http.server 8000 Serving HTTP on 0.0.0.0 port 8000 ... 127.0.0.1 - - [31/Aug/2015 16:11:10] "GET / HTTP/1.1" 200 -
The last line is the log you get when you access http://localhost:8000, where our beautiful page will be served. Alternatively, you can put that command in a file called serve.sh, and just run that with this command (make sure it's executable):
$ ./serve.sh
It will have the same effect. If you have the code for this book, your page should look something like this:
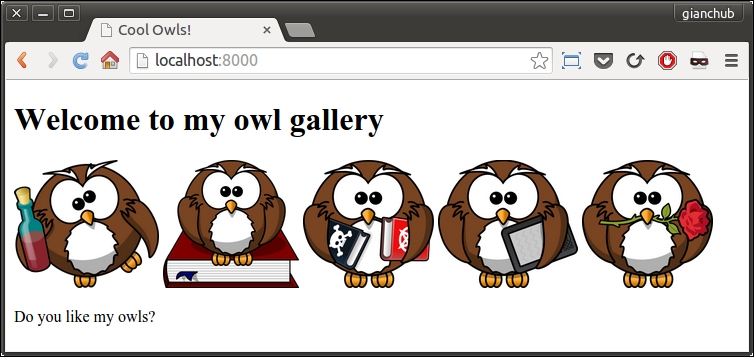
Feel free to use any other set of images, as long as you use at least one PNG and one JPG, and that in the src tag you use relative paths, not absolute. I got those lovely owls from https://openclipart.org/.
Now, let's start writing the script. I'll go through the source in three steps: imports first, then the argument parsing logic, and finally the business logic.
scrape.py (Imports)
import argparse import base64 import json import os from bs4 import BeautifulSoup import requests
Going through them from the top, you can see that we'll need to parse the arguments. which we'll feed to the script itself (argparse). We will need the base64 library to save the images within a JSON file (base64 and json), and we'll need to open files for writing (os). Finally, we'll need BeautifulSoup for scraping the web page easily, and requests to fetch its content. requests is an extremely popular library for performing HTTP requests, built to avoid the difficulties and quirks of using the standard library urllib module. It's based on the fast urllib3 third-party library.
Note
We will explore the HTTP protocol and requests mechanism in Chapter 10, Web Development Done Right so, for now, let's just (simplistically) say that we perform an HTTP request to fetch the content of a web page. We can do it programmatically using a library such as requests, and it's more or less the equivalent of typing a URL in your browser and pressing Enter (the browser then fetches the content of a web page and also displays it to you).
Of all these imports, only the last two don't belong to the Python standard library, but they are so widely used throughout the world that I dare not exclude them in this book. Make sure you have them installed:
$ pip freeze | egrep -i "soup|requests" beautifulsoup4==4.4.0 requests==2.7.0
Of course, the version numbers might be different for you. If they're not installed, use this command to do so:
$ pip install beautifulsoup4 requests
At this point, the only thing that I reckon might confuse you is the base64/json couple, so allow me to spend a few words on that.
As we saw in the previous chapter, JSON is one of the most popular formats for data exchange between applications. It's also widely used for other purposes too, for example, to save data in a file. In our script, we're going to offer the user the ability to save images as image files, or as a JSON single file. Within the JSON, we'll put a dictionary with keys as the images names and values as their content. The only issue is that saving images in the binary format is tricky, and this is where the base64 library comes to the rescue. Base64 is a very popular binary-to-text encoding scheme that represents binary data in an ASCII string format by translating it into a radix-64 representation.
If you think you have never used it, think again. Every time you send an email with an image attached to it, the image gets encoded with Base64 before the email is sent. On the recipient side, images are automatically decoded into their original binary format so that the email client can display them.
Now that the technicalities are out of the way, let's see the second section of our script (it should be at the end of the scrape.py module).
scrape.py (Argument parsing and scraper triggering)
if __name__ == "__main__":
parser = argparse.ArgumentParser(
description='Scrape a webpage.')
parser.add_argument(
'-t',
'--type',
choices=['all', 'png', 'jpg'],
default='all',
help='The image type we want to scrape.')
parser.add_argument(
'-f',
'--format',
choices=['img', 'json'],
default='img',
help='The format images are saved to.')
parser.add_argument(
'url',
help='The URL we want to scrape for images.')
args = parser.parse_args()
scrape(args.url, args.format, args.type)Look at that first line; it is a very common idiom when it comes to scripting. According to the official Python documentation, the string '__main__' is the name of the scope in which top-level code executes. A module's __name__ is set equal to '__main__' when read from standard input, a script, or from an interactive prompt.
Therefore, if you put the execution logic under that if, the result is that you will be able to use the module as a library should you need to import any of the functions or objects defined in it, because when importing it from another module, __name__ won't be '__main__'. On the other hand, when you run the script directly, like we're going to, __name__ will be '__main__', so the execution logic will run.
The first thing we do then is define our parser. I would recommend using the standard library module, argparse, which is simple enough and quite powerful. There are other options out there, but in this case, argparse will provide us with all we need.
We want to feed our script three different data: the type of images we want to save, the format in which we want to save them, and the URL for the page to be scraped.
The type can be PNG, JPG or both (default), while the format can be either image or JSON, image being the default. URL is the only mandatory argument.
So, we add the -t option, allowing also the long version --type. The choices are 'all', 'png', and 'jpg'. We set the default to 'all' and we add a help message.
We do a similar procedure for the format argument allowing both the short and long syntax (-f and --format), and finally we add the url argument, which is the only one that is specified differently so that it won't be treated as an option, but rather as a positional argument.
In order to parse all the arguments, all we need is parser.parse_args(). Very simple, isn't it?
The last line is where we trigger the actual logic, by calling the scrape function, passing all the arguments we just parsed. We will see its definition shortly.
The nice thing about argparse is that if you call the script by passing -h, it will print a nice usage text for you automatically. Let's try it out:
$ python scrape.py -h usage: scrape.py [-h] [-t {all,png,jpg}] [-f {img,json}] url
Scrape a webpage. positional arguments: url The URL we want to scrape for images. optional arguments: -h, --help show this help message and exit -t {all,png,jpg}, --type {all,png,jpg} The image type we want to scrape. -f {img,json}, --format {img,json} The format images are saved to.
If you think about it, the one true advantage of this is that we just need to specify the arguments and we don't have to worry about the usage text, which means we won't have to keep it in sync with the arguments' definition every time we change something. This is precious.
Here's a few different ways to call our scrape.py script, which demonstrate that type and format are optional, and how you can use the short and long syntax to use them:
$ python scrape.py http://localhost:8000 $ python scrape.py -t png http://localhost:8000 $ python scrape.py --type=jpg -f json http://localhost:8000
The first one is using default values for type and format. The second one will save only PNG images, and the third one will save only JPGs, but in JSON format.
Now that we've seen the scaffolding, let's dive deep into the actual logic (if it looks intimidating don't worry; we'll go through it together). Within the script, this logic lies after the imports and before the parsing (before the if __name__ clause):
scrape.py (Business logic)
def scrape(url, format_, type_):
try:
page = requests.get(url)
except requests.RequestException as rex:
print(str(rex))
else:
soup = BeautifulSoup(page.content, 'html.parser')
images = _fetch_images(soup, url)
images = _filter_images(images, type_)
_save(images, format_)
def _fetch_images(soup, base_url):
images = []
for img in soup.findAll('img'):
src = img.get('src')
img_url = (
'{base_url}/{src}'.format(
base_url=base_url, src=src))
name = img_url.split('/')[-1]
images.append(dict(name=name, url=img_url))
return images
def _filter_images(images, type_):
if type_ == 'all':
return images
ext_map = {
'png': ['.png'],
'jpg': ['.jpg', '.jpeg'],
}
return [
img for img in images
if _matches_extension(img['name'], ext_map[type_])
]
def _matches_extension(filename, extension_list):
name, extension = os.path.splitext(filename.lower())
return extension in extension_list
def _save(images, format_):
if images:
if format_ == 'img':
_save_images(images)
else:
_save_json(images)
print('Done')
else:
print('No images to save.')
def _save_images(images):
for img in images:
img_data = requests.get(img['url']).content
with open(img['name'], 'wb') as f:
f.write(img_data)
def _save_json(images):
data = {}
for img in images:
img_data = requests.get(img['url']).content
b64_img_data = base64.b64encode(img_data)
str_img_data = b64_img_data.decode('utf-8')
data[img['name']] = str_img_data
with open('images.json', 'w') as ijson:
ijson.write(json.dumps(data))Let's start with the scrape function. The first thing it does is fetch the page at the given url argument. Whatever error may happen while doing this, we trap it in the RequestException rex and we print it. The RequestException is the base exception class for all the exceptions in the requests library.
However, if things go well, and we have a page back from the GET request, then we can proceed (else branch) and feed its content to the BeautifulSoup parser. The BeautifulSoup library allows us to parse a web page in no time, without having to write all the logic that would be needed to find all the images in a page, which we really don't want to do. It's not as easy as it seems, and reinventing the wheel is never good. To fetch images, we use the _fetch_images function and we filter them with _filter_images. Finally, we call _save with the result.
Splitting the code into different functions with meaningful names allows us to read it more easily. Even if you haven't seen the logic of the _fetch_images, _filter_images, and _save functions, it's not hard to predict what they do, right?
_fetch_images takes a BeautifulSoup object and a base URL. All it does is looping through all of the images found on the page and filling in the 'name' and 'url' information about them in a dictionary (one per image). All dictionaries are added to the images list, which is returned at the end.
There is some trickery going on when we get the name of an image. What we do is split the img_url (http://localhost:8000/img/my_image_name.png) string using '/' as a separator, and we take the last item as the image name. There is a more robust way of doing this, but for this example it would be overkill. If you want to see the details of each step, try to break this logic down into smaller steps, and print the result of each of them to help yourself understand.
Towards the end of the book, I'll show you another technique to debug in a much more efficient way.
Anyway, by just adding print(images) at the end of the _fetch_images function, we get this:
[{'url': 'http://localhost:8000/img/owl-alcohol.png', 'name': 'owl-alcohol.png'}, {'url': 'http://localhost:8000/img/owl-book.png', 'name': 'owl-book.png'}, ...]
I truncated the result for brevity. You can see each dictionary has a 'url' and 'name' key/value pair, which we can use to fetch, identify and save our images as we like. At this point, I hear you asking what would happen if the images on the page were specified with an absolute path instead of a relative one, right? Good question!
The answer is that the script will fail to download them because this logic expects relative paths. I was about to add a bit of logic to solve this issue when I thought that, at this stage, it would be a nice exercise for you to do it, so I'll leave it up to you to fix it.
I hope the body of the _filter_images function is interesting to you. I wanted to show you how to check on multiple extensions by using a mapping technique.
In this function, if type_ is 'all', then no filtering is required, so we just return all the images. On the other hand, when type_ is not 'all', we get the allowed extensions from the ext_map dictionary, and use it to filter the images in the list comprehension that ends the function body. You can see that by using another helper function, _matches_extension, I have made the list comprehension simpler and more readable.
All _matches_extension does is split the name of the image getting its extension and checking whether it is within the list of allowed ones. Can you find one micro improvement (speed-wise) that could be done to this function?
I'm sure that you're wondering why I have collected all the images in the list and then removed them, instead of checking whether I wanted to save them before adding them to the list. The first reason is that I needed _fetch_images in the GUI app as it is now. A second reason is that combining, fetching, and filtering would produce a longer and a bit more complicated function, and I'm trying to keep the complexity level down. A third reason is that this could be a nice exercise for you to do. Feels like we're pairing here...
Let's keep going through the code and inspect the _save function. You can see that, when images isn't empty, this basically acts as a dispatcher. We either call _save_images or _save_json, depending on which information is stored in the format_ variable.
We are almost done. Let's jump to _save_images. We loop on the images list and for each dictionary we find there we perform a GET request on the image URL and save its content in a file, which we name as the image itself. The one important thing to note here is how we save that file.
We use a context manager, represented by the keyword with, to do that. Python's with statement supports the concept of a runtime context defined by a context manager. This is implemented using a pair of methods (contextmanager.__enter__() and contextmanager.__exit__(exc_type, exc_val, exc_tb)) that allow user-defined classes to define a runtime context that is entered before the statement body is executed and exited when the statement ends.
In our case, using a context manager, in conjunction with the open function, gives us the guarantee that if anything bad were to happen while writing that file, the resources involved in the process will be cleaned up and released properly regardless of the error. Have you ever tried to delete a file on Windows, only to be presented with an alert that tells you that you cannot delete the file because there is another process that is holding on to it? We're avoiding that sort of very annoying thing.
When we open a file, we get a handler for it and, no matter what happens, we want to be sure we release it when we're done with the file. A context manager is the tool we need to make sure of that.
Finally, let's now step into the _save_json function. It's very similar to the previous one. We basically fill in the data dictionary. The image name is the key, and the Base64 representation of its binary content is the value. When we're done populating our dictionary, we use the json library to dump it in the images.json file. I'll give you a small preview of that:
images.json (truncated)
{ "owl-ebook.jpg": "/9j/4AAQSkZJRgABAQEAMQAxAAD/2wBDAAEBAQ... "owl-book.png": "iVBORw0KGgoAAAANSUhEUgAAASwAAAEbCAYAAAB... "owl-books.png": "iVBORw0KGgoAAAANSUhEUgAAASwAAAElCAYAAA... "owl-alcohol.png": "iVBORw0KGgoAAAANSUhEUgAAASwAAAEICAYA... "owl-rose.jpeg": "/9j/4AAQSkZJRgABAQEANAA0AAD/2wBDAAEBAQ... }
And that's it! Now, before proceeding to the next section, make sure you play with this script and understand well how it works. Try and modify something, print out intermediate results, add a new argument or functionality, or scramble the logic. We're going to migrate it into a GUI application now, which will add a layer of complexity simply because we'll have to build the GUI interface, so it's important that you're well acquainted with the business logic: it will allow you to concentrate on the rest of the code.
There are several libraries to write GUI applications in Python. The most famous ones are tkinter, wxPython, PyGTK, and PyQt. They all offer a wide range of tools and widgets that you can use to compose a GUI application.
The one I'm going to use for the rest of this chapter is tkinter. tkinter stands for Tk interface and it is the standard Python interface to the Tk GUI toolkit. Both Tk and tkinter are available on most Unix platforms, Mac OS X, as well as on Windows systems.
Let's make sure that tkinter is installed properly on your system by running this command:
$ python -m tkinter
It should open a dialog window demonstrating a simple Tk interface. If you can see that, then we're good to go. However, if it doesn't work, please search for tkinter in the Python official documentation. You will find several links to resources that will help you get up and running with it.
We're going to make a very simple GUI application that basically mimics the behavior of the script we saw in the first part of this chapter. We won't add the ability to save JPGs or PNGs singularly, but after you've gone through this chapter, you should be able to play with the code and put that feature back in by yourself.
So, this is what we're aiming for:
Gorgeous, isn't it? As you can see, it's a very simple interface (this is how it should look on Ubuntu). There is a frame (that is, a container) for the URL field and the Fetch info button, another frame for the Listbox to hold the image names and the radio button to control the way we save them, and finally there is a Scrape! button at the bottom. We also have a status bar, which shows us some information.
In order to get this layout, we could just place all the widgets on a root window, but that would make the layout logic quite messy and unnecessarily complicated. So, instead, we will divide the space using frames and place the widgets in those frames. This way we will achieve a much nicer result. So, this is the draft for the layout:
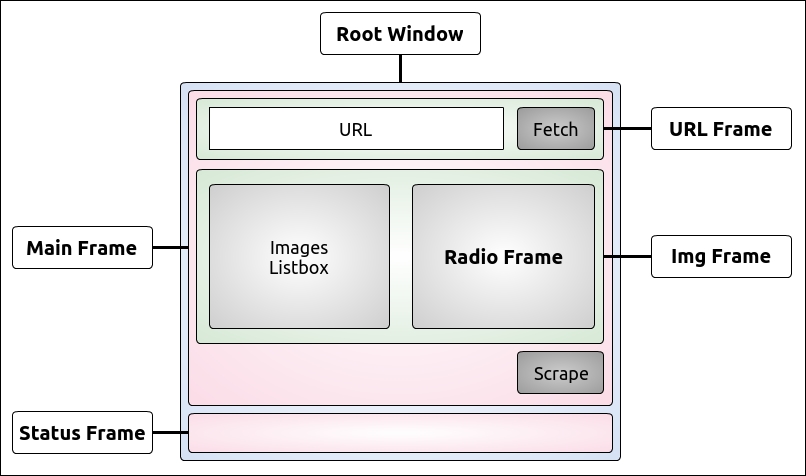
We have a Root Window, which is the main window of the application. We divide it into two rows, the first one in which we place the Main Frame, and the second one in which we place the Status Frame (which will hold the status bar). The Main Frame is subsequently divided into three rows itself. In the first one we place the URL Frame, which holds the URL widgets. In the second one we place the Img Frame, which will hold the Listbox and the Radio Frame, which will host a label and the radio button widgets. And finally a third one, which will just hold the Scrape button.
In order to lay out frames and widgets, we will use a layout manager called grid, that simply divides up the space into rows and columns, as in a matrix.
Now, all the code I'm going to write comes from the guiscrape.py module, so I won't repeat its name for each snippet, to save space. The module is logically divided into three sections, not unlike the script version: imports, layout logic, and business logic. We're going to analyze them line by line, in three chunks.
from tkinter import * from tkinter import ttk, filedialog, messagebox import base64 import json import os from bs4 import BeautifulSoup import requests
We're already familiar with most of these. The interesting bit here is those first two lines. The first one is quite common practice, although it is bad practice in Python to import using the star syntax. You can incur in name collisions and, if the module is too big, importing everything would be expensive.
After that, we import ttk, filedialog, and messagebox explicitly, following the conventional approach used with this library. ttk is the new set of styled widgets. They behave basically like the old ones, but are capable of drawing themselves correctly according to the style your OS is set on, which is nice.
The rest of the imports is what we need in order to carry out the task you know well by now. Note that there is nothing we need to install with pip in this second part, we already have everything we need.
I'm going to paste it chunk by chunk so that I can explain it easily to you. You'll see how all those pieces we talked about in the layout draft are arranged and glued together. What I'm about to paste, as we did in the script before, is the final part of the guiscrape.py module. We'll leave the middle part, the business logic, for last.
if __name__ == "__main__":
_root = Tk()
_root.title('Scrape app')As you know by now, we only want to execute the logic when the module is run directly, so that first line shouldn't surprise you.
In the last two lines. we set up the main window, which is an instance of the Tk class. We instantiate it and give it a title. Note that I use the prepending underscore technique for all the names of the tkinter objects, in order to avoid potential collisions with names in the business logic. I just find it cleaner like this, but you're allowed to disagree.
_mainframe = ttk.Frame(_root, padding='5 5 5 5')
_mainframe.grid(row=0, column=0, sticky=(E, W, N, S))Here, we set up the Main Frame. It's a ttk.Frame instance. We set _root as its parent, and give it some padding. The padding is a measure in pixels of how much space should be inserted between the inner content and the borders in order to let our layout breathe a little, otherwise we have the sardine effect, where widgets are packed too tightly.
The second line is much more interesting. We place this _mainframe on the first row (0) and first column (0) of the parent object (_root). We also say that this frame needs to extend itself in each direction by using the sticky argument with all four cardinal directions. If you're wondering where they came from, it's the from tkinter import * magic that brought them to us.
_url_frame = ttk.LabelFrame(
_mainframe, text='URL', padding='5 5 5 5')
_url_frame.grid(row=0, column=0, sticky=(E, W))
_url_frame.columnconfigure(0, weight=1)
_url_frame.rowconfigure(0, weight=1)Next, we start by placing the URL Frame down. This time, the parent object is _mainframe, as you will recall from our draft. This is not just a simple Frame, but it's actually a LabelFrame, which means we can set the text argument and expect a rectangle to be drawn around it, with the content of the text argument written in the top-left part of it (check out the previous picture if it helps). We position this frame at (0, 0), and say that it should expand to the left and to the right. We don't need the other two directions.
Finally, we use rowconfigure and columnconfigure to make sure it behaves correctly, should it need to resize. This is just a formality in our present layout.
_url = StringVar()
_url.set('http://localhost:8000')
_url_entry = ttk.Entry(
_url_frame, width=40, textvariable=_url)
_url_entry.grid(row=0, column=0, sticky=(E, W, S, N), padx=5)
_fetch_btn = ttk.Button(
_url_frame, text='Fetch info', command=fetch_url)
_fetch_btn.grid(row=0, column=1, sticky=W, padx=5)Here, we have the code to lay out the URL textbox and the _fetch button. A textbox in this environment is called Entry. We instantiate it as usual, setting _url_frame as its parent and giving it a width. Also, and this is the most interesting part, we set the textvariable argument to be _url. _url is a StringVar, which is an object that is now connected to Entry and will be used to manipulate its content. Therefore, we don't modify the text in the _url_entry instance directly, but by accessing _url. In this case, we call the set method on it to set the initial value to the URL of our local web page.
We position _url_entry at (0, 0), setting all four cardinal directions for it to stick to, and we also set a bit of extra padding on the left and right edges by using padx, which adds padding on the x-axis (horizontal). On the other hand, pady takes care of the vertical direction.
By now, you should get that every time you call the .grid method on an object, we're basically telling the grid layout manager to place that object somewhere, according to rules that we specify as arguments in the grid() call.
Similarly, we set up and place the _fetch button. The only interesting parameter is command=fetch_url. This means that when we click this button, we actually call the fetch_url function. This technique is called callback.
_img_frame = ttk.LabelFrame(
_mainframe, text='Content', padding='9 0 0 0')
_img_frame.grid(row=1, column=0, sticky=(N, S, E, W))This is what we called Img Frame in the layout draft. It is placed on the second row of its parent _mainframe. It will hold the Listbox and the Radio Frame.
_images = StringVar()
_img_listbox = Listbox(
_img_frame, listvariable=_images, height=6, width=25)
_img_listbox.grid(row=0, column=0, sticky=(E, W), pady=5)
_scrollbar = ttk.Scrollbar(
_img_frame, orient=VERTICAL, command=_img_listbox.yview)
_scrollbar.grid(row=0, column=1, sticky=(S, N), pady=6)
_img_listbox.configure(yscrollcommand=_scrollbar.set)This is probably the most interesting bit of the whole layout logic. As we did with the _url_entry, we need to drive the contents of Listbox by tying it to a variable _images. We set up Listbox so that _img_frame is its parent, and _images is the variable it's tied to. We also pass some dimensions.
The interesting bit comes from the _scrollbar instance. Note that, when we instantiate it, we set its command to _img_listbox.yview. This is the first half of the contract between a Listbox and a Scrollbar. The other half is provided by the _img_listbox.configure method, which sets the yscrollcommand=_scrollbar.set.
By providing this reciprocal bond, when we scroll on Listbox, the Scrollbar will move accordingly and vice-versa, when we operate the Scrollbar, the Listbox will scroll accordingly.
_radio_frame = ttk.Frame(_img_frame)
_radio_frame.grid(row=0, column=2, sticky=(N, S, W, E))We place the Radio Frame, ready to be populated. Note that the Listbox is occupying (0, 0) on _img_frame, the Scrollbar (0, 1) and therefore _radio_frame will go in (0, 2).
_choice_lbl = ttk.Label(
_radio_frame, text="Choose how to save images")
_choice_lbl.grid(row=0, column=0, padx=5, pady=5)
_save_method = StringVar()
_save_method.set('img')
_img_only_radio = ttk.Radiobutton(
_radio_frame, text='As Images', variable=_save_method,
value='img')
_img_only_radio.grid(
row=1, column=0, padx=5, pady=2, sticky=W)
_img_only_radio.configure(state='normal')
_json_radio = ttk.Radiobutton(
_radio_frame, text='As JSON', variable=_save_method,
value='json')
_json_radio.grid(row=2, column=0, padx=5, pady=2, sticky=W)Firstly, we place the label, and we give it some padding. Note that the label and radio buttons are children of _radio_frame.
As for the Entry and Listbox objects, the Radiobutton is also driven by a bond to an external variable, which I called _save_method. Each Radiobutton instance sets a value argument, and by checking the value on _save_method, we know which button is selected.
_scrape_btn = ttk.Button(
_mainframe, text='Scrape!', command=save)
_scrape_btn.grid(row=2, column=0, sticky=E, pady=5)On the third row of _mainframe we place the Scrape button. Its command is save, which saves the images to be listed in Listbox, after we have successfully parsed a web page.
_status_frame = ttk.Frame(
_root, relief='sunken', padding='2 2 2 2')
_status_frame.grid(row=1, column=0, sticky=(E, W, S))
_status_msg = StringVar()
_status_msg.set('Type a URL to start scraping...')
_status = ttk.Label(
_status_frame, textvariable=_status_msg, anchor=W)
_status.grid(row=0, column=0, sticky=(E, W))We end the layout section by placing down the status frame, which is a simple ttk.Frame. To give it a little status bar effect, we set its relief property to 'sunken' and give it a uniform padding of 2 pixels. It needs to stick to the _root window left, right and bottom parts, so we set its sticky attribute to (E, W, S).
We then place a label in it and, this time, we tie it to a StringVar object, because we will have to modify it every time we want to update the status bar text. You should be acquainted to this technique by now.
Finally, on the last line, we run the application by calling the mainloop method on the Tk instance.
_root.mainloop()
Please remember that all these instructions are placed under the if __name__ == "__main__": clause in the original script.
As you can see, the code to design our GUI application is not hard. Granted, at the beginning you have to play around a little bit. Not everything will work out perfectly at the first attempt, but I promise you it's very easy and you can find plenty of tutorials on the web. Let's now get to the interesting bit, the business logic.
We'll analyze the business logic of the GUI application in three chunks. There is the fetching logic, the saving logic, and the alerting logic.
config = {}
def fetch_url():
url = _url.get()
config['images'] = []
_images.set(()) # initialized as an empty tuple
try:
page = requests.get(url)
except requests.RequestException as rex:
_sb(str(rex))
else:
soup = BeautifulSoup(page.content, 'html.parser')
images = fetch_images(soup, url)
if images:
_images.set(tuple(img['name'] for img in images))
_sb('Images found: {}'.format(len(images)))
else:
_sb('No images found')
config['images'] = images
def fetch_images(soup, base_url):
images = []
for img in soup.findAll('img'):
src = img.get('src')
img_url = (
'{base_url}/{src}'.format(base_url=base_url, src=src))
name = img_url.split('/')[-1]
images.append(dict(name=name, url=img_url))
return imagesFirst of all, let me explain that config dictionary. We need some way of passing data between the GUI application and the business logic. Now, instead of polluting the global namespace with many different variables, my personal preference is to have a single dictionary that holds all the objects we need to pass back and forth, so that the global namespace isn't be clogged up with all those names, and we have one single, clean, easy way of knowing where all the objects that are needed by our application are.
In this simple example, we'll just populate the config dictionary with the images we fetch from the page, but I wanted to show you the technique so that you have at least an example. This technique comes from my experience with JavaScript. When you code a web page, you very often import several different libraries. If each of these cluttered the global namespace with all sorts of variables, there would be severe issues in making everything work, because of name clashes and variable overriding. They make the coder's life a living hell.
So, it's much better to try and leave the global namespace as clean as we can. In this case, I find that using one config variable is more than acceptable.
The fetch_url function is quite similar to what we did in the script. Firstly, we get the url value by calling _url.get(). Remember that the _url object is a StringVar instance that is tied to the _url_entry object, which is an Entry. The text field you see on the GUI is the Entry, but the text behind the scenes is the value of the StringVar object.
By calling get() on _url, we get the value of the text which is displayed in _url_entry.
The next step is to prepare config['images'] to be an empty list, and to empty the _images variable, which is tied to _img_listbox. This, of course, has the effect of cleaning up all the items in _img_listbox.
After this preparation step, we can try to fetch the page, using the same try/except logic we adopted in the script at the beginning of the chapter.
The one difference is in the action we take if things go wrong. We call _sb(str(rex)). _sb is a helper function whose code we'll see shortly. Basically, it sets the text in the status bar for us. Not a good name, right? I had to explain its behavior to you: food for thought.
If we can fetch the page, then we create the soup instance, and fetch the images from it. The logic of fetch_images is exactly the same as the one explained before, so I won't repeat myself here.
If we have images, using a quick tuple comprehension (which is actually a generator expression fed to a tuple constructor) we feed the _images StringVar and this has the effect of populating our _img_listbox with all the image names. Finally, we update the status bar.
If there were no images, we still update the status bar, and at the end of the function, regardless of how many images were found, we update config['images'] to hold the images list. In this way, we'll be able to access the images from other functions by inspecting config['images'] without having to pass that list around.
The logic to save the images is pretty straightforward. Here it is:
def save():
if not config.get('images'):
_alert('No images to save')
return
if _save_method.get() == 'img':
dirname = filedialog.askdirectory(mustexist=True)
_save_images(dirname)
else:
filename = filedialog.asksaveasfilename(
initialfile='images.json',
filetypes=[('JSON', '.json')])
_save_json(filename)
def _save_images(dirname):
if dirname and config.get('images'):
for img in config['images']:
img_data = requests.get(img['url']).content
filename = os.path.join(dirname, img['name'])
with open(filename, 'wb') as f:
f.write(img_data)
_alert('Done')
def _save_json(filename):
if filename and config.get('images'):
data = {}
for img in config['images']:
img_data = requests.get(img['url']).content
b64_img_data = base64.b64encode(img_data)
str_img_data = b64_img_data.decode('utf-8')
data[img['name']] = str_img_data
with open(filename, 'w') as ijson:
ijson.write(json.dumps(data))
_alert('Done')When the user clicks the Scrape button, the save function is called using the callback mechanism.
The first thing that this function does is check whether there are actually any images to be saved. If not, it alerts the user about it, using another helper function, _alert, whose code we'll see shortly. No further action is performed if there are no images.
On the other hand, if the config['images'] list is not empty, save acts as a dispatcher, and it calls _save_images or _save_json, according to which value is held by _same_method. Remember, this variable is tied to the radio buttons, therefore we expect its value to be either 'img' or 'json'.
This dispatcher is a bit different from the one in the script. According to which method we have selected, a different action must be taken.
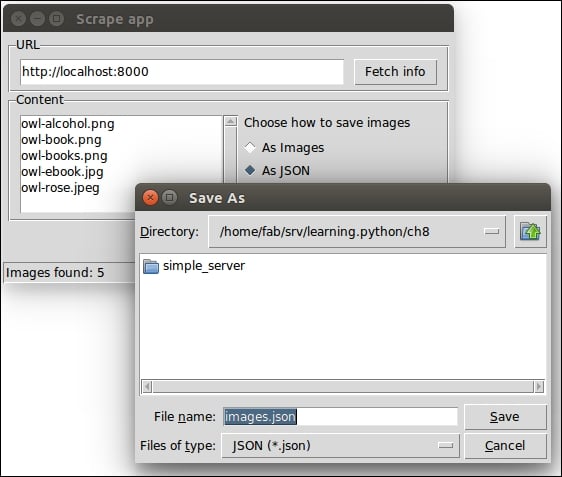
If we want to save the images as images, we need to ask the user to choose a directory. We do this by calling filedialog.askdirectory and assigning the result of the call to the variable dirname. This opens up a nice dialog window that asks us to choose a directory. The directory we choose must exist, as specified by the way we call the method. This is done so that we don't have to write code to deal with a potentially missing directory when saving the files.
Here's how this dialog should look on Ubuntu:

If we cancel the operation, dirname will be set to None.
Before finishing analyzing the logic in save, let's quickly go through _save_images.
It's very similar to the version we had in the script so just note that, at the beginning, in order to be sure that we actually have something to do, we check on both dirname and the presence of at least one image in config['images'].
If that's the case, it means we have at least one image to save and the path for it, so we can proceed. The logic to save the images has already been explained. The one thing we do differently this time is to join the directory (which means the complete path) to the image name, by means of os.path.join. In the os.path module there's plenty of useful methods to work with paths and filenames.
At the end of _save_images, if we saved at least one image, we alert the user that we're done.
Let's go back now to the other branch in save. This branch is executed when the user selects the As JSON radio button before pressing the Scrape button. In this case, we want to save a file; therefore, we cannot just ask for a directory. We want to give the user the ability to choose a filename as well. Hence, we fire up a different dialog: filedialog.asksaveasfilename.
We pass an initial filename, which is proposed to the user with the ability to change it if they don't like it. Moreover, because we're saving a JSON file, we're forcing the user to use the correct extension by passing the filetypes argument. It is a list with any number of 2-tuples (description, extension) that runs the logic of the dialog.
Here's how this dialog should look on Ubuntu:
Once we have chosen a place and a filename, we can proceed with the saving logic, which is the same as it was in the previous script. We create a JSON object from a Python dictionary (data) that we populate with key/value pairs made by the images name and Base64 encoded content.
In _save_json as well, we have a little check at the beginning that makes sure that we don't proceed unless we have a file name and at least one image to save.
This ensures that if the user presses the Cancel button, nothing bad happens.
Finally, let's see the alerting logic. It's extremely simple.
def _sb(msg):
_status_msg.set(msg)
def _alert(msg):
messagebox.showinfo(message=msg)That's it! To change the status bar message all we need to do is to access _status_msg StringVar, as it's tied to the _status label.
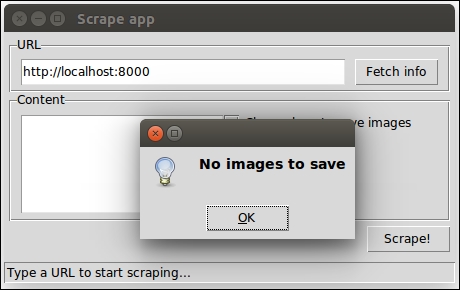
On the other hand, if we want to show the user a more visible message, we can fire up a message box. Here's how it should look on Ubuntu:
The messagebox object can also be used to warn the user (messagebox.showwarning) or to signal an error (messagebox.showerror). But it can also be used to provide dialogs that ask us if we're sure that we want to proceed or if we really want to delete that file, and so on.
If you inspect messagebox by simply printing out what dir(messagebox) returns, you'll find methods like askokcancel, askquestion, askretrycancel, askyesno, and askyesnocancel, as well as a set of constants to verify the response of the user, such as CANCEL, NO, OK, OKCANCEL, YES, YESNOCANCEL, and so on. You can compare these to the user's choice so that you know what the next action to execute when the dialog closes.
Now that you're accustomed to the fundamentals of designing a GUI application, I'd like to give you some suggestions on how to make ours better.
We can start from the code quality. Do you think this code is good enough, or would you improve it? If so, how? I would test it, and make sure it's robust and caters for all the various scenarios that a user might create by clicking around on the application. I would also make sure the behavior is what I would expect when the website we're scraping is down for any reason.
Another thing that we could improve is the naming. I have prudently named all the components with a leading underscore, both to highlight their somewhat "private" nature, and to avoid having name clashes with the underlying objects they are linked to. But in retrospect, many of those components could use a better name, so it's really up to you to refactor until you find the form that suits you best. You could start by giving a better name to the _sb function!
For what concerns the user interface, you could try and resize the main application. See what happens? The whole content stays exactly where it is. Empty space is added if you expand, or the whole widgets set disappears gradually if you shrink. This behavior isn't exactly nice, therefore one quick solution could be to make the root window fixed (that is, unable to resize).
Another thing that you could do to improve the application is to add the same functionality we had in the script, to save only PNGs or JPGs. In order to do this, you could place a combo box somewhere, with three values: All, PNGs, JPGs, or something similar. The user should be able to select one of those options before saving the files.
Even better, you could change the declaration of Listbox so that it's possible to select multiple images at the same time, and only the selected ones will be saved. If you manage to do this (it's not as hard as it seems, believe me), then you should consider presenting the Listbox a bit better, maybe providing alternating background colors for the rows.
Another nice thing you could add is a button that opens up a dialog to select a file. The file must be one of the JSON files the application can produce. Once selected, you could run some logic to reconstruct the images from their Base64-encoded version. The logic to do this is very simple, so here's an example:
with open('images.json', 'r') as f:
data = json.loads(f.read())
for (name, b64val) in data.items():
with open(name, 'wb') as f:
f.write(base64.b64decode(b64val))As you can see, we need to open images.json in read mode, and grab the data dictionary. Once we have it, we can loop through its items, and save each image with the Base64 decoded content. I'll leave it up to you to tie this logic to a button in the application.
Another cool feature that you could add is the ability to open up a preview pane that shows any image you select from the Listbox, so that the user can take a peek at the images before deciding to save them.
Finally, one last suggestion for this application is to add a menu. Maybe even a simple menu with File and ? to provide the usual Help or About. Just for fun. Adding menus is not that complicated; you can add text, keyboard shortcuts, images, and so on.
The imports
from tkinter import * from tkinter import ttk, filedialog, messagebox import base64 import json import os from bs4 import BeautifulSoup import requests
We're already familiar with most of these. The interesting bit here is those first two lines. The first one is quite common practice, although it is bad practice in Python to import using the star syntax. You can incur in name collisions and, if the module is too big, importing everything would be expensive.
After that, we import ttk, filedialog, and messagebox explicitly, following the conventional approach used with this library. ttk is the new set of styled widgets. They behave basically like the old ones, but are capable of drawing themselves correctly according to the style your OS is set on, which is nice.
The rest of the imports is what we need in order to carry out the task you know well by now. Note that there is nothing we need to install with pip in this second part, we already have everything we need.
I'm going to paste it chunk by chunk so that I can explain it easily to you. You'll see how all those pieces we talked about in the layout draft are arranged and glued together. What I'm about to paste, as we did in the script before, is the final part of the guiscrape.py module. We'll leave the middle part, the business logic, for last.
if __name__ == "__main__":
_root = Tk()
_root.title('Scrape app')As you know by now, we only want to execute the logic when the module is run directly, so that first line shouldn't surprise you.
In the last two lines. we set up the main window, which is an instance of the Tk class. We instantiate it and give it a title. Note that I use the prepending underscore technique for all the names of the tkinter objects, in order to avoid potential collisions with names in the business logic. I just find it cleaner like this, but you're allowed to disagree.
_mainframe = ttk.Frame(_root, padding='5 5 5 5')
_mainframe.grid(row=0, column=0, sticky=(E, W, N, S))Here, we set up the Main Frame. It's a ttk.Frame instance. We set _root as its parent, and give it some padding. The padding is a measure in pixels of how much space should be inserted between the inner content and the borders in order to let our layout breathe a little, otherwise we have the sardine effect, where widgets are packed too tightly.
The second line is much more interesting. We place this _mainframe on the first row (0) and first column (0) of the parent object (_root). We also say that this frame needs to extend itself in each direction by using the sticky argument with all four cardinal directions. If you're wondering where they came from, it's the from tkinter import * magic that brought them to us.
_url_frame = ttk.LabelFrame(
_mainframe, text='URL', padding='5 5 5 5')
_url_frame.grid(row=0, column=0, sticky=(E, W))
_url_frame.columnconfigure(0, weight=1)
_url_frame.rowconfigure(0, weight=1)Next, we start by placing the URL Frame down. This time, the parent object is _mainframe, as you will recall from our draft. This is not just a simple Frame, but it's actually a LabelFrame, which means we can set the text argument and expect a rectangle to be drawn around it, with the content of the text argument written in the top-left part of it (check out the previous picture if it helps). We position this frame at (0, 0), and say that it should expand to the left and to the right. We don't need the other two directions.
Finally, we use rowconfigure and columnconfigure to make sure it behaves correctly, should it need to resize. This is just a formality in our present layout.
_url = StringVar()
_url.set('http://localhost:8000')
_url_entry = ttk.Entry(
_url_frame, width=40, textvariable=_url)
_url_entry.grid(row=0, column=0, sticky=(E, W, S, N), padx=5)
_fetch_btn = ttk.Button(
_url_frame, text='Fetch info', command=fetch_url)
_fetch_btn.grid(row=0, column=1, sticky=W, padx=5)Here, we have the code to lay out the URL textbox and the _fetch button. A textbox in this environment is called Entry. We instantiate it as usual, setting _url_frame as its parent and giving it a width. Also, and this is the most interesting part, we set the textvariable argument to be _url. _url is a StringVar, which is an object that is now connected to Entry and will be used to manipulate its content. Therefore, we don't modify the text in the _url_entry instance directly, but by accessing _url. In this case, we call the set method on it to set the initial value to the URL of our local web page.
We position _url_entry at (0, 0), setting all four cardinal directions for it to stick to, and we also set a bit of extra padding on the left and right edges by using padx, which adds padding on the x-axis (horizontal). On the other hand, pady takes care of the vertical direction.
By now, you should get that every time you call the .grid method on an object, we're basically telling the grid layout manager to place that object somewhere, according to rules that we specify as arguments in the grid() call.
Similarly, we set up and place the _fetch button. The only interesting parameter is command=fetch_url. This means that when we click this button, we actually call the fetch_url function. This technique is called callback.
_img_frame = ttk.LabelFrame(
_mainframe, text='Content', padding='9 0 0 0')
_img_frame.grid(row=1, column=0, sticky=(N, S, E, W))This is what we called Img Frame in the layout draft. It is placed on the second row of its parent _mainframe. It will hold the Listbox and the Radio Frame.
_images = StringVar()
_img_listbox = Listbox(
_img_frame, listvariable=_images, height=6, width=25)
_img_listbox.grid(row=0, column=0, sticky=(E, W), pady=5)
_scrollbar = ttk.Scrollbar(
_img_frame, orient=VERTICAL, command=_img_listbox.yview)
_scrollbar.grid(row=0, column=1, sticky=(S, N), pady=6)
_img_listbox.configure(yscrollcommand=_scrollbar.set)This is probably the most interesting bit of the whole layout logic. As we did with the _url_entry, we need to drive the contents of Listbox by tying it to a variable _images. We set up Listbox so that _img_frame is its parent, and _images is the variable it's tied to. We also pass some dimensions.
The interesting bit comes from the _scrollbar instance. Note that, when we instantiate it, we set its command to _img_listbox.yview. This is the first half of the contract between a Listbox and a Scrollbar. The other half is provided by the _img_listbox.configure method, which sets the yscrollcommand=_scrollbar.set.
By providing this reciprocal bond, when we scroll on Listbox, the Scrollbar will move accordingly and vice-versa, when we operate the Scrollbar, the Listbox will scroll accordingly.
_radio_frame = ttk.Frame(_img_frame)
_radio_frame.grid(row=0, column=2, sticky=(N, S, W, E))We place the Radio Frame, ready to be populated. Note that the Listbox is occupying (0, 0) on _img_frame, the Scrollbar (0, 1) and therefore _radio_frame will go in (0, 2).
_choice_lbl = ttk.Label(
_radio_frame, text="Choose how to save images")
_choice_lbl.grid(row=0, column=0, padx=5, pady=5)
_save_method = StringVar()
_save_method.set('img')
_img_only_radio = ttk.Radiobutton(
_radio_frame, text='As Images', variable=_save_method,
value='img')
_img_only_radio.grid(
row=1, column=0, padx=5, pady=2, sticky=W)
_img_only_radio.configure(state='normal')
_json_radio = ttk.Radiobutton(
_radio_frame, text='As JSON', variable=_save_method,
value='json')
_json_radio.grid(row=2, column=0, padx=5, pady=2, sticky=W)Firstly, we place the label, and we give it some padding. Note that the label and radio buttons are children of _radio_frame.
As for the Entry and Listbox objects, the Radiobutton is also driven by a bond to an external variable, which I called _save_method. Each Radiobutton instance sets a value argument, and by checking the value on _save_method, we know which button is selected.
_scrape_btn = ttk.Button(
_mainframe, text='Scrape!', command=save)
_scrape_btn.grid(row=2, column=0, sticky=E, pady=5)On the third row of _mainframe we place the Scrape button. Its command is save, which saves the images to be listed in Listbox, after we have successfully parsed a web page.
_status_frame = ttk.Frame(
_root, relief='sunken', padding='2 2 2 2')
_status_frame.grid(row=1, column=0, sticky=(E, W, S))
_status_msg = StringVar()
_status_msg.set('Type a URL to start scraping...')
_status = ttk.Label(
_status_frame, textvariable=_status_msg, anchor=W)
_status.grid(row=0, column=0, sticky=(E, W))We end the layout section by placing down the status frame, which is a simple ttk.Frame. To give it a little status bar effect, we set its relief property to 'sunken' and give it a uniform padding of 2 pixels. It needs to stick to the _root window left, right and bottom parts, so we set its sticky attribute to (E, W, S).
We then place a label in it and, this time, we tie it to a StringVar object, because we will have to modify it every time we want to update the status bar text. You should be acquainted to this technique by now.
Finally, on the last line, we run the application by calling the mainloop method on the Tk instance.
_root.mainloop()
Please remember that all these instructions are placed under the if __name__ == "__main__": clause in the original script.
As you can see, the code to design our GUI application is not hard. Granted, at the beginning you have to play around a little bit. Not everything will work out perfectly at the first attempt, but I promise you it's very easy and you can find plenty of tutorials on the web. Let's now get to the interesting bit, the business logic.
We'll analyze the business logic of the GUI application in three chunks. There is the fetching logic, the saving logic, and the alerting logic.
config = {}
def fetch_url():
url = _url.get()
config['images'] = []
_images.set(()) # initialized as an empty tuple
try:
page = requests.get(url)
except requests.RequestException as rex:
_sb(str(rex))
else:
soup = BeautifulSoup(page.content, 'html.parser')
images = fetch_images(soup, url)
if images:
_images.set(tuple(img['name'] for img in images))
_sb('Images found: {}'.format(len(images)))
else:
_sb('No images found')
config['images'] = images
def fetch_images(soup, base_url):
images = []
for img in soup.findAll('img'):
src = img.get('src')
img_url = (
'{base_url}/{src}'.format(base_url=base_url, src=src))
name = img_url.split('/')[-1]
images.append(dict(name=name, url=img_url))
return imagesFirst of all, let me explain that config dictionary. We need some way of passing data between the GUI application and the business logic. Now, instead of polluting the global namespace with many different variables, my personal preference is to have a single dictionary that holds all the objects we need to pass back and forth, so that the global namespace isn't be clogged up with all those names, and we have one single, clean, easy way of knowing where all the objects that are needed by our application are.
In this simple example, we'll just populate the config dictionary with the images we fetch from the page, but I wanted to show you the technique so that you have at least an example. This technique comes from my experience with JavaScript. When you code a web page, you very often import several different libraries. If each of these cluttered the global namespace with all sorts of variables, there would be severe issues in making everything work, because of name clashes and variable overriding. They make the coder's life a living hell.
So, it's much better to try and leave the global namespace as clean as we can. In this case, I find that using one config variable is more than acceptable.
The fetch_url function is quite similar to what we did in the script. Firstly, we get the url value by calling _url.get(). Remember that the _url object is a StringVar instance that is tied to the _url_entry object, which is an Entry. The text field you see on the GUI is the Entry, but the text behind the scenes is the value of the StringVar object.
By calling get() on _url, we get the value of the text which is displayed in _url_entry.
The next step is to prepare config['images'] to be an empty list, and to empty the _images variable, which is tied to _img_listbox. This, of course, has the effect of cleaning up all the items in _img_listbox.
After this preparation step, we can try to fetch the page, using the same try/except logic we adopted in the script at the beginning of the chapter.
The one difference is in the action we take if things go wrong. We call _sb(str(rex)). _sb is a helper function whose code we'll see shortly. Basically, it sets the text in the status bar for us. Not a good name, right? I had to explain its behavior to you: food for thought.
If we can fetch the page, then we create the soup instance, and fetch the images from it. The logic of fetch_images is exactly the same as the one explained before, so I won't repeat myself here.
If we have images, using a quick tuple comprehension (which is actually a generator expression fed to a tuple constructor) we feed the _images StringVar and this has the effect of populating our _img_listbox with all the image names. Finally, we update the status bar.
If there were no images, we still update the status bar, and at the end of the function, regardless of how many images were found, we update config['images'] to hold the images list. In this way, we'll be able to access the images from other functions by inspecting config['images'] without having to pass that list around.
The logic to save the images is pretty straightforward. Here it is:
def save():
if not config.get('images'):
_alert('No images to save')
return
if _save_method.get() == 'img':
dirname = filedialog.askdirectory(mustexist=True)
_save_images(dirname)
else:
filename = filedialog.asksaveasfilename(
initialfile='images.json',
filetypes=[('JSON', '.json')])
_save_json(filename)
def _save_images(dirname):
if dirname and config.get('images'):
for img in config['images']:
img_data = requests.get(img['url']).content
filename = os.path.join(dirname, img['name'])
with open(filename, 'wb') as f:
f.write(img_data)
_alert('Done')
def _save_json(filename):
if filename and config.get('images'):
data = {}
for img in config['images']:
img_data = requests.get(img['url']).content
b64_img_data = base64.b64encode(img_data)
str_img_data = b64_img_data.decode('utf-8')
data[img['name']] = str_img_data
with open(filename, 'w') as ijson:
ijson.write(json.dumps(data))
_alert('Done')When the user clicks the Scrape button, the save function is called using the callback mechanism.
The first thing that this function does is check whether there are actually any images to be saved. If not, it alerts the user about it, using another helper function, _alert, whose code we'll see shortly. No further action is performed if there are no images.
On the other hand, if the config['images'] list is not empty, save acts as a dispatcher, and it calls _save_images or _save_json, according to which value is held by _same_method. Remember, this variable is tied to the radio buttons, therefore we expect its value to be either 'img' or 'json'.
This dispatcher is a bit different from the one in the script. According to which method we have selected, a different action must be taken.
If we want to save the images as images, we need to ask the user to choose a directory. We do this by calling filedialog.askdirectory and assigning the result of the call to the variable dirname. This opens up a nice dialog window that asks us to choose a directory. The directory we choose must exist, as specified by the way we call the method. This is done so that we don't have to write code to deal with a potentially missing directory when saving the files.
Here's how this dialog should look on Ubuntu:
If we cancel the operation, dirname will be set to None.
Before finishing analyzing the logic in save, let's quickly go through _save_images.
It's very similar to the version we had in the script so just note that, at the beginning, in order to be sure that we actually have something to do, we check on both dirname and the presence of at least one image in config['images'].
If that's the case, it means we have at least one image to save and the path for it, so we can proceed. The logic to save the images has already been explained. The one thing we do differently this time is to join the directory (which means the complete path) to the image name, by means of os.path.join. In the os.path module there's plenty of useful methods to work with paths and filenames.
At the end of _save_images, if we saved at least one image, we alert the user that we're done.
Let's go back now to the other branch in save. This branch is executed when the user selects the As JSON radio button before pressing the Scrape button. In this case, we want to save a file; therefore, we cannot just ask for a directory. We want to give the user the ability to choose a filename as well. Hence, we fire up a different dialog: filedialog.asksaveasfilename.
We pass an initial filename, which is proposed to the user with the ability to change it if they don't like it. Moreover, because we're saving a JSON file, we're forcing the user to use the correct extension by passing the filetypes argument. It is a list with any number of 2-tuples (description, extension) that runs the logic of the dialog.
Here's how this dialog should look on Ubuntu:
Once we have chosen a place and a filename, we can proceed with the saving logic, which is the same as it was in the previous script. We create a JSON object from a Python dictionary (data) that we populate with key/value pairs made by the images name and Base64 encoded content.
In _save_json as well, we have a little check at the beginning that makes sure that we don't proceed unless we have a file name and at least one image to save.
This ensures that if the user presses the Cancel button, nothing bad happens.
Finally, let's see the alerting logic. It's extremely simple.
def _sb(msg):
_status_msg.set(msg)
def _alert(msg):
messagebox.showinfo(message=msg)That's it! To change the status bar message all we need to do is to access _status_msg StringVar, as it's tied to the _status label.
On the other hand, if we want to show the user a more visible message, we can fire up a message box. Here's how it should look on Ubuntu:
The messagebox object can also be used to warn the user (messagebox.showwarning) or to signal an error (messagebox.showerror). But it can also be used to provide dialogs that ask us if we're sure that we want to proceed or if we really want to delete that file, and so on.
If you inspect messagebox by simply printing out what dir(messagebox) returns, you'll find methods like askokcancel, askquestion, askretrycancel, askyesno, and askyesnocancel, as well as a set of constants to verify the response of the user, such as CANCEL, NO, OK, OKCANCEL, YES, YESNOCANCEL, and so on. You can compare these to the user's choice so that you know what the next action to execute when the dialog closes.
Now that you're accustomed to the fundamentals of designing a GUI application, I'd like to give you some suggestions on how to make ours better.
We can start from the code quality. Do you think this code is good enough, or would you improve it? If so, how? I would test it, and make sure it's robust and caters for all the various scenarios that a user might create by clicking around on the application. I would also make sure the behavior is what I would expect when the website we're scraping is down for any reason.
Another thing that we could improve is the naming. I have prudently named all the components with a leading underscore, both to highlight their somewhat "private" nature, and to avoid having name clashes with the underlying objects they are linked to. But in retrospect, many of those components could use a better name, so it's really up to you to refactor until you find the form that suits you best. You could start by giving a better name to the _sb function!
For what concerns the user interface, you could try and resize the main application. See what happens? The whole content stays exactly where it is. Empty space is added if you expand, or the whole widgets set disappears gradually if you shrink. This behavior isn't exactly nice, therefore one quick solution could be to make the root window fixed (that is, unable to resize).
Another thing that you could do to improve the application is to add the same functionality we had in the script, to save only PNGs or JPGs. In order to do this, you could place a combo box somewhere, with three values: All, PNGs, JPGs, or something similar. The user should be able to select one of those options before saving the files.
Even better, you could change the declaration of Listbox so that it's possible to select multiple images at the same time, and only the selected ones will be saved. If you manage to do this (it's not as hard as it seems, believe me), then you should consider presenting the Listbox a bit better, maybe providing alternating background colors for the rows.
Another nice thing you could add is a button that opens up a dialog to select a file. The file must be one of the JSON files the application can produce. Once selected, you could run some logic to reconstruct the images from their Base64-encoded version. The logic to do this is very simple, so here's an example:
with open('images.json', 'r') as f:
data = json.loads(f.read())
for (name, b64val) in data.items():
with open(name, 'wb') as f:
f.write(base64.b64decode(b64val))As you can see, we need to open images.json in read mode, and grab the data dictionary. Once we have it, we can loop through its items, and save each image with the Base64 decoded content. I'll leave it up to you to tie this logic to a button in the application.
Another cool feature that you could add is the ability to open up a preview pane that shows any image you select from the Listbox, so that the user can take a peek at the images before deciding to save them.
Finally, one last suggestion for this application is to add a menu. Maybe even a simple menu with File and ? to provide the usual Help or About. Just for fun. Adding menus is not that complicated; you can add text, keyboard shortcuts, images, and so on.
The layout logic
I'm going to paste it chunk by chunk so that I can explain it easily to you. You'll see how all those pieces we talked about in the layout draft are arranged and glued together. What I'm about to paste, as we did in the script before, is the final part of the guiscrape.py module. We'll leave the middle part, the business logic, for last.
if __name__ == "__main__":
_root = Tk()
_root.title('Scrape app')As you know by now, we only want to execute the logic when the module is run directly, so that first line shouldn't surprise you.
In the last two lines. we set up the main window, which is an instance of the Tk class. We instantiate it and give it a title. Note that I use the prepending underscore technique for all the names of the tkinter objects, in order to avoid potential collisions with names in the business logic. I just find it cleaner like this, but you're allowed to disagree.
_mainframe = ttk.Frame(_root, padding='5 5 5 5')
_mainframe.grid(row=0, column=0, sticky=(E, W, N, S))Here, we set up the Main Frame. It's a ttk.Frame instance. We set _root as its parent, and give it some padding. The padding is a measure in pixels of how much space should be inserted between the inner content and the borders in order to let our layout breathe a little, otherwise we have the sardine effect, where widgets are packed too tightly.
The second line is much more interesting. We place this _mainframe on the first row (0) and first column (0) of the parent object (_root). We also say that this frame needs to extend itself in each direction by using the sticky argument with all four cardinal directions. If you're wondering where they came from, it's the from tkinter import * magic that brought them to us.
_url_frame = ttk.LabelFrame(
_mainframe, text='URL', padding='5 5 5 5')
_url_frame.grid(row=0, column=0, sticky=(E, W))
_url_frame.columnconfigure(0, weight=1)
_url_frame.rowconfigure(0, weight=1)Next, we start by placing the URL Frame down. This time, the parent object is _mainframe, as you will recall from our draft. This is not just a simple Frame, but it's actually a LabelFrame, which means we can set the text argument and expect a rectangle to be drawn around it, with the content of the text argument written in the top-left part of it (check out the previous picture if it helps). We position this frame at (0, 0), and say that it should expand to the left and to the right. We don't need the other two directions.
Finally, we use rowconfigure and columnconfigure to make sure it behaves correctly, should it need to resize. This is just a formality in our present layout.
_url = StringVar()
_url.set('http://localhost:8000')
_url_entry = ttk.Entry(
_url_frame, width=40, textvariable=_url)
_url_entry.grid(row=0, column=0, sticky=(E, W, S, N), padx=5)
_fetch_btn = ttk.Button(
_url_frame, text='Fetch info', command=fetch_url)
_fetch_btn.grid(row=0, column=1, sticky=W, padx=5)Here, we have the code to lay out the URL textbox and the _fetch button. A textbox in this environment is called Entry. We instantiate it as usual, setting _url_frame as its parent and giving it a width. Also, and this is the most interesting part, we set the textvariable argument to be _url. _url is a StringVar, which is an object that is now connected to Entry and will be used to manipulate its content. Therefore, we don't modify the text in the _url_entry instance directly, but by accessing _url. In this case, we call the set method on it to set the initial value to the URL of our local web page.
We position _url_entry at (0, 0), setting all four cardinal directions for it to stick to, and we also set a bit of extra padding on the left and right edges by using padx, which adds padding on the x-axis (horizontal). On the other hand, pady takes care of the vertical direction.
By now, you should get that every time you call the .grid method on an object, we're basically telling the grid layout manager to place that object somewhere, according to rules that we specify as arguments in the grid() call.
Similarly, we set up and place the _fetch button. The only interesting parameter is command=fetch_url. This means that when we click this button, we actually call the fetch_url function. This technique is called callback.
_img_frame = ttk.LabelFrame(
_mainframe, text='Content', padding='9 0 0 0')
_img_frame.grid(row=1, column=0, sticky=(N, S, E, W))This is what we called Img Frame in the layout draft. It is placed on the second row of its parent _mainframe. It will hold the Listbox and the Radio Frame.
_images = StringVar()
_img_listbox = Listbox(
_img_frame, listvariable=_images, height=6, width=25)
_img_listbox.grid(row=0, column=0, sticky=(E, W), pady=5)
_scrollbar = ttk.Scrollbar(
_img_frame, orient=VERTICAL, command=_img_listbox.yview)
_scrollbar.grid(row=0, column=1, sticky=(S, N), pady=6)
_img_listbox.configure(yscrollcommand=_scrollbar.set)This is probably the most interesting bit of the whole layout logic. As we did with the _url_entry, we need to drive the contents of Listbox by tying it to a variable _images. We set up Listbox so that _img_frame is its parent, and _images is the variable it's tied to. We also pass some dimensions.
The interesting bit comes from the _scrollbar instance. Note that, when we instantiate it, we set its command to _img_listbox.yview. This is the first half of the contract between a Listbox and a Scrollbar. The other half is provided by the _img_listbox.configure method, which sets the yscrollcommand=_scrollbar.set.
By providing this reciprocal bond, when we scroll on Listbox, the Scrollbar will move accordingly and vice-versa, when we operate the Scrollbar, the Listbox will scroll accordingly.
_radio_frame = ttk.Frame(_img_frame)
_radio_frame.grid(row=0, column=2, sticky=(N, S, W, E))We place the Radio Frame, ready to be populated. Note that the Listbox is occupying (0, 0) on _img_frame, the Scrollbar (0, 1) and therefore _radio_frame will go in (0, 2).
_choice_lbl = ttk.Label(
_radio_frame, text="Choose how to save images")
_choice_lbl.grid(row=0, column=0, padx=5, pady=5)
_save_method = StringVar()
_save_method.set('img')
_img_only_radio = ttk.Radiobutton(
_radio_frame, text='As Images', variable=_save_method,
value='img')
_img_only_radio.grid(
row=1, column=0, padx=5, pady=2, sticky=W)
_img_only_radio.configure(state='normal')
_json_radio = ttk.Radiobutton(
_radio_frame, text='As JSON', variable=_save_method,
value='json')
_json_radio.grid(row=2, column=0, padx=5, pady=2, sticky=W)Firstly, we place the label, and we give it some padding. Note that the label and radio buttons are children of _radio_frame.
As for the Entry and Listbox objects, the Radiobutton is also driven by a bond to an external variable, which I called _save_method. Each Radiobutton instance sets a value argument, and by checking the value on _save_method, we know which button is selected.
_scrape_btn = ttk.Button(
_mainframe, text='Scrape!', command=save)
_scrape_btn.grid(row=2, column=0, sticky=E, pady=5)On the third row of _mainframe we place the Scrape button. Its command is save, which saves the images to be listed in Listbox, after we have successfully parsed a web page.
_status_frame = ttk.Frame(
_root, relief='sunken', padding='2 2 2 2')
_status_frame.grid(row=1, column=0, sticky=(E, W, S))
_status_msg = StringVar()
_status_msg.set('Type a URL to start scraping...')
_status = ttk.Label(
_status_frame, textvariable=_status_msg, anchor=W)
_status.grid(row=0, column=0, sticky=(E, W))We end the layout section by placing down the status frame, which is a simple ttk.Frame. To give it a little status bar effect, we set its relief property to 'sunken' and give it a uniform padding of 2 pixels. It needs to stick to the _root window left, right and bottom parts, so we set its sticky attribute to (E, W, S).
We then place a label in it and, this time, we tie it to a StringVar object, because we will have to modify it every time we want to update the status bar text. You should be acquainted to this technique by now.
Finally, on the last line, we run the application by calling the mainloop method on the Tk instance.
_root.mainloop()
Please remember that all these instructions are placed under the if __name__ == "__main__": clause in the original script.
As you can see, the code to design our GUI application is not hard. Granted, at the beginning you have to play around a little bit. Not everything will work out perfectly at the first attempt, but I promise you it's very easy and you can find plenty of tutorials on the web. Let's now get to the interesting bit, the business logic.
We'll analyze the business logic of the GUI application in three chunks. There is the fetching logic, the saving logic, and the alerting logic.
config = {}
def fetch_url():
url = _url.get()
config['images'] = []
_images.set(()) # initialized as an empty tuple
try:
page = requests.get(url)
except requests.RequestException as rex:
_sb(str(rex))
else:
soup = BeautifulSoup(page.content, 'html.parser')
images = fetch_images(soup, url)
if images:
_images.set(tuple(img['name'] for img in images))
_sb('Images found: {}'.format(len(images)))
else:
_sb('No images found')
config['images'] = images
def fetch_images(soup, base_url):
images = []
for img in soup.findAll('img'):
src = img.get('src')
img_url = (
'{base_url}/{src}'.format(base_url=base_url, src=src))
name = img_url.split('/')[-1]
images.append(dict(name=name, url=img_url))
return imagesFirst of all, let me explain that config dictionary. We need some way of passing data between the GUI application and the business logic. Now, instead of polluting the global namespace with many different variables, my personal preference is to have a single dictionary that holds all the objects we need to pass back and forth, so that the global namespace isn't be clogged up with all those names, and we have one single, clean, easy way of knowing where all the objects that are needed by our application are.
In this simple example, we'll just populate the config dictionary with the images we fetch from the page, but I wanted to show you the technique so that you have at least an example. This technique comes from my experience with JavaScript. When you code a web page, you very often import several different libraries. If each of these cluttered the global namespace with all sorts of variables, there would be severe issues in making everything work, because of name clashes and variable overriding. They make the coder's life a living hell.
So, it's much better to try and leave the global namespace as clean as we can. In this case, I find that using one config variable is more than acceptable.
The fetch_url function is quite similar to what we did in the script. Firstly, we get the url value by calling _url.get(). Remember that the _url object is a StringVar instance that is tied to the _url_entry object, which is an Entry. The text field you see on the GUI is the Entry, but the text behind the scenes is the value of the StringVar object.
By calling get() on _url, we get the value of the text which is displayed in _url_entry.
The next step is to prepare config['images'] to be an empty list, and to empty the _images variable, which is tied to _img_listbox. This, of course, has the effect of cleaning up all the items in _img_listbox.
After this preparation step, we can try to fetch the page, using the same try/except logic we adopted in the script at the beginning of the chapter.
The one difference is in the action we take if things go wrong. We call _sb(str(rex)). _sb is a helper function whose code we'll see shortly. Basically, it sets the text in the status bar for us. Not a good name, right? I had to explain its behavior to you: food for thought.
If we can fetch the page, then we create the soup instance, and fetch the images from it. The logic of fetch_images is exactly the same as the one explained before, so I won't repeat myself here.
If we have images, using a quick tuple comprehension (which is actually a generator expression fed to a tuple constructor) we feed the _images StringVar and this has the effect of populating our _img_listbox with all the image names. Finally, we update the status bar.
If there were no images, we still update the status bar, and at the end of the function, regardless of how many images were found, we update config['images'] to hold the images list. In this way, we'll be able to access the images from other functions by inspecting config['images'] without having to pass that list around.
The logic to save the images is pretty straightforward. Here it is:
def save():
if not config.get('images'):
_alert('No images to save')
return
if _save_method.get() == 'img':
dirname = filedialog.askdirectory(mustexist=True)
_save_images(dirname)
else:
filename = filedialog.asksaveasfilename(
initialfile='images.json',
filetypes=[('JSON', '.json')])
_save_json(filename)
def _save_images(dirname):
if dirname and config.get('images'):
for img in config['images']:
img_data = requests.get(img['url']).content
filename = os.path.join(dirname, img['name'])
with open(filename, 'wb') as f:
f.write(img_data)
_alert('Done')
def _save_json(filename):
if filename and config.get('images'):
data = {}
for img in config['images']:
img_data = requests.get(img['url']).content
b64_img_data = base64.b64encode(img_data)
str_img_data = b64_img_data.decode('utf-8')
data[img['name']] = str_img_data
with open(filename, 'w') as ijson:
ijson.write(json.dumps(data))
_alert('Done')When the user clicks the Scrape button, the save function is called using the callback mechanism.
The first thing that this function does is check whether there are actually any images to be saved. If not, it alerts the user about it, using another helper function, _alert, whose code we'll see shortly. No further action is performed if there are no images.
On the other hand, if the config['images'] list is not empty, save acts as a dispatcher, and it calls _save_images or _save_json, according to which value is held by _same_method. Remember, this variable is tied to the radio buttons, therefore we expect its value to be either 'img' or 'json'.
This dispatcher is a bit different from the one in the script. According to which method we have selected, a different action must be taken.
If we want to save the images as images, we need to ask the user to choose a directory. We do this by calling filedialog.askdirectory and assigning the result of the call to the variable dirname. This opens up a nice dialog window that asks us to choose a directory. The directory we choose must exist, as specified by the way we call the method. This is done so that we don't have to write code to deal with a potentially missing directory when saving the files.
Here's how this dialog should look on Ubuntu:
If we cancel the operation, dirname will be set to None.
Before finishing analyzing the logic in save, let's quickly go through _save_images.
It's very similar to the version we had in the script so just note that, at the beginning, in order to be sure that we actually have something to do, we check on both dirname and the presence of at least one image in config['images'].
If that's the case, it means we have at least one image to save and the path for it, so we can proceed. The logic to save the images has already been explained. The one thing we do differently this time is to join the directory (which means the complete path) to the image name, by means of os.path.join. In the os.path module there's plenty of useful methods to work with paths and filenames.
At the end of _save_images, if we saved at least one image, we alert the user that we're done.
Let's go back now to the other branch in save. This branch is executed when the user selects the As JSON radio button before pressing the Scrape button. In this case, we want to save a file; therefore, we cannot just ask for a directory. We want to give the user the ability to choose a filename as well. Hence, we fire up a different dialog: filedialog.asksaveasfilename.
We pass an initial filename, which is proposed to the user with the ability to change it if they don't like it. Moreover, because we're saving a JSON file, we're forcing the user to use the correct extension by passing the filetypes argument. It is a list with any number of 2-tuples (description, extension) that runs the logic of the dialog.
Here's how this dialog should look on Ubuntu:
Once we have chosen a place and a filename, we can proceed with the saving logic, which is the same as it was in the previous script. We create a JSON object from a Python dictionary (data) that we populate with key/value pairs made by the images name and Base64 encoded content.
In _save_json as well, we have a little check at the beginning that makes sure that we don't proceed unless we have a file name and at least one image to save.
This ensures that if the user presses the Cancel button, nothing bad happens.
Finally, let's see the alerting logic. It's extremely simple.
def _sb(msg):
_status_msg.set(msg)
def _alert(msg):
messagebox.showinfo(message=msg)That's it! To change the status bar message all we need to do is to access _status_msg StringVar, as it's tied to the _status label.
On the other hand, if we want to show the user a more visible message, we can fire up a message box. Here's how it should look on Ubuntu:
The messagebox object can also be used to warn the user (messagebox.showwarning) or to signal an error (messagebox.showerror). But it can also be used to provide dialogs that ask us if we're sure that we want to proceed or if we really want to delete that file, and so on.
If you inspect messagebox by simply printing out what dir(messagebox) returns, you'll find methods like askokcancel, askquestion, askretrycancel, askyesno, and askyesnocancel, as well as a set of constants to verify the response of the user, such as CANCEL, NO, OK, OKCANCEL, YES, YESNOCANCEL, and so on. You can compare these to the user's choice so that you know what the next action to execute when the dialog closes.
Now that you're accustomed to the fundamentals of designing a GUI application, I'd like to give you some suggestions on how to make ours better.
We can start from the code quality. Do you think this code is good enough, or would you improve it? If so, how? I would test it, and make sure it's robust and caters for all the various scenarios that a user might create by clicking around on the application. I would also make sure the behavior is what I would expect when the website we're scraping is down for any reason.
Another thing that we could improve is the naming. I have prudently named all the components with a leading underscore, both to highlight their somewhat "private" nature, and to avoid having name clashes with the underlying objects they are linked to. But in retrospect, many of those components could use a better name, so it's really up to you to refactor until you find the form that suits you best. You could start by giving a better name to the _sb function!
For what concerns the user interface, you could try and resize the main application. See what happens? The whole content stays exactly where it is. Empty space is added if you expand, or the whole widgets set disappears gradually if you shrink. This behavior isn't exactly nice, therefore one quick solution could be to make the root window fixed (that is, unable to resize).
Another thing that you could do to improve the application is to add the same functionality we had in the script, to save only PNGs or JPGs. In order to do this, you could place a combo box somewhere, with three values: All, PNGs, JPGs, or something similar. The user should be able to select one of those options before saving the files.
Even better, you could change the declaration of Listbox so that it's possible to select multiple images at the same time, and only the selected ones will be saved. If you manage to do this (it's not as hard as it seems, believe me), then you should consider presenting the Listbox a bit better, maybe providing alternating background colors for the rows.
Another nice thing you could add is a button that opens up a dialog to select a file. The file must be one of the JSON files the application can produce. Once selected, you could run some logic to reconstruct the images from their Base64-encoded version. The logic to do this is very simple, so here's an example:
with open('images.json', 'r') as f:
data = json.loads(f.read())
for (name, b64val) in data.items():
with open(name, 'wb') as f:
f.write(base64.b64decode(b64val))As you can see, we need to open images.json in read mode, and grab the data dictionary. Once we have it, we can loop through its items, and save each image with the Base64 decoded content. I'll leave it up to you to tie this logic to a button in the application.
Another cool feature that you could add is the ability to open up a preview pane that shows any image you select from the Listbox, so that the user can take a peek at the images before deciding to save them.
Finally, one last suggestion for this application is to add a menu. Maybe even a simple menu with File and ? to provide the usual Help or About. Just for fun. Adding menus is not that complicated; you can add text, keyboard shortcuts, images, and so on.
The business logic
We'll analyze the business logic of the GUI application in three chunks. There is the fetching logic, the saving logic, and the alerting logic.
config = {}
def fetch_url():
url = _url.get()
config['images'] = []
_images.set(()) # initialized as an empty tuple
try:
page = requests.get(url)
except requests.RequestException as rex:
_sb(str(rex))
else:
soup = BeautifulSoup(page.content, 'html.parser')
images = fetch_images(soup, url)
if images:
_images.set(tuple(img['name'] for img in images))
_sb('Images found: {}'.format(len(images)))
else:
_sb('No images found')
config['images'] = images
def fetch_images(soup, base_url):
images = []
for img in soup.findAll('img'):
src = img.get('src')
img_url = (
'{base_url}/{src}'.format(base_url=base_url, src=src))
name = img_url.split('/')[-1]
images.append(dict(name=name, url=img_url))
return imagesFirst of all, let me explain that config dictionary. We need some way of passing data between the GUI application and the business logic. Now, instead of polluting the global namespace with many different variables, my personal preference is to have a single dictionary that holds all the objects we need to pass back and forth, so that the global namespace isn't be clogged up with all those names, and we have one single, clean, easy way of knowing where all the objects that are needed by our application are.
In this simple example, we'll just populate the config dictionary with the images we fetch from the page, but I wanted to show you the technique so that you have at least an example. This technique comes from my experience with JavaScript. When you code a web page, you very often import several different libraries. If each of these cluttered the global namespace with all sorts of variables, there would be severe issues in making everything work, because of name clashes and variable overriding. They make the coder's life a living hell.
So, it's much better to try and leave the global namespace as clean as we can. In this case, I find that using one config variable is more than acceptable.
The fetch_url function is quite similar to what we did in the script. Firstly, we get the url value by calling _url.get(). Remember that the _url object is a StringVar instance that is tied to the _url_entry object, which is an Entry. The text field you see on the GUI is the Entry, but the text behind the scenes is the value of the StringVar object.
By calling get() on _url, we get the value of the text which is displayed in _url_entry.
The next step is to prepare config['images'] to be an empty list, and to empty the _images variable, which is tied to _img_listbox. This, of course, has the effect of cleaning up all the items in _img_listbox.
After this preparation step, we can try to fetch the page, using the same try/except logic we adopted in the script at the beginning of the chapter.
The one difference is in the action we take if things go wrong. We call _sb(str(rex)). _sb is a helper function whose code we'll see shortly. Basically, it sets the text in the status bar for us. Not a good name, right? I had to explain its behavior to you: food for thought.
If we can fetch the page, then we create the soup instance, and fetch the images from it. The logic of fetch_images is exactly the same as the one explained before, so I won't repeat myself here.
If we have images, using a quick tuple comprehension (which is actually a generator expression fed to a tuple constructor) we feed the _images StringVar and this has the effect of populating our _img_listbox with all the image names. Finally, we update the status bar.
If there were no images, we still update the status bar, and at the end of the function, regardless of how many images were found, we update config['images'] to hold the images list. In this way, we'll be able to access the images from other functions by inspecting config['images'] without having to pass that list around.
The logic to save the images is pretty straightforward. Here it is:
def save():
if not config.get('images'):
_alert('No images to save')
return
if _save_method.get() == 'img':
dirname = filedialog.askdirectory(mustexist=True)
_save_images(dirname)
else:
filename = filedialog.asksaveasfilename(
initialfile='images.json',
filetypes=[('JSON', '.json')])
_save_json(filename)
def _save_images(dirname):
if dirname and config.get('images'):
for img in config['images']:
img_data = requests.get(img['url']).content
filename = os.path.join(dirname, img['name'])
with open(filename, 'wb') as f:
f.write(img_data)
_alert('Done')
def _save_json(filename):
if filename and config.get('images'):
data = {}
for img in config['images']:
img_data = requests.get(img['url']).content
b64_img_data = base64.b64encode(img_data)
str_img_data = b64_img_data.decode('utf-8')
data[img['name']] = str_img_data
with open(filename, 'w') as ijson:
ijson.write(json.dumps(data))
_alert('Done')When the user clicks the Scrape button, the save function is called using the callback mechanism.
The first thing that this function does is check whether there are actually any images to be saved. If not, it alerts the user about it, using another helper function, _alert, whose code we'll see shortly. No further action is performed if there are no images.
On the other hand, if the config['images'] list is not empty, save acts as a dispatcher, and it calls _save_images or _save_json, according to which value is held by _same_method. Remember, this variable is tied to the radio buttons, therefore we expect its value to be either 'img' or 'json'.
This dispatcher is a bit different from the one in the script. According to which method we have selected, a different action must be taken.
If we want to save the images as images, we need to ask the user to choose a directory. We do this by calling filedialog.askdirectory and assigning the result of the call to the variable dirname. This opens up a nice dialog window that asks us to choose a directory. The directory we choose must exist, as specified by the way we call the method. This is done so that we don't have to write code to deal with a potentially missing directory when saving the files.
Here's how this dialog should look on Ubuntu:
If we cancel the operation, dirname will be set to None.
Before finishing analyzing the logic in save, let's quickly go through _save_images.
It's very similar to the version we had in the script so just note that, at the beginning, in order to be sure that we actually have something to do, we check on both dirname and the presence of at least one image in config['images'].
If that's the case, it means we have at least one image to save and the path for it, so we can proceed. The logic to save the images has already been explained. The one thing we do differently this time is to join the directory (which means the complete path) to the image name, by means of os.path.join. In the os.path module there's plenty of useful methods to work with paths and filenames.
At the end of _save_images, if we saved at least one image, we alert the user that we're done.
Let's go back now to the other branch in save. This branch is executed when the user selects the As JSON radio button before pressing the Scrape button. In this case, we want to save a file; therefore, we cannot just ask for a directory. We want to give the user the ability to choose a filename as well. Hence, we fire up a different dialog: filedialog.asksaveasfilename.
We pass an initial filename, which is proposed to the user with the ability to change it if they don't like it. Moreover, because we're saving a JSON file, we're forcing the user to use the correct extension by passing the filetypes argument. It is a list with any number of 2-tuples (description, extension) that runs the logic of the dialog.
Here's how this dialog should look on Ubuntu:
Once we have chosen a place and a filename, we can proceed with the saving logic, which is the same as it was in the previous script. We create a JSON object from a Python dictionary (data) that we populate with key/value pairs made by the images name and Base64 encoded content.
In _save_json as well, we have a little check at the beginning that makes sure that we don't proceed unless we have a file name and at least one image to save.
This ensures that if the user presses the Cancel button, nothing bad happens.
Finally, let's see the alerting logic. It's extremely simple.
def _sb(msg):
_status_msg.set(msg)
def _alert(msg):
messagebox.showinfo(message=msg)That's it! To change the status bar message all we need to do is to access _status_msg StringVar, as it's tied to the _status label.
On the other hand, if we want to show the user a more visible message, we can fire up a message box. Here's how it should look on Ubuntu:
The messagebox object can also be used to warn the user (messagebox.showwarning) or to signal an error (messagebox.showerror). But it can also be used to provide dialogs that ask us if we're sure that we want to proceed or if we really want to delete that file, and so on.
If you inspect messagebox by simply printing out what dir(messagebox) returns, you'll find methods like askokcancel, askquestion, askretrycancel, askyesno, and askyesnocancel, as well as a set of constants to verify the response of the user, such as CANCEL, NO, OK, OKCANCEL, YES, YESNOCANCEL, and so on. You can compare these to the user's choice so that you know what the next action to execute when the dialog closes.
Now that you're accustomed to the fundamentals of designing a GUI application, I'd like to give you some suggestions on how to make ours better.
We can start from the code quality. Do you think this code is good enough, or would you improve it? If so, how? I would test it, and make sure it's robust and caters for all the various scenarios that a user might create by clicking around on the application. I would also make sure the behavior is what I would expect when the website we're scraping is down for any reason.
Another thing that we could improve is the naming. I have prudently named all the components with a leading underscore, both to highlight their somewhat "private" nature, and to avoid having name clashes with the underlying objects they are linked to. But in retrospect, many of those components could use a better name, so it's really up to you to refactor until you find the form that suits you best. You could start by giving a better name to the _sb function!
For what concerns the user interface, you could try and resize the main application. See what happens? The whole content stays exactly where it is. Empty space is added if you expand, or the whole widgets set disappears gradually if you shrink. This behavior isn't exactly nice, therefore one quick solution could be to make the root window fixed (that is, unable to resize).
Another thing that you could do to improve the application is to add the same functionality we had in the script, to save only PNGs or JPGs. In order to do this, you could place a combo box somewhere, with three values: All, PNGs, JPGs, or something similar. The user should be able to select one of those options before saving the files.
Even better, you could change the declaration of Listbox so that it's possible to select multiple images at the same time, and only the selected ones will be saved. If you manage to do this (it's not as hard as it seems, believe me), then you should consider presenting the Listbox a bit better, maybe providing alternating background colors for the rows.
Another nice thing you could add is a button that opens up a dialog to select a file. The file must be one of the JSON files the application can produce. Once selected, you could run some logic to reconstruct the images from their Base64-encoded version. The logic to do this is very simple, so here's an example:
with open('images.json', 'r') as f:
data = json.loads(f.read())
for (name, b64val) in data.items():
with open(name, 'wb') as f:
f.write(base64.b64decode(b64val))As you can see, we need to open images.json in read mode, and grab the data dictionary. Once we have it, we can loop through its items, and save each image with the Base64 decoded content. I'll leave it up to you to tie this logic to a button in the application.
Another cool feature that you could add is the ability to open up a preview pane that shows any image you select from the Listbox, so that the user can take a peek at the images before deciding to save them.
Finally, one last suggestion for this application is to add a menu. Maybe even a simple menu with File and ? to provide the usual Help or About. Just for fun. Adding menus is not that complicated; you can add text, keyboard shortcuts, images, and so on.
Fetching the web page
config = {}
def fetch_url():
url = _url.get()
config['images'] = []
_images.set(()) # initialized as an empty tuple
try:
page = requests.get(url)
except requests.RequestException as rex:
_sb(str(rex))
else:
soup = BeautifulSoup(page.content, 'html.parser')
images = fetch_images(soup, url)
if images:
_images.set(tuple(img['name'] for img in images))
_sb('Images found: {}'.format(len(images)))
else:
_sb('No images found')
config['images'] = images
def fetch_images(soup, base_url):
images = []
for img in soup.findAll('img'):
src = img.get('src')
img_url = (
'{base_url}/{src}'.format(base_url=base_url, src=src))
name = img_url.split('/')[-1]
images.append(dict(name=name, url=img_url))
return imagesFirst of all, let me explain that config dictionary. We need some way of passing data between the GUI application and the business logic. Now, instead of polluting the global namespace with many different variables, my personal preference is to have a single dictionary that holds all the objects we need to pass back and forth, so that the global namespace isn't be clogged up with all those names, and we have one single, clean, easy way of knowing where all the objects that are needed by our application are.
In this simple example, we'll just populate the config dictionary with the images we fetch from the page, but I wanted to show you the technique so that you have at least an example. This technique comes from my experience with JavaScript. When you code a web page, you very often import several different libraries. If each of these cluttered the global namespace with all sorts of variables, there would be severe issues in making everything work, because of name clashes and variable overriding. They make the coder's life a living hell.
So, it's much better to try and leave the global namespace as clean as we can. In this case, I find that using one config variable is more than acceptable.
The fetch_url function is quite similar to what we did in the script. Firstly, we get the url value by calling _url.get(). Remember that the _url object is a StringVar instance that is tied to the _url_entry object, which is an Entry. The text field you see on the GUI is the Entry, but the text behind the scenes is the value of the StringVar object.
By calling get() on _url, we get the value of the text which is displayed in _url_entry.
The next step is to prepare config['images'] to be an empty list, and to empty the _images variable, which is tied to _img_listbox. This, of course, has the effect of cleaning up all the items in _img_listbox.
After this preparation step, we can try to fetch the page, using the same try/except logic we adopted in the script at the beginning of the chapter.
The one difference is in the action we take if things go wrong. We call _sb(str(rex)). _sb is a helper function whose code we'll see shortly. Basically, it sets the text in the status bar for us. Not a good name, right? I had to explain its behavior to you: food for thought.
If we can fetch the page, then we create the soup instance, and fetch the images from it. The logic of fetch_images is exactly the same as the one explained before, so I won't repeat myself here.
If we have images, using a quick tuple comprehension (which is actually a generator expression fed to a tuple constructor) we feed the _images StringVar and this has the effect of populating our _img_listbox with all the image names. Finally, we update the status bar.
If there were no images, we still update the status bar, and at the end of the function, regardless of how many images were found, we update config['images'] to hold the images list. In this way, we'll be able to access the images from other functions by inspecting config['images'] without having to pass that list around.
The logic to save the images is pretty straightforward. Here it is:
def save():
if not config.get('images'):
_alert('No images to save')
return
if _save_method.get() == 'img':
dirname = filedialog.askdirectory(mustexist=True)
_save_images(dirname)
else:
filename = filedialog.asksaveasfilename(
initialfile='images.json',
filetypes=[('JSON', '.json')])
_save_json(filename)
def _save_images(dirname):
if dirname and config.get('images'):
for img in config['images']:
img_data = requests.get(img['url']).content
filename = os.path.join(dirname, img['name'])
with open(filename, 'wb') as f:
f.write(img_data)
_alert('Done')
def _save_json(filename):
if filename and config.get('images'):
data = {}
for img in config['images']:
img_data = requests.get(img['url']).content
b64_img_data = base64.b64encode(img_data)
str_img_data = b64_img_data.decode('utf-8')
data[img['name']] = str_img_data
with open(filename, 'w') as ijson:
ijson.write(json.dumps(data))
_alert('Done')When the user clicks the Scrape button, the save function is called using the callback mechanism.
The first thing that this function does is check whether there are actually any images to be saved. If not, it alerts the user about it, using another helper function, _alert, whose code we'll see shortly. No further action is performed if there are no images.
On the other hand, if the config['images'] list is not empty, save acts as a dispatcher, and it calls _save_images or _save_json, according to which value is held by _same_method. Remember, this variable is tied to the radio buttons, therefore we expect its value to be either 'img' or 'json'.
This dispatcher is a bit different from the one in the script. According to which method we have selected, a different action must be taken.
If we want to save the images as images, we need to ask the user to choose a directory. We do this by calling filedialog.askdirectory and assigning the result of the call to the variable dirname. This opens up a nice dialog window that asks us to choose a directory. The directory we choose must exist, as specified by the way we call the method. This is done so that we don't have to write code to deal with a potentially missing directory when saving the files.
Here's how this dialog should look on Ubuntu:
If we cancel the operation, dirname will be set to None.
Before finishing analyzing the logic in save, let's quickly go through _save_images.
It's very similar to the version we had in the script so just note that, at the beginning, in order to be sure that we actually have something to do, we check on both dirname and the presence of at least one image in config['images'].
If that's the case, it means we have at least one image to save and the path for it, so we can proceed. The logic to save the images has already been explained. The one thing we do differently this time is to join the directory (which means the complete path) to the image name, by means of os.path.join. In the os.path module there's plenty of useful methods to work with paths and filenames.
At the end of _save_images, if we saved at least one image, we alert the user that we're done.
Let's go back now to the other branch in save. This branch is executed when the user selects the As JSON radio button before pressing the Scrape button. In this case, we want to save a file; therefore, we cannot just ask for a directory. We want to give the user the ability to choose a filename as well. Hence, we fire up a different dialog: filedialog.asksaveasfilename.
We pass an initial filename, which is proposed to the user with the ability to change it if they don't like it. Moreover, because we're saving a JSON file, we're forcing the user to use the correct extension by passing the filetypes argument. It is a list with any number of 2-tuples (description, extension) that runs the logic of the dialog.
Here's how this dialog should look on Ubuntu:
Once we have chosen a place and a filename, we can proceed with the saving logic, which is the same as it was in the previous script. We create a JSON object from a Python dictionary (data) that we populate with key/value pairs made by the images name and Base64 encoded content.
In _save_json as well, we have a little check at the beginning that makes sure that we don't proceed unless we have a file name and at least one image to save.
This ensures that if the user presses the Cancel button, nothing bad happens.
Finally, let's see the alerting logic. It's extremely simple.
def _sb(msg):
_status_msg.set(msg)
def _alert(msg):
messagebox.showinfo(message=msg)That's it! To change the status bar message all we need to do is to access _status_msg StringVar, as it's tied to the _status label.
On the other hand, if we want to show the user a more visible message, we can fire up a message box. Here's how it should look on Ubuntu:
The messagebox object can also be used to warn the user (messagebox.showwarning) or to signal an error (messagebox.showerror). But it can also be used to provide dialogs that ask us if we're sure that we want to proceed or if we really want to delete that file, and so on.
If you inspect messagebox by simply printing out what dir(messagebox) returns, you'll find methods like askokcancel, askquestion, askretrycancel, askyesno, and askyesnocancel, as well as a set of constants to verify the response of the user, such as CANCEL, NO, OK, OKCANCEL, YES, YESNOCANCEL, and so on. You can compare these to the user's choice so that you know what the next action to execute when the dialog closes.
Now that you're accustomed to the fundamentals of designing a GUI application, I'd like to give you some suggestions on how to make ours better.
We can start from the code quality. Do you think this code is good enough, or would you improve it? If so, how? I would test it, and make sure it's robust and caters for all the various scenarios that a user might create by clicking around on the application. I would also make sure the behavior is what I would expect when the website we're scraping is down for any reason.
Another thing that we could improve is the naming. I have prudently named all the components with a leading underscore, both to highlight their somewhat "private" nature, and to avoid having name clashes with the underlying objects they are linked to. But in retrospect, many of those components could use a better name, so it's really up to you to refactor until you find the form that suits you best. You could start by giving a better name to the _sb function!
For what concerns the user interface, you could try and resize the main application. See what happens? The whole content stays exactly where it is. Empty space is added if you expand, or the whole widgets set disappears gradually if you shrink. This behavior isn't exactly nice, therefore one quick solution could be to make the root window fixed (that is, unable to resize).
Another thing that you could do to improve the application is to add the same functionality we had in the script, to save only PNGs or JPGs. In order to do this, you could place a combo box somewhere, with three values: All, PNGs, JPGs, or something similar. The user should be able to select one of those options before saving the files.
Even better, you could change the declaration of Listbox so that it's possible to select multiple images at the same time, and only the selected ones will be saved. If you manage to do this (it's not as hard as it seems, believe me), then you should consider presenting the Listbox a bit better, maybe providing alternating background colors for the rows.
Another nice thing you could add is a button that opens up a dialog to select a file. The file must be one of the JSON files the application can produce. Once selected, you could run some logic to reconstruct the images from their Base64-encoded version. The logic to do this is very simple, so here's an example:
with open('images.json', 'r') as f:
data = json.loads(f.read())
for (name, b64val) in data.items():
with open(name, 'wb') as f:
f.write(base64.b64decode(b64val))As you can see, we need to open images.json in read mode, and grab the data dictionary. Once we have it, we can loop through its items, and save each image with the Base64 decoded content. I'll leave it up to you to tie this logic to a button in the application.
Another cool feature that you could add is the ability to open up a preview pane that shows any image you select from the Listbox, so that the user can take a peek at the images before deciding to save them.
Finally, one last suggestion for this application is to add a menu. Maybe even a simple menu with File and ? to provide the usual Help or About. Just for fun. Adding menus is not that complicated; you can add text, keyboard shortcuts, images, and so on.
Saving the images
The logic to save the images is pretty straightforward. Here it is:
def save():
if not config.get('images'):
_alert('No images to save')
return
if _save_method.get() == 'img':
dirname = filedialog.askdirectory(mustexist=True)
_save_images(dirname)
else:
filename = filedialog.asksaveasfilename(
initialfile='images.json',
filetypes=[('JSON', '.json')])
_save_json(filename)
def _save_images(dirname):
if dirname and config.get('images'):
for img in config['images']:
img_data = requests.get(img['url']).content
filename = os.path.join(dirname, img['name'])
with open(filename, 'wb') as f:
f.write(img_data)
_alert('Done')
def _save_json(filename):
if filename and config.get('images'):
data = {}
for img in config['images']:
img_data = requests.get(img['url']).content
b64_img_data = base64.b64encode(img_data)
str_img_data = b64_img_data.decode('utf-8')
data[img['name']] = str_img_data
with open(filename, 'w') as ijson:
ijson.write(json.dumps(data))
_alert('Done')When the user clicks the Scrape button, the save function is called using the callback mechanism.
The first thing that this function does is check whether there are actually any images to be saved. If not, it alerts the user about it, using another helper function, _alert, whose code we'll see shortly. No further action is performed if there are no images.
On the other hand, if the config['images'] list is not empty, save acts as a dispatcher, and it calls _save_images or _save_json, according to which value is held by _same_method. Remember, this variable is tied to the radio buttons, therefore we expect its value to be either 'img' or 'json'.
This dispatcher is a bit different from the one in the script. According to which method we have selected, a different action must be taken.
If we want to save the images as images, we need to ask the user to choose a directory. We do this by calling filedialog.askdirectory and assigning the result of the call to the variable dirname. This opens up a nice dialog window that asks us to choose a directory. The directory we choose must exist, as specified by the way we call the method. This is done so that we don't have to write code to deal with a potentially missing directory when saving the files.
Here's how this dialog should look on Ubuntu:
If we cancel the operation, dirname will be set to None.
Before finishing analyzing the logic in save, let's quickly go through _save_images.
It's very similar to the version we had in the script so just note that, at the beginning, in order to be sure that we actually have something to do, we check on both dirname and the presence of at least one image in config['images'].
If that's the case, it means we have at least one image to save and the path for it, so we can proceed. The logic to save the images has already been explained. The one thing we do differently this time is to join the directory (which means the complete path) to the image name, by means of os.path.join. In the os.path module there's plenty of useful methods to work with paths and filenames.
At the end of _save_images, if we saved at least one image, we alert the user that we're done.
Let's go back now to the other branch in save. This branch is executed when the user selects the As JSON radio button before pressing the Scrape button. In this case, we want to save a file; therefore, we cannot just ask for a directory. We want to give the user the ability to choose a filename as well. Hence, we fire up a different dialog: filedialog.asksaveasfilename.
We pass an initial filename, which is proposed to the user with the ability to change it if they don't like it. Moreover, because we're saving a JSON file, we're forcing the user to use the correct extension by passing the filetypes argument. It is a list with any number of 2-tuples (description, extension) that runs the logic of the dialog.
Here's how this dialog should look on Ubuntu:
Once we have chosen a place and a filename, we can proceed with the saving logic, which is the same as it was in the previous script. We create a JSON object from a Python dictionary (data) that we populate with key/value pairs made by the images name and Base64 encoded content.
In _save_json as well, we have a little check at the beginning that makes sure that we don't proceed unless we have a file name and at least one image to save.
This ensures that if the user presses the Cancel button, nothing bad happens.
Finally, let's see the alerting logic. It's extremely simple.
def _sb(msg):
_status_msg.set(msg)
def _alert(msg):
messagebox.showinfo(message=msg)That's it! To change the status bar message all we need to do is to access _status_msg StringVar, as it's tied to the _status label.
On the other hand, if we want to show the user a more visible message, we can fire up a message box. Here's how it should look on Ubuntu:
The messagebox object can also be used to warn the user (messagebox.showwarning) or to signal an error (messagebox.showerror). But it can also be used to provide dialogs that ask us if we're sure that we want to proceed or if we really want to delete that file, and so on.
If you inspect messagebox by simply printing out what dir(messagebox) returns, you'll find methods like askokcancel, askquestion, askretrycancel, askyesno, and askyesnocancel, as well as a set of constants to verify the response of the user, such as CANCEL, NO, OK, OKCANCEL, YES, YESNOCANCEL, and so on. You can compare these to the user's choice so that you know what the next action to execute when the dialog closes.
Now that you're accustomed to the fundamentals of designing a GUI application, I'd like to give you some suggestions on how to make ours better.
We can start from the code quality. Do you think this code is good enough, or would you improve it? If so, how? I would test it, and make sure it's robust and caters for all the various scenarios that a user might create by clicking around on the application. I would also make sure the behavior is what I would expect when the website we're scraping is down for any reason.
Another thing that we could improve is the naming. I have prudently named all the components with a leading underscore, both to highlight their somewhat "private" nature, and to avoid having name clashes with the underlying objects they are linked to. But in retrospect, many of those components could use a better name, so it's really up to you to refactor until you find the form that suits you best. You could start by giving a better name to the _sb function!
For what concerns the user interface, you could try and resize the main application. See what happens? The whole content stays exactly where it is. Empty space is added if you expand, or the whole widgets set disappears gradually if you shrink. This behavior isn't exactly nice, therefore one quick solution could be to make the root window fixed (that is, unable to resize).
Another thing that you could do to improve the application is to add the same functionality we had in the script, to save only PNGs or JPGs. In order to do this, you could place a combo box somewhere, with three values: All, PNGs, JPGs, or something similar. The user should be able to select one of those options before saving the files.
Even better, you could change the declaration of Listbox so that it's possible to select multiple images at the same time, and only the selected ones will be saved. If you manage to do this (it's not as hard as it seems, believe me), then you should consider presenting the Listbox a bit better, maybe providing alternating background colors for the rows.
Another nice thing you could add is a button that opens up a dialog to select a file. The file must be one of the JSON files the application can produce. Once selected, you could run some logic to reconstruct the images from their Base64-encoded version. The logic to do this is very simple, so here's an example:
with open('images.json', 'r') as f:
data = json.loads(f.read())
for (name, b64val) in data.items():
with open(name, 'wb') as f:
f.write(base64.b64decode(b64val))As you can see, we need to open images.json in read mode, and grab the data dictionary. Once we have it, we can loop through its items, and save each image with the Base64 decoded content. I'll leave it up to you to tie this logic to a button in the application.
Another cool feature that you could add is the ability to open up a preview pane that shows any image you select from the Listbox, so that the user can take a peek at the images before deciding to save them.
Finally, one last suggestion for this application is to add a menu. Maybe even a simple menu with File and ? to provide the usual Help or About. Just for fun. Adding menus is not that complicated; you can add text, keyboard shortcuts, images, and so on.
Alerting the user
Finally, let's see the alerting logic. It's extremely simple.
def _sb(msg):
_status_msg.set(msg)
def _alert(msg):
messagebox.showinfo(message=msg)That's it! To change the status bar message all we need to do is to access _status_msg StringVar, as it's tied to the _status label.
On the other hand, if we want to show the user a more visible message, we can fire up a message box. Here's how it should look on Ubuntu:
The messagebox object can also be used to warn the user (messagebox.showwarning) or to signal an error (messagebox.showerror). But it can also be used to provide dialogs that ask us if we're sure that we want to proceed or if we really want to delete that file, and so on.
If you inspect messagebox by simply printing out what dir(messagebox) returns, you'll find methods like askokcancel, askquestion, askretrycancel, askyesno, and askyesnocancel, as well as a set of constants to verify the response of the user, such as CANCEL, NO, OK, OKCANCEL, YES, YESNOCANCEL, and so on. You can compare these to the user's choice so that you know what the next action to execute when the dialog closes.
Now that you're accustomed to the fundamentals of designing a GUI application, I'd like to give you some suggestions on how to make ours better.
We can start from the code quality. Do you think this code is good enough, or would you improve it? If so, how? I would test it, and make sure it's robust and caters for all the various scenarios that a user might create by clicking around on the application. I would also make sure the behavior is what I would expect when the website we're scraping is down for any reason.
Another thing that we could improve is the naming. I have prudently named all the components with a leading underscore, both to highlight their somewhat "private" nature, and to avoid having name clashes with the underlying objects they are linked to. But in retrospect, many of those components could use a better name, so it's really up to you to refactor until you find the form that suits you best. You could start by giving a better name to the _sb function!
For what concerns the user interface, you could try and resize the main application. See what happens? The whole content stays exactly where it is. Empty space is added if you expand, or the whole widgets set disappears gradually if you shrink. This behavior isn't exactly nice, therefore one quick solution could be to make the root window fixed (that is, unable to resize).
Another thing that you could do to improve the application is to add the same functionality we had in the script, to save only PNGs or JPGs. In order to do this, you could place a combo box somewhere, with three values: All, PNGs, JPGs, or something similar. The user should be able to select one of those options before saving the files.
Even better, you could change the declaration of Listbox so that it's possible to select multiple images at the same time, and only the selected ones will be saved. If you manage to do this (it's not as hard as it seems, believe me), then you should consider presenting the Listbox a bit better, maybe providing alternating background colors for the rows.
Another nice thing you could add is a button that opens up a dialog to select a file. The file must be one of the JSON files the application can produce. Once selected, you could run some logic to reconstruct the images from their Base64-encoded version. The logic to do this is very simple, so here's an example:
with open('images.json', 'r') as f:
data = json.loads(f.read())
for (name, b64val) in data.items():
with open(name, 'wb') as f:
f.write(base64.b64decode(b64val))As you can see, we need to open images.json in read mode, and grab the data dictionary. Once we have it, we can loop through its items, and save each image with the Base64 decoded content. I'll leave it up to you to tie this logic to a button in the application.
Another cool feature that you could add is the ability to open up a preview pane that shows any image you select from the Listbox, so that the user can take a peek at the images before deciding to save them.
Finally, one last suggestion for this application is to add a menu. Maybe even a simple menu with File and ? to provide the usual Help or About. Just for fun. Adding menus is not that complicated; you can add text, keyboard shortcuts, images, and so on.
How to improve the application?
Now that you're accustomed to the fundamentals of designing a GUI application, I'd like to give you some suggestions on how to make ours better.
We can start from the code quality. Do you think this code is good enough, or would you improve it? If so, how? I would test it, and make sure it's robust and caters for all the various scenarios that a user might create by clicking around on the application. I would also make sure the behavior is what I would expect when the website we're scraping is down for any reason.
Another thing that we could improve is the naming. I have prudently named all the components with a leading underscore, both to highlight their somewhat "private" nature, and to avoid having name clashes with the underlying objects they are linked to. But in retrospect, many of those components could use a better name, so it's really up to you to refactor until you find the form that suits you best. You could start by giving a better name to the _sb function!
For what concerns the user interface, you could try and resize the main application. See what happens? The whole content stays exactly where it is. Empty space is added if you expand, or the whole widgets set disappears gradually if you shrink. This behavior isn't exactly nice, therefore one quick solution could be to make the root window fixed (that is, unable to resize).
Another thing that you could do to improve the application is to add the same functionality we had in the script, to save only PNGs or JPGs. In order to do this, you could place a combo box somewhere, with three values: All, PNGs, JPGs, or something similar. The user should be able to select one of those options before saving the files.
Even better, you could change the declaration of Listbox so that it's possible to select multiple images at the same time, and only the selected ones will be saved. If you manage to do this (it's not as hard as it seems, believe me), then you should consider presenting the Listbox a bit better, maybe providing alternating background colors for the rows.
Another nice thing you could add is a button that opens up a dialog to select a file. The file must be one of the JSON files the application can produce. Once selected, you could run some logic to reconstruct the images from their Base64-encoded version. The logic to do this is very simple, so here's an example:
with open('images.json', 'r') as f:
data = json.loads(f.read())
for (name, b64val) in data.items():
with open(name, 'wb') as f:
f.write(base64.b64decode(b64val))As you can see, we need to open images.json in read mode, and grab the data dictionary. Once we have it, we can loop through its items, and save each image with the Base64 decoded content. I'll leave it up to you to tie this logic to a button in the application.
Another cool feature that you could add is the ability to open up a preview pane that shows any image you select from the Listbox, so that the user can take a peek at the images before deciding to save them.
Finally, one last suggestion for this application is to add a menu. Maybe even a simple menu with File and ? to provide the usual Help or About. Just for fun. Adding menus is not that complicated; you can add text, keyboard shortcuts, images, and so on.
If you are interested in digging deeper into the world of GUIs, then I'd like to offer you the following suggestions.
Exploring tkinter and its themed widget set, tkinter.ttk, will take you some time. There's much to learn and play with. Another interesting module to explore, when you'll be familiar with this technology, is tkinter.tix.
The tkinter.tix (Tk Interface Extension) module provides an additional very rich set of widgets. The need for them stems from the fact that the widgets in the standard Tk library are far from complete.
The tkinter.tix library allows us to solve this problem by providing widgets like HList, ComboBox, Control (or SpinBox), and various scrollable widgets. Altogether, there are more than 40 widgets. They allow you to introduce different interaction techniques and paradigms into your applications, thus improving their quality and usability.
The turtle module is an extended reimplementation of the eponymous module from the Python standard distribution up to version Python 2.5. It's a very popular way to introduce children to programming.
It's based on the idea of an imaginary turtle starting at (0, 0) in the Cartesian plane. You can programmatically command the turtle to move forward and backwards, rotate, and so on. and by combining together all the possible moves, all sorts of intricate shapes and images can be drawn.
It's definitely worth checking out, if only to see something different.
After you have explored the vastness of the tkinter realm, I'd suggest you to explore other GUI libraries: wxPython, PyQt, and PyGTK. You may find out one of these works better for you, or it makes easier for you to code the application you need.
I believe that coders can realize their ideas only when they are conscious about what tools they have available. If your toolset is too narrow, your ideas may seem impossible or extremely hard to realize, and they risk remaining exactly what they are, just ideas.
Of course, the technological spectrum today is humongous, so knowing everything is not possible; therefore, when you are about to learn a new technology or a new subject, my suggestion is to grow your knowledge by exploring breadth first.
Investigate several things not too deeply, and then go deep with the one or the few that looked most promising. This way you'll be able to be productive with at least one tool, and when the tool no longer fits your needs, you'll know where to dig deeper, thanks to your previous exploration.
When designing an interface, there are many different things to bear in mind. One of them, which for me is the most important, is the law or principle of least astonishment. It basically states that if in your design a necessary feature has a high astonishing factor, it may be necessary to redesign your application. To give you one example, when you're used to working with Windows, where the buttons to minimize, maximize and close a window are on the top-right corner, it's quite hard to work on Linux, where they are at the top-left corner. You'll find yourself constantly going to the top-right corner only to discover once more that the buttons are on the other side.
If a certain button has become so important in applications that it's now placed in a precise location by designers, please don't innovate. Just follow the convention. Users will only become frustrated when they have to waste time looking for a button that is not where it's supposed to be.
The disregard for this rule is the reason why I cannot work with products like Jira. It takes me minutes to do simple things that should require seconds.
This topic is beyond the scope of an introductory book like this, but I do want to mention it. In a nutshell, a thread of execution is the smallest sequence of programmed instructions that can be managed independently by a scheduler. The reason we have the perception that modern computers can do many things at the same time is not only due to the fact that they have multiple processors. They also subdivide the work in different threads, which are then worked on in sequence. If their lifecycle is sufficiently short, threads can be worked on in one single go, but typically, what happens is that the OS works on a thread for a little time, then switches to another one, then to another one, then back to the first one, and so on. The order in which they are worked on depends on different factors. The end result is that, because computers are extremely fast in doing this switching, we perceive many things happening at the same time.
If you are coding a GUI application that needs to perform a long running operation when a button is clicked, you will see that your application will probably freeze until the operation has been carried out. In order to avoid this, and maintain the application's responsiveness, you may need to run that time-expensive operation in a different thread so that the OS will be able to dedicate a little bit of time to the GUI every now and then, to keep it responsive.
Threads are an advanced topic, especially in Python. Gain a good grasp of the fundamentals first, and then have fun exploring them!
The tkinter.tix module
Exploring tkinter and its themed widget set, tkinter.ttk, will take you some time. There's much to learn and play with. Another interesting module to explore, when you'll be familiar with this technology, is tkinter.tix.
The tkinter.tix (Tk Interface Extension) module provides an additional very rich set of widgets. The need for them stems from the fact that the widgets in the standard Tk library are far from complete.
The tkinter.tix library allows us to solve this problem by providing widgets like HList, ComboBox, Control (or SpinBox), and various scrollable widgets. Altogether, there are more than 40 widgets. They allow you to introduce different interaction techniques and paradigms into your applications, thus improving their quality and usability.
The turtle module is an extended reimplementation of the eponymous module from the Python standard distribution up to version Python 2.5. It's a very popular way to introduce children to programming.
It's based on the idea of an imaginary turtle starting at (0, 0) in the Cartesian plane. You can programmatically command the turtle to move forward and backwards, rotate, and so on. and by combining together all the possible moves, all sorts of intricate shapes and images can be drawn.
It's definitely worth checking out, if only to see something different.
After you have explored the vastness of the tkinter realm, I'd suggest you to explore other GUI libraries: wxPython, PyQt, and PyGTK. You may find out one of these works better for you, or it makes easier for you to code the application you need.
I believe that coders can realize their ideas only when they are conscious about what tools they have available. If your toolset is too narrow, your ideas may seem impossible or extremely hard to realize, and they risk remaining exactly what they are, just ideas.
Of course, the technological spectrum today is humongous, so knowing everything is not possible; therefore, when you are about to learn a new technology or a new subject, my suggestion is to grow your knowledge by exploring breadth first.
Investigate several things not too deeply, and then go deep with the one or the few that looked most promising. This way you'll be able to be productive with at least one tool, and when the tool no longer fits your needs, you'll know where to dig deeper, thanks to your previous exploration.
When designing an interface, there are many different things to bear in mind. One of them, which for me is the most important, is the law or principle of least astonishment. It basically states that if in your design a necessary feature has a high astonishing factor, it may be necessary to redesign your application. To give you one example, when you're used to working with Windows, where the buttons to minimize, maximize and close a window are on the top-right corner, it's quite hard to work on Linux, where they are at the top-left corner. You'll find yourself constantly going to the top-right corner only to discover once more that the buttons are on the other side.
If a certain button has become so important in applications that it's now placed in a precise location by designers, please don't innovate. Just follow the convention. Users will only become frustrated when they have to waste time looking for a button that is not where it's supposed to be.
The disregard for this rule is the reason why I cannot work with products like Jira. It takes me minutes to do simple things that should require seconds.
This topic is beyond the scope of an introductory book like this, but I do want to mention it. In a nutshell, a thread of execution is the smallest sequence of programmed instructions that can be managed independently by a scheduler. The reason we have the perception that modern computers can do many things at the same time is not only due to the fact that they have multiple processors. They also subdivide the work in different threads, which are then worked on in sequence. If their lifecycle is sufficiently short, threads can be worked on in one single go, but typically, what happens is that the OS works on a thread for a little time, then switches to another one, then to another one, then back to the first one, and so on. The order in which they are worked on depends on different factors. The end result is that, because computers are extremely fast in doing this switching, we perceive many things happening at the same time.
If you are coding a GUI application that needs to perform a long running operation when a button is clicked, you will see that your application will probably freeze until the operation has been carried out. In order to avoid this, and maintain the application's responsiveness, you may need to run that time-expensive operation in a different thread so that the OS will be able to dedicate a little bit of time to the GUI every now and then, to keep it responsive.
Threads are an advanced topic, especially in Python. Gain a good grasp of the fundamentals first, and then have fun exploring them!
The turtle module
The turtle module is an extended reimplementation of the eponymous module from the Python standard distribution up to version Python 2.5. It's a very popular way to introduce children to programming.
It's based on the idea of an imaginary turtle starting at (0, 0) in the Cartesian plane. You can programmatically command the turtle to move forward and backwards, rotate, and so on. and by combining together all the possible moves, all sorts of intricate shapes and images can be drawn.
It's definitely worth checking out, if only to see something different.
After you have explored the vastness of the tkinter realm, I'd suggest you to explore other GUI libraries: wxPython, PyQt, and PyGTK. You may find out one of these works better for you, or it makes easier for you to code the application you need.
I believe that coders can realize their ideas only when they are conscious about what tools they have available. If your toolset is too narrow, your ideas may seem impossible or extremely hard to realize, and they risk remaining exactly what they are, just ideas.
Of course, the technological spectrum today is humongous, so knowing everything is not possible; therefore, when you are about to learn a new technology or a new subject, my suggestion is to grow your knowledge by exploring breadth first.
Investigate several things not too deeply, and then go deep with the one or the few that looked most promising. This way you'll be able to be productive with at least one tool, and when the tool no longer fits your needs, you'll know where to dig deeper, thanks to your previous exploration.
When designing an interface, there are many different things to bear in mind. One of them, which for me is the most important, is the law or principle of least astonishment. It basically states that if in your design a necessary feature has a high astonishing factor, it may be necessary to redesign your application. To give you one example, when you're used to working with Windows, where the buttons to minimize, maximize and close a window are on the top-right corner, it's quite hard to work on Linux, where they are at the top-left corner. You'll find yourself constantly going to the top-right corner only to discover once more that the buttons are on the other side.
If a certain button has become so important in applications that it's now placed in a precise location by designers, please don't innovate. Just follow the convention. Users will only become frustrated when they have to waste time looking for a button that is not where it's supposed to be.
The disregard for this rule is the reason why I cannot work with products like Jira. It takes me minutes to do simple things that should require seconds.
This topic is beyond the scope of an introductory book like this, but I do want to mention it. In a nutshell, a thread of execution is the smallest sequence of programmed instructions that can be managed independently by a scheduler. The reason we have the perception that modern computers can do many things at the same time is not only due to the fact that they have multiple processors. They also subdivide the work in different threads, which are then worked on in sequence. If their lifecycle is sufficiently short, threads can be worked on in one single go, but typically, what happens is that the OS works on a thread for a little time, then switches to another one, then to another one, then back to the first one, and so on. The order in which they are worked on depends on different factors. The end result is that, because computers are extremely fast in doing this switching, we perceive many things happening at the same time.
If you are coding a GUI application that needs to perform a long running operation when a button is clicked, you will see that your application will probably freeze until the operation has been carried out. In order to avoid this, and maintain the application's responsiveness, you may need to run that time-expensive operation in a different thread so that the OS will be able to dedicate a little bit of time to the GUI every now and then, to keep it responsive.
Threads are an advanced topic, especially in Python. Gain a good grasp of the fundamentals first, and then have fun exploring them!
wxPython, PyQt, and PyGTK
After you have explored the vastness of the tkinter realm, I'd suggest you to explore other GUI libraries: wxPython, PyQt, and PyGTK. You may find out one of these works better for you, or it makes easier for you to code the application you need.
I believe that coders can realize their ideas only when they are conscious about what tools they have available. If your toolset is too narrow, your ideas may seem impossible or extremely hard to realize, and they risk remaining exactly what they are, just ideas.
Of course, the technological spectrum today is humongous, so knowing everything is not possible; therefore, when you are about to learn a new technology or a new subject, my suggestion is to grow your knowledge by exploring breadth first.
Investigate several things not too deeply, and then go deep with the one or the few that looked most promising. This way you'll be able to be productive with at least one tool, and when the tool no longer fits your needs, you'll know where to dig deeper, thanks to your previous exploration.
When designing an interface, there are many different things to bear in mind. One of them, which for me is the most important, is the law or principle of least astonishment. It basically states that if in your design a necessary feature has a high astonishing factor, it may be necessary to redesign your application. To give you one example, when you're used to working with Windows, where the buttons to minimize, maximize and close a window are on the top-right corner, it's quite hard to work on Linux, where they are at the top-left corner. You'll find yourself constantly going to the top-right corner only to discover once more that the buttons are on the other side.
If a certain button has become so important in applications that it's now placed in a precise location by designers, please don't innovate. Just follow the convention. Users will only become frustrated when they have to waste time looking for a button that is not where it's supposed to be.
The disregard for this rule is the reason why I cannot work with products like Jira. It takes me minutes to do simple things that should require seconds.
This topic is beyond the scope of an introductory book like this, but I do want to mention it. In a nutshell, a thread of execution is the smallest sequence of programmed instructions that can be managed independently by a scheduler. The reason we have the perception that modern computers can do many things at the same time is not only due to the fact that they have multiple processors. They also subdivide the work in different threads, which are then worked on in sequence. If their lifecycle is sufficiently short, threads can be worked on in one single go, but typically, what happens is that the OS works on a thread for a little time, then switches to another one, then to another one, then back to the first one, and so on. The order in which they are worked on depends on different factors. The end result is that, because computers are extremely fast in doing this switching, we perceive many things happening at the same time.
If you are coding a GUI application that needs to perform a long running operation when a button is clicked, you will see that your application will probably freeze until the operation has been carried out. In order to avoid this, and maintain the application's responsiveness, you may need to run that time-expensive operation in a different thread so that the OS will be able to dedicate a little bit of time to the GUI every now and then, to keep it responsive.
Threads are an advanced topic, especially in Python. Gain a good grasp of the fundamentals first, and then have fun exploring them!
The principle of least astonishment
When designing an interface, there are many different things to bear in mind. One of them, which for me is the most important, is the law or principle of least astonishment. It basically states that if in your design a necessary feature has a high astonishing factor, it may be necessary to redesign your application. To give you one example, when you're used to working with Windows, where the buttons to minimize, maximize and close a window are on the top-right corner, it's quite hard to work on Linux, where they are at the top-left corner. You'll find yourself constantly going to the top-right corner only to discover once more that the buttons are on the other side.
If a certain button has become so important in applications that it's now placed in a precise location by designers, please don't innovate. Just follow the convention. Users will only become frustrated when they have to waste time looking for a button that is not where it's supposed to be.
The disregard for this rule is the reason why I cannot work with products like Jira. It takes me minutes to do simple things that should require seconds.
This topic is beyond the scope of an introductory book like this, but I do want to mention it. In a nutshell, a thread of execution is the smallest sequence of programmed instructions that can be managed independently by a scheduler. The reason we have the perception that modern computers can do many things at the same time is not only due to the fact that they have multiple processors. They also subdivide the work in different threads, which are then worked on in sequence. If their lifecycle is sufficiently short, threads can be worked on in one single go, but typically, what happens is that the OS works on a thread for a little time, then switches to another one, then to another one, then back to the first one, and so on. The order in which they are worked on depends on different factors. The end result is that, because computers are extremely fast in doing this switching, we perceive many things happening at the same time.
If you are coding a GUI application that needs to perform a long running operation when a button is clicked, you will see that your application will probably freeze until the operation has been carried out. In order to avoid this, and maintain the application's responsiveness, you may need to run that time-expensive operation in a different thread so that the OS will be able to dedicate a little bit of time to the GUI every now and then, to keep it responsive.
Threads are an advanced topic, especially in Python. Gain a good grasp of the fundamentals first, and then have fun exploring them!
Threading considerations
This topic is beyond the scope of an introductory book like this, but I do want to mention it. In a nutshell, a thread of execution is the smallest sequence of programmed instructions that can be managed independently by a scheduler. The reason we have the perception that modern computers can do many things at the same time is not only due to the fact that they have multiple processors. They also subdivide the work in different threads, which are then worked on in sequence. If their lifecycle is sufficiently short, threads can be worked on in one single go, but typically, what happens is that the OS works on a thread for a little time, then switches to another one, then to another one, then back to the first one, and so on. The order in which they are worked on depends on different factors. The end result is that, because computers are extremely fast in doing this switching, we perceive many things happening at the same time.
If you are coding a GUI application that needs to perform a long running operation when a button is clicked, you will see that your application will probably freeze until the operation has been carried out. In order to avoid this, and maintain the application's responsiveness, you may need to run that time-expensive operation in a different thread so that the OS will be able to dedicate a little bit of time to the GUI every now and then, to keep it responsive.
Threads are an advanced topic, especially in Python. Gain a good grasp of the fundamentals first, and then have fun exploring them!
In this chapter, we worked on a project together. We have written a script that scrapes a very simple web page and accepts optional commands that alter its behavior in doing so. We also coded a GUI application to do the same thing by clicking buttons instead of typing on a console. I hope you enjoyed reading it and following along as much as I enjoyed writing it.
We saw many different concepts like context managers, working with files, performing HTTP requests, and we've talked about guidelines for usability and design.
I have only been able to scratch the surface, but hopefully, you have a good starting point from which to expand your exploration.
Throughout the chapter, I have pointed you in several different ways on how to improve the application, and I have challenged you with a few exercises and questions. I hope you have taken the time to play with those ideas. One can learn a lot just by playing around with fun applications like the one we've coded together.
In the next chapter, we're going to talk about data science, or at least about the tools that a Python programmer has when it comes to facing this subject.