Sign In Start Free Trial
Account

Add to playlist

Create a Playlist

Modal Close icon
You need to login to use this feature.
  • Book Overview & Buying .NET Standard 2.0 Cookbook
  • Table Of Contents Toc
  • Feedback & Rating feedback
.NET Standard 2.0 Cookbook

.NET Standard 2.0 Cookbook

By : Ismail
1 (1)
close
close
.NET Standard 2.0 Cookbook

.NET Standard 2.0 Cookbook

1 (1)
By: Ismail

Overview of this book

The .NET Standard is a standard that represents a set of APIs that all .NET platforms have to implement, making it easy for developers to access and use one common library for their development needs. This book begins with a quick refresher, helping you understand the mechanics of the new standard and offering insight into how it works. You’ll explore the core library concepts, such as working with collections, configurations, I/O, security, and multithreading. You’ll explore the iOS and Android libraries of Xamarin and we’ll guide you through creating a .NET Standard 2.0 library, which you’ll use with both Android and iOS applications. In the final chapters, you’ll learn the various debugging and diagnostics tools to deliver quality libraries and create a NuGet package of the .NET Standard 2.0 library. By the end of this book, you’ll be able to expand your current workflow to various .NET flavors and have the essential skills to create a .NET Standard 2.0 library from scratch to package and deliver it to the world.
Table of Contents (13 chapters)
close
close

Creating a classic Windows-based application to use the library

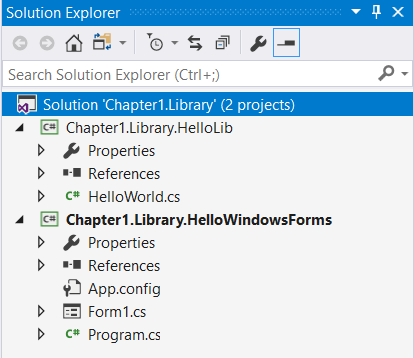
So far, from the previous recipe, we have created a blank solution and a class library that uses the full .NET Framework. In this recipe, let's create a classic Windows Forms application that uses the class library created in the previous recipe. We are going to build a Windows form that takes a name using a text box and a button, and that triggers the public method we have created in the class library. 

Getting ready

For this recipe, you will require the solution and the class you built in the previous recipe. Open Visual Studio 2017 and prepare for the project. Click Build | Build Solution, or press Ctrl + Shift + B, and the solution should build successfully. Everything's ready for testing our class library. 

How to do it...

  1. Open Visual Studio 2017.
  2. Now open the solution from the previous recipe. Click File | Open | Project/Solution, or press Ctrl + Shift + O, and select the Chapter1.Library solution. 
  3. Now click on the Chapter1.Library solution label. Click File | Add | New Project....
  4. In the Add New Project template dialog box, expand the Visual C# node in the left-hand pane. 
  5. Select Windows Classic Desktop and select Windows Forms App (.NET Framework) in the right template pane:
  1. Now, in the Name: textbox, type a name for the new project. Let's type Chapter1.Library.HelloWindowsForms and leave the Location: textbox as it is and the defaults as well. Click OK to create the new project.
  1. The new project will be added to the Solution Explorer and it should look like this: 
  1. Now let's do some cleaning of the names. Change Form1.cs to MainForm.cs. Remember, giving a meaningful name to your files is very important and a very good practice. 
  2. Select the Form in the MainForm [Design] tab and go to the Properties window (or press F4). Now change the Text property to Hello World
  1. Let's add some UI components to the form. Go to the tool box window (or press Ctrl + Alt + X ) and drag and drop a Label, a TextBox, and a Button to the form. Arrange them as per the following screenshot: 
  1. Let's change some properties of the components we just dropped on the form. Go to the Properties window and change the defaults to the following:
Component Property Value
Label Name NameLabel
Label Text Type your name
TextBox Name NameTextBox
Button Name HelloButton
Button Text Say Hello


After the changes, the Windows form designer should look like this: 

  1. Let's add our library to the Windows Forms project. To do this, expand References under the Chaper1.Library.HelloWindowsForms project. Right-click on the References label and select Add Reference....
  2. Under the Reference Manager dialog box, click on the Projects label in the left-hand pane. In the middle pane, check the Chapter1.Library.HelloLib project: 
  1. Click OK.
  2. Now double-click on the Say Hello button to open the code window. 
  3. In the code window, scroll to the top and type the following code, at the end of  the very last line of using directive:
      using Chapter1.Library.HelloLib;
  1. Now scroll down to the HelloButton_Click method. In between the curly brackets, type the following code: 
      var helloMessage = new HelloWorld();
var yourName = NameTextBox.Text;
MessageBox.Show(helloMessage.SayHello(yourName));
  1. Time to test our classic Windows application with the class library created in the previous recipe. Hit F5 to debug the code. Now you should see the Windows form created. 
  1. Type your name in the text box and hit the Say Hello button. A message box will appear with a message from the class library: 
  1. Congratulations!!! You have just used a class library from a classic Windows application. 

How it works...

If you have a closer look at the recipe we just completed, we have used a solution created from a previous recipe. In a real-world application, this is a day-to-day process. From steps 1 to 7, we opened an existing solution that contained the class library from the previous recipe and added a Classic Windows Forms application to the solution. 

In steps 8 to 11, we prepared the Windows Form projects. Proper naming of the components and files is good practice. Even though this is a small application, proper naming is a good discipline. Steps 12 to 14 are the most important steps in this recipe. In these steps, we have added our class library to the Windows project as a reference. Now you can access all the public methods given by the class library from your Windows application. 

In steps 15 to 17, we have added code to the button click event of HelloButton. Double-clicking on a component will get you to the C# code of the Windows form. Visual Studio will generate the code for you. In this case, it's the button click event. The default event of a component will vary depending on the component you have selected. In step 17, we created a variable to hold the instance of the HelloWorld class from the class library created. Then, we created another variable to hold the user input to the text box. The last line of code will call the HelloWorld.SayHello(string name) method with the string parameter supplied from the variable created in the previous line of code. Finally, a default message box will display the string returned from the SayHello(string name) method from the HelloWorld class. 

Step 19 will execute the default project, in this case, our Windows-based application. Sometimes, if the class library project is selected as the default project, Visual Studio will complain that you cannot execute this sort of project. So make sure you have selected the Windows project as the default startup project.

Visually different images
CONTINUE READING
83
Tech Concepts
36
Programming languages
73
Tech Tools
Icon Unlimited access to the largest independent learning library in tech of over 8,000 expert-authored tech books and videos.
Icon Innovative learning tools, including AI book assistants, code context explainers, and text-to-speech.
Icon 50+ new titles added per month and exclusive early access to books as they are being written.
.NET Standard 2.0 Cookbook
notes
bookmark Notes and Bookmarks search Search in title playlist Add to playlist font-size Font size

Change the font size

margin-width Margin width

Change margin width

day-mode Day/Sepia/Night Modes

Change background colour

Close icon Search
Country selected

Close icon Your notes and bookmarks

Confirmation

Modal Close icon
claim successful

Buy this book with your credits?

Modal Close icon
Are you sure you want to buy this book with one of your credits?
Close
YES, BUY

Submit Your Feedback

Modal Close icon
Modal Close icon
Modal Close icon