
So far, from the previous recipe, we have created a blank solution and a class library that uses the full .NET Framework. In this recipe, let's create a classic Windows Forms application that uses the class library created in the previous recipe. We are going to build a Windows form that takes a name using a text box and a button, and that triggers the public method we have created in the class library.
For this recipe, you will require the solution and the class you built in the previous recipe. Open Visual Studio 2017 and prepare for the project. Click Build | Build Solution, or press Ctrl + Shift + B, and the solution should build successfully. Everything's ready for testing our class library.
- Open Visual Studio 2017.
- Now open the solution from the previous recipe. Click
File|Open|Project/Solution, or press Ctrl + Shift + O, and select theChapter1.Librarysolution. - Now click on the
Chapter1.Librarysolution label. ClickFile|Add|New Project.... - In the
Add New Projecttemplate dialog box, expand theVisual C#node in the left-hand pane. - Select
Windows Classic Desktopand selectWindows Forms App (.NET Framework)in the right template pane:

- Now, in the
Name:textbox, type a name for the new project. Let's typeChapter1.Library.HelloWindowsFormsand leave theLocation:textbox as it is and the defaults as well. ClickOKto create the new project.


- Now let's do some cleaning of the names. Change
Form1.cstoMainForm.cs. Remember, giving a meaningful name to your files is very important and a very good practice. - Select the Form in the
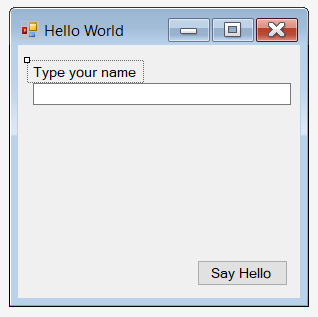
MainForm [Design]tab and go to thePropertieswindow (or press F4). Now change theTextproperty toHello World.
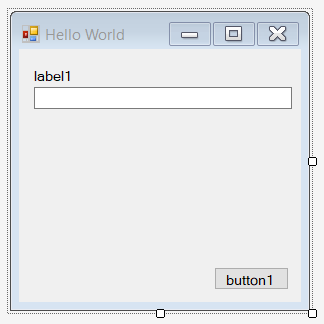
- Let's add some UI components to the form. Go to the tool box window (or press Ctrl + Alt + X ) and drag and drop a
Label, aTextBox, and aButtonto the form. Arrange them as per the following screenshot:
Component | Property | Value |
|
|
|
|
|
|
|
|
|
|
|
|
|
|
|
After the changes, the Windows form designer should look like this:
- Let's add our library to the Windows Forms project. To do this, expand
Referencesunder theChaper1.Library.HelloWindowsFormsproject. Right-click on theReferenceslabel and selectAdd Reference.... - Under the
Reference Managerdialog box, click on theProjectslabel in the left-hand pane. In the middle pane, check theChapter1.Library.HelloLibproject:

- Click
OK. - Now double-click on the
Say Hellobutton to open the code window. - In the code window, scroll to the top and type the following code, at the end of the very last line of
usingdirective:
using Chapter1.Library.HelloLib;
- Now scroll down to the
HelloButton_Clickmethod. In between the curly brackets, type the following code:
      var helloMessage = new HelloWorld();
      var yourName = NameTextBox.Text;
MessageBox.Show(helloMessage.SayHello(yourName));- Time to test our classic Windows application with the class library created in the previous recipe. Hit F5 to debug the code. Now you should see the Windows form created.

- Congratulations!!! You have just used a class library from a classic Windows application.
If you have a closer look at the recipe we just completed, we have used a solution created from a previous recipe. In a real-world application, this is a day-to-day process. From steps 1 to 7, we opened an existing solution that contained the class library from the previous recipe and added a Classic Windows Forms application to the solution.
In steps 8 to 11, we prepared the Windows Form projects. Proper naming of the components and files is good practice. Even though this is a small application, proper naming is a good discipline. Steps 12 to 14 are the most important steps in this recipe. In these steps, we have added our class library to the Windows project as a reference. Now you can access all the public methods given by the class library from your Windows application.
In steps 15 to 17, we have added code to the button click event of HelloButton. Double-clicking on a component will get you to the C# code of the Windows form. Visual Studio will generate the code for you. In this case, it's the button click event. The default event of a component will vary depending on the component you have selected. In step 17, we created a variable to hold the instance of the HelloWorld class from the class library created. Then, we created another variable to hold the user input to the text box. The last line of code will call the HelloWorld.SayHello(string name) method with the string parameter supplied from the variable created in the previous line of code. Finally, a default message box will display the string returned from the SayHello(string name) method from the HelloWorld class.
Step 19 will execute the default project, in this case, our Windows-based application. Sometimes, if the class library project is selected as the default project, Visual Studio will complain that you cannot execute this sort of project. So make sure you have selected the Windows project as the default startup project.