Book Image

Matplotlib 3.0 Cookbook

By : Srinivasa Rao Poladi, Nikhil Borkar
Book Image

Matplotlib 3.0 Cookbook

By: Srinivasa Rao Poladi, Nikhil Borkar

Overview of this book

Matplotlib provides a large library of customizable plots, along with a comprehensive set of backends. Matplotlib 3.0 Cookbook is your hands-on guide to exploring the world of Matplotlib, and covers the most effective plotting packages for Python 3.7. With the help of this cookbook, you'll be able to tackle any problem you might come across while designing attractive, insightful data visualizations. With the help of over 150 recipes, you'll learn how to develop plots related to business intelligence, data science, and engineering disciplines with highly detailed visualizations. Once you've familiarized yourself with the fundamentals, you'll move on to developing professional dashboards with a wide variety of graphs and sophisticated grid layouts in 2D and 3D. You'll annotate and add rich text to the plots, enabling the creation of a business storyline. In addition to this, you'll learn how to save figures and animations in various formats for downstream deployment, followed by extending the functionality offered by various internal and third-party toolkits, such as axisartist, axes_grid, Cartopy, and Seaborn. By the end of this book, you'll be able to create high-quality customized plots and deploy them on the web and on supported GUI applications such as Tkinter, Qt 5, and wxPython by implementing real-world use cases and examples.
Table of Contents (17 chapters)

Reading from external files and plotting

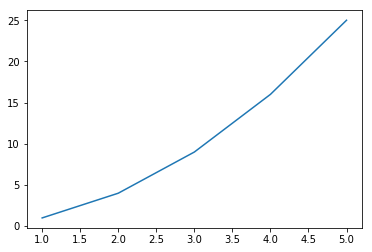
By default, Matplotlib accepts input data as a Python list, NumPy array, or pandas DataFrame. So all external data needs to be read and converted to one of these formats before feeding it to Matplotlib for plotting the graph. From a performance perspective, NumPy format is more efficient, but for default labels, pandas format is convenient.

If the data is a .txt file, you can use NumPy function to read the data and put it in NumPy arrays. If the data is in .csv or .xlsx formats, you can use pandas to read the data. Here we will demonstrate how to read .txt, .csv, and .xlsx formats and then plot the graph.

Getting ready

Import the matplotlib.pyplot, numpy , and pandas packages that are required to read the input files:

  1. Import the pyplot library with the plt synonym:
import matplotlib.pyplot as plt
  1. Import the numpy library with the np synonym. The numpy library can manage n-dimensional arrays, supporting all mathematical operations on these arrays:
import numpy as np
  1. Import the pandas package with pd as a synonym:
import pandas as pd

How to do it...

We will follow the order of .txt, .csv, and .xlsx files, in three separate sections.

Reading from a .txt file

Here are some steps to follow:

  1. Read the text file into the txt variable:
txt = np.loadtxt('test.txt', delimiter = ',')
txt

Here is the explanation for the preceding code block:

  • The test.txt text file has 10 numbers separated by a comma, representing the x and y coordinates of five points (1, 1), (2, 4), (3, 9), (4, 16), and (5, 25) in a two-dimensional space.
  • The loadtxt() function loads text data into a NumPy array.

You should get the following output:

array([ 1., 1., 2., 4., 3., 9., 4., 16., 5., 25.])
  1. Convert the flat array into five points in 2D space:
txt = txt.reshape(5,2)
txt

After executing preceding code, you should see the following output:

array([[ 1., 1.], [ 2., 4.], [ 3., 9.], [ 4., 16.], [ 5., 25.]])
  1. Split the .txt variable into x and y axis co-ordinates:
x = txt[:,0]
y = txt[:,1]
print(x, y)

Here is the explanation for the preceding code block:

  • Separate the x and y axis points from the txt variable.
  • x is the first column in txt and y is the second column.
  • The Python indexing starts from 0.

After executing the preceding code, you should see the following output:

[ 1. 2. 3. 4. 5.] [ 1. 4. 9. 16. 25.]

Reading from a .csv file

The .csv file has a relational database structure of rows and columns, and the test.csv file has x, y co-ordinates for five points in 2D space. Each point is a row in the file, with two columns: x and y. The same NumPy loadtxt() function is used to load data:

x, y = np.loadtxt ('test.csv', unpack = True, usecols = (0,1), delimiter = ',')
print(x)
print(y)

On execution of the preceding code, you should see the following output:

[ 1. 2. 3. 4. 5.] [ 1. 4. 9. 16. 25.]

Reading from an .xlsx file

Now let's read the same data from an .xlsx file and create the x and y NumPy arrays. The .xlsx file format is not supported by the NumPy loadtxt() function. A Python data processing package, pandas can be used:

  1. Read the .xlsx file into pandas DataFrame. This file has the same five points in 2D space, each in a separate row with x, y columns:
df = pd.read_excel('test.xlsx', 'sheet', header=None)
  1. Convert the pandas DataFrame to a NumPy array:
data_array = np.array(df)
print(data_array)

You should see the following output:

[[ 1 1] [ 2 4] [ 3 9] [ 4 16] [ 5 25]]
  1. Now extract the x and y coordinates from the NumPy array:
x , y = data_array[:,0], data_array[:,1]
print(x,y)

You should see the following output:

[1 2 3 4 5] [ 1 4 9 16 25]

Plotting the graph

After reading the data from any of the three formats (.txt, .csv, .xlsx) and format it to x and y variables, then we plot the graph using these variables as follows:

plt.plot(x, y)

Display the graph on the screen:

plt.show()

The following is the output obtained:

How it works...

Depending on the format and the structure of the data, we will have to use the Python, NumPy, or pandas functions to read the data and reformat it into an appropriate structure that can be fed into the matplotlib.pyplot function. After that, follow the usual plotting instructions to plot the graph that you want.