This second edition of Angular for Enterprise-Ready Web Applications is updated with in-depth coverage of the evergreen Angular platform.
You’ll start by mastering Angular programming fundamentals. Using the Kanban method and GitHub tools, you’ll build great-looking apps with Angular Material and also leverage reactive programming patterns with RxJS, discover the flux pattern with NgRx, become familiar with automated testing, utilize continuous integration using CircleCI, and deploy your app to the cloud using Vercel Now and GCloud.
You will then learn how to design and develop line-of-business apps using router-first architecture with observable data anchors, demonstrated through oft-used recipes like master/detail views, and data tables with pagination and forms. Next, you’ll discover robust authentication and authorization design demonstrated via integration with Firebase, API documentation using Swagger, and API implementation using the MEAN stack.
Finally, you will learn about DevOps using Docker, build a highly available cloud infrastructure on AWS, capture user behavior with Google Analytics, and perform load testing. By the end of the book, you’ll be familiar with the entire gamut of modern web development and full-stack architecture, learning patterns and practices to be successful as an individual developer on the web or as a team in the enterprise.
The Angular CLI tool, ng, is an official Angular project to ensure that newly created Angular applications have a uniform architecture, following the best practices perfected by the community over time. This means that any Angular application you encounter going forward should have the same general shape.
Setting up your development directory
Setting up a dedicated dev directory is a lifesaver. Since all the data under this directory is backed up using GitHub, you can safely configure your antivirus, cloud sync, or backup software to ignore it. This helps significantly reduce CPU, disk, and network utilization. As a full-stack developer, you're likely to be multitasking a lot, so avoiding unnecessary activity has a net positive impact on performance, power, and data consumption daily, especially if your development environment is a laptop that is resource-starved or you wish to squeeze as much battery life as possible when you're on the move.
Creating a dev folder directly in the c:\ drive is very important on Windows. Earlier versions of Windows, or rather NTFS, can't handle file paths longer than 260 characters. This may seem adequate at first, but when you install npm packages in a folder structure that is already deep in the hierarchy, the node_modules folder structure can get deep enough to hit this limit very easily. With npm 3+, a new, flatter package installation strategy was introduced, which helps with npm-related issues, but being as close to the root folder as possible helps tremendously with any tool.
Create your dev folder using the following commands:
For Windows:
PS> mkdir c:\dev PS>cd c:\dev
For macOS:
$ mkdir ~/dev
$ cd ~/dev
In Unix-based operating systems, ~ (pronounced tilde) is a shortcut to the current user's home directory, which resides under /Users/your-user-name.
Now that your development directory is ready, let's start with generating your Angular application.
Generating your Angular application
The Angular CLI is an official Angular project to ensure that newly created Angular applications have a uniform architecture, following the best practices perfected by the community over time. This means that any Angular application you encounter going forward should have the same general shape. The Angular CLI goes beyond initial code generation; you'll use it frequently to create new components, directives, pipes, services, modules, and more. The Angular CLI also helps during development, with live-reloading features so that you can quickly see the results of your changes. The Angular CLI can also test, lint, and build optimized versions of your code for a production release. Furthermore, as new Angular versions are released, the Angular CLI helps you upgrade your code by automatically rewriting portions of it so that it remains compatible with potential breaking changes.
Installing the Angular CLI
The documentation at https://angular.io/guide/quickstart guides you on how to install @angular/cli as a global npm package. Do not do this. Over time, as the Angular CLI is upgraded, it is a constant irritant to have to keep the global and the in-project version in sync. If you don't, the tool complains endlessly. Additionally, if you are working on multiple projects, you end up with varying versions of the Angular CLI over time. As a result, your commands may not return the results you expect or the results your team members get.
The strategy detailed in the next section makes the initial configuration of your Angular project a bit more complicated than it needs to be; however, you'll more than make up for this pain if you have to return to a project a few months or a year later. In that case, you could use the version of the tool that you last used on the project, instead of some future version that may require upgrades that you're not willing to perform. In the next section, you'll use this best practice to initialize your Angular app.
Initializing your Angular app
The main way to initialize your app is by using the Angular CLI. Let's initialize the application for development using npx, which is already installed on your system from when you installed the latest version of Node LTS, from PowerShell/Terminal:
Under your dev folder, execute npx @angular/cli new local-weather-app
Select No, when asked Would you like to add Angular routing?
Select CSS, when asked Which stylesheet format would you like to use?
On your terminal, you should see a success message similar to this:
Your project folder—local-weather-app—has been initialized as a Git repository and scaffolded with the initial file and folder structure, which should look like this:
The alias for @angular/cli is ng. If you were to install the Angular CLI globally, you would execute ng new local-weather-app, but we didn't do this. So, it is essential to remember that, going forward, you execute the ng command, but this time under the local-weather-app directory. The latest version of the Angular CLI has been installed under the node_modules/.bin directory so that you can run ng commands such as npx ng generate component my-new-component and continue working efficiently.
If you are on macOS, you can further improve your development experience by implementing shell auto-fallback, which removes the necessity of having to use the npx command. If an unknown command is found, npx takes over the request. If the package already locally exists under node_modules/.bin, npx passes along your request to the correct binary. So, you can run commands like ng g c my-new-component as if they're globally installed. Refer to npx's readme on how to set this up, at npmjs.com/package/npx#shell-auto-fallback.
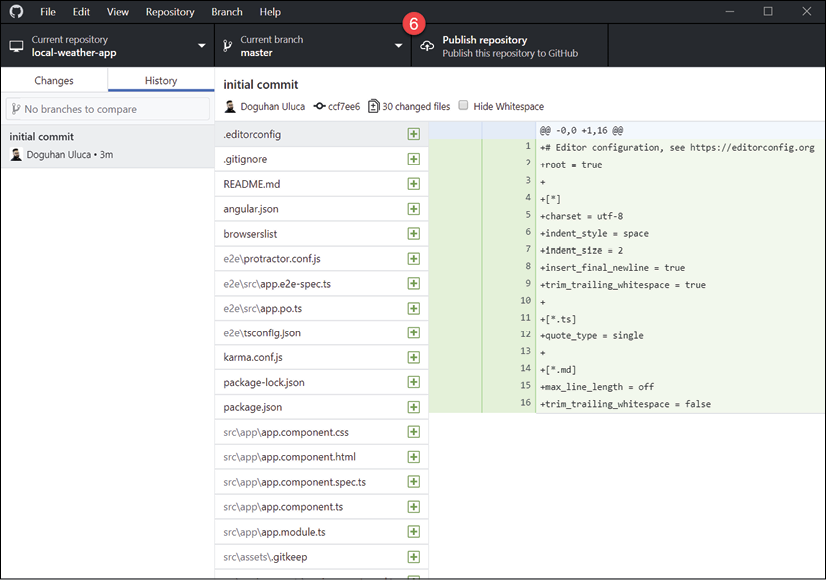
Publishing a Git repository using GitHub Desktop
GitHub Desktop allows you to create a new repository directly within the application:
Open GitHub for Desktop
File | Add local repository...
Locate the local-weather-app folder by clicking on Choose...
Click on Add repository
Note that the Angular CLI already created the first commit for you in the History tab
Finally, click on Publish repository, marked in the following screenshot as 6:
Figure 2.4: GitHub Desktop
Inspecting and updating package.json
Package.json is the single most important configuration file that you should be keenly aware of at all times. Your project's scripts, runtime, and development dependencies are stored in this file.
Open package.json and locate the name and version properties:
Rename your app to whatever you wish; I used localcast-weather
Set your version number to 1.0.0
npm uses semantic versioning (semver), where version number digits represent Major.Minor.Patch increments. Semver starts version numbers at 1.0.0 for any published API, though it doesn't prevent 0.x.x versioning. As the author of a web application, the versioning of your app has no real impact on you, outside of internal tooling, team, or company communication purposes. However, the versioning of your dependencies is critical to the reliability of your application. In summary, patch versions should just be bug fixes. Minor versions add functionality without breaking the existing features, and major version increments are free to make incompatible API changes. However, any update is risky to the tested behavior of your application. Therefore, the package-lock.json file stores the entire dependency tree of your application, so the exact state of your application can be replicated by other developers or CI servers. For more information, visit: https://semver.org/.
In the following code block, observe that the scripts property contains a collection of helpful starter scripts that you can expand on. The start and test commands are npm defaults, so they can just be executed by npm start or npm test. However, the other commands are custom commands that must be prepended with the run keyword. For example, in order to build your application, you must use npm run build:
Before the introduction of npx, if you wanted to use the Angular CLI without a global install, you would have to run it with npm run ng -- g c my-new-component. The double-dashes are needed to let npm know where the command-line tool name ends and the options begin. For example, in order to start your Angular application on a port other than the default 4200, you need to run npm start -- --port 5000.
Update your package.json file to run your development version of the app from a little-used port like 5000 as the new default behavior:
Under the dependencies property, you can observe your runtime dependencies. These are libraries that get packaged up alongside your code and shipped to the client browser. It's essential to keep this list to a minimum:
In the preceding example, all Angular components are on the same version. As you install additional Angular components or upgrade individual ones, it is advisable to keep all Angular packages on the same version. This is especially easy to do since npm doesn't require the --save option anymore to permanently update the package version. For example, just executing npm install @angular/router is sufficient to update the version in package.json. This is a positive change overall, since what you see in package.json matches what is actually installed. However, you must be careful, because npm also automatically updates package-lock.json, which propagates your, potentially unintended, changes to your team members.
Your development dependencies are stored under the devDependencies property. When installing new tools for your project, you must take care to append the command with --save-dev so that your dependency is correctly categorized. Dev dependencies are only used during development and not shipped to the client browser. You should familiarize yourself with every single one of these packages and their specific purpose. If you are unfamiliar with a package shown as we move on, your best resource to learn more about them is https://www.npmjs.com/:
The characters in front of the version numbers have specific meanings in semver:
The tilde, ~, enables tilde ranges when all three digits of the version number are defined, allowing patch version upgrades to be automatically applied
The up-caret character, ^, enables caret ranges, allowing minor version upgrades to be automatically applied
A lack of any character signals npm to install that exact version of the library on your machine
You may notice that major version upgrades aren't allowed to happen automatically. In general, updating packages can be risky. In order to ensure no package is updating without your explicit knowledge, you may install exact version packages by using npm's --save-exact option. Let's experiment with this behavior by installing an npm package that I published called dev-norms, a CLI tool that generates a markdown file with sensible default norms for your team to have a conversation about, as shown here:
Under the local-weather-app directory, execute npm install dev-norms --save-dev --save-exact. Note that "dev-norms": "1.7.0" or similar has been added to package.json with package-lock.json automatically updated to reflect the changes accordingly.
After the tool is installed, execute npx dev-norms create. A file named dev-norms.md has been created containing the developer norms mentioned previously.
Save your changes to package.json.
Working with stale packages comes with its risks. With npm 6, the npm audit command has been introduced to make you aware of any vulnerabilities discovered in packages you're using. During npm install, if you receive any vulnerability notices, you may execute npm audit to find out details about any potential risk.
In the next section, you'll commit the changes you have made to Git.
Committing code using VS Code
To commit your changes to Git and then synchronize your commits to GitHub, you can use VS Code:
Switch over to the Source Control pane, marked as 1 here:
Figure 2.5: Visual Studio Code Source Control pane
Enter a commit message in the box marked as 2
Click on the check-mark icon, marked as 3, to commit your changes
Finally, synchronize your changes with your GitHub repository by clicking on the refresh icon, marked as 4
If you have two-factor authentication enabled, as you should, GitHub may ask for your credentials. In this case, you need to create a personal access token. Follow the instructions below to get this done:
Ignore the GitHub authentication window, which presents you with VS Code's credential input bar
Enter your GitHub username, not your email
Paste in the token as your password
The sync should succeed, and subsequent syncs shouldn't prompt for a password
See the Git and Github Desktop section earlier in this chapter for a wider discussion of the various methods you can use to connect your Git client to GitHub.
Going forward, you can do most Git operations from within VS Code.
Running your Angular app
Run your Angular app to check whether it works. During development, you can execute npm start through the ng serve command; this action transpiles, packages, and serves the code on localhost with live-reloading enabled:
Execute npm start
Navigate to http://localhost:5000
You should see a rendered page similar to this:
Figure 2.6: Default Angular CLI landing page
Stop your application by pressing Ctrl + C in the integrated terminal
Congrats! You're ready to start developing your web application. If you ran into any trouble during your setup, see the next section on how you can verify your code against the sample project on GitHub.
Verifying your code
The most up-to-date versions of the sample code for the book are on GitHub at the repository linked following. The repository contains the final and completed state of the code. You can verify your progress at the end of a chapter by looking for the end-of-chapter snapshot of code under the projects folder.
Execute npm install on the root folder to install dependencies
The code sample for this chapter is under the sub-folder:
projects/ch2
To run the Angular app for this chapter, execute:
npx ng serve ch2
To run Angular Unit Tests for this chapter, execute:
npx ng test ch2 --watch=false
Beware that the source code in the book or on GitHub may not always match the code generated by Angular CLI. There may also be slight differences in implementation between the code in the book and what's on GitHub because the ecosystem is ever evolving. It is natural for the sample code to change over time. Also on GitHub, expect to find corrections, fixes to support newer versions of libraries, or side-by-side implementations of multiple techniques for the reader to observe. The reader is only expected to implement the ideal solution recommended in the book. If you find errors or have questions, please create an issue or submit a pull request on GitHub for the benefit of all readers.
In the next section, I'll cover how you can optimize VS Code for Angular for the best possible development experience.
Read this chapter and the full book FREE of cost - No Credit card required!
Plus access over 9,000 other expert tech books and videos just by signing up - No commitment!
CONTINUE READING
83
Tech Concepts
36
Programming languages
73
Tech Tools
Unlimited access to the largest independent learning library in tech of over 8,000 expert-authored tech books and videos.
Innovative learning tools, including AI book assistants, code context explainers, and text-to-speech.
50+ new titles added per month and exclusive early access to books as they are being written.


 Free Chapter