-
Book Overview & Buying
-
Table Of Contents
PostGIS Cookbook
By :
PostGIS 2.0 now has full support for raster datasets, and it is possible to import raster datasets using the raster2pgsql command.
In this recipe, you will import a raster file to PostGIS using the raster2pgsql command. This command, included in any PostGIS distribution from Version 2.0 onward, is able to generate an sql dump to be loaded in PostGIS for any GDAL raster-supported format (in the same fashion that the command shp2pgsql does for shapefiles).
After loading the raster to PostGIS, you will inspect it both with SQL commands (analyzing the raster metadata information contained in the database), and with the gdalinfo command-line utility (to understand the way the input raster2pgsql parameters have been reflected in the PostGIS import process).
You will finally open the raster in a Desktop GIS and try a basic spatial query-mixing vector and raster tables.
We need the following in place before we can proceed with the steps required for the recipe:
data/chp01). Each of the two archives (data/tmax_10m_bil.zip and data/tmin_10m_bil.zip) contain 12 rasters in the BIL format, one for each month. You can look for more information at http://www.worldclim.org/formats.worldclim in your working directory.tmax1.bil and tmax1.hdr will become tmax01.bil and tmax01.hdr.ogr2ogr or shp2pgsql commands. The following is the shp2pgsql syntax:$ shp2pgsql -I -d -s 4326 -W LATIN1 -g the_geom countries.shp chp01.countries > countries.sql $ psql -U me -d postgis_cookbook -f countries.sql
The steps you need to follow to complete this recipe are as follows:
gdalinfo command-line tool as follows:$ gdalinfo worldclim/tmax09.bil Driver: EHdr/ESRI .hdr Labelled Files: worldclim/tmax9.bil worldclim/tmax9.hdr Size is 2160, 900 Coordinate System is: GEOGCS["WGS 84",DATUM["WGS_1984",SPHEROID["WGS 84",6378137,298.257223563,AUTHORITY["EPSG","7030"]],TOWGS84[0,0,0,0,0,0,0],AUTHORITY["EPSG","6326"]],PRIMEM["Greenwich",0,AUTHORITY["EPSG","8901"]],UNIT["degree",0.0174532925199433,AUTHORITY["EPSG","9108"]],AUTHORITY["EPSG","4326"]]Origin = (-180.000000000000057,90.000000000000000) Pixel Size = (0.166666666666667,-0.166666666666667) Corner Coordinates: Upper Left (-180.0000000, 90.0000000) (180d 0' 0.00"W, 90d0' 0.00"N) Lower Left (-180.0000000, -60.0000000) (180d 0' 0.00"W, 60d0' 0.00"S) Upper Right ( 180.0000000, 90.0000000) (180d 0' 0.00"E, 90d0' 0.00"N) Lower Right ( 180.0000000, -60.0000000) (180d 0' 0.00"E, 60d0' 0.00"S) Center ( 0.0000000, 15.0000000) ( 0d 0' 0.00"E, 15d0' 0.00"N) Band 1 Block=2160x1 Type=Int16, ColorInterp=Undefined Min=-153.000 Max=441.000 NoData Value=-9999
gdalinfo command provides a series of useful information about the raster, for example, the GDAL driver being used to read it, the files composing it (in this case, two files with a .bil and .hdr extension), the size in pixels (2160 x 900), the spatial reference (WGS 84), the geographic extents, the origin and the pixel size (needed to correctly georeference the raster), and for each raster band (just one in the case of this file), some statistical information like the min and max value (-153.000 and 441.000, corresponding to a temperature of -15.3 °C and 44.1 °C. Values are expressed as temperature * 10 in °C, according to the documentation available at worldclim.org).raster2pgsql file to generate the .sql dump file and then import the raster in PostGIS:$ raster2pgsql -I -C -F -t 100x100 -s 4326 worldclim/tmax01.bil chp01.tmax01 > tmax01.sql $ psql -d postgis_cookbook -U me -f tmax01.sql
If you are in Linux, you may pipe the two commands in a unique line:
$ raster2pgsql -I -C -M -F -t 100x100 worldclim/tmax1.bil chp01.tmax01 | psql -d postgis_cookbook -U me -f tmax01.sql
$ pg_dump -t chp01.tmax01 --schema-only -U me postgis_cookbook ... CREATE TABLE tmax01 ( rid integer NOT NULL, rast public.raster, filename text, CONSTRAINT enforce_height_rast CHECK ((public.st_height(rast) = 100)), CONSTRAINT enforce_max_extent_rast CHECK (public.st_coveredby(public.st_convexhull(rast), '0103...'::public.geometry)), CONSTRAINT enforce_nodata_values_rast CHECK (((public._raster_constraint_nodata_values(rast))::numeric(16,10)[] = '{0}'::numeric(16,10)[])), CONSTRAINT enforce_num_bands_rast CHECK ((public.st_numbands(rast) = 1)), CONSTRAINT enforce_out_db_rast CHECK ((public._raster_constraint_out_db(rast) = '{f}'::boolean[])), CONSTRAINT enforce_pixel_types_rast CHECK ((public._raster_constraint_pixel_types(rast) = '{16BUI}'::text[])), CONSTRAINT enforce_same_alignment_rast CHECK (public.st_samealignment(rast, '01000...'::public.raster)), CONSTRAINT enforce_scalex_rast CHECK (((public.st_scalex(rast))::numeric(16,10) = 0.166666666666667::numeric(16,10))), CONSTRAINT enforce_scaley_rast CHECK (((public.st_scaley(rast))::numeric(16,10) = (-0.166666666666667)::numeric(16,10))), CONSTRAINT enforce_srid_rast CHECK ((public.st_srid(rast) = 0)), CONSTRAINT enforce_width_rast CHECK ((public.st_width(rast) = 100)) );
raster_columns metadata view, and note the main metadata information that has been stored there such as schema, name, raster column name (default is raster), SRID, scale (for x and y), block size (for x and y), band numbers (1), band types (16BUI), zero data values (0), and db storage type (out_db is false, as we have stored the raster bytes in the database; you could have used the -R option to register the raster as an out-of-db filesystem):postgis_cookbook=# SELECT * FROM raster_columns;
-t raster2pgsql option):postgis_cookbook=# SELECT count(*) FROM chp01.tmax01;
The output of the preceding command is as follows:
count ------- 198 (1 row)
gdalinfo. You should see the same information you got from gdalinfo when you were analyzing the original BIL file. The only difference is the block size, as you moved to a smaller one (100x100) from the original (2160x900). That's why the original file has been split into several datasets (198):gdalinfo PG":host=localhost port=5432 dbname=postgis_cookbook user=me password=mypassword schema='chp01' table='tmax01'"
gdalinfo command reads the PostGIS raster as being composed of multiple raster subdatasets (198, one for each row in the table). You still have the possibility of reading the whole table as a single raster, using the mode=2 option in the PostGIS raster connection string (mode=1 is the default). Check the difference:gdalinfo PG":host=localhost port=5432 dbname=postgis_cookbook user=me password=mypassword schema='chp01' table='tmax01' mode=2"
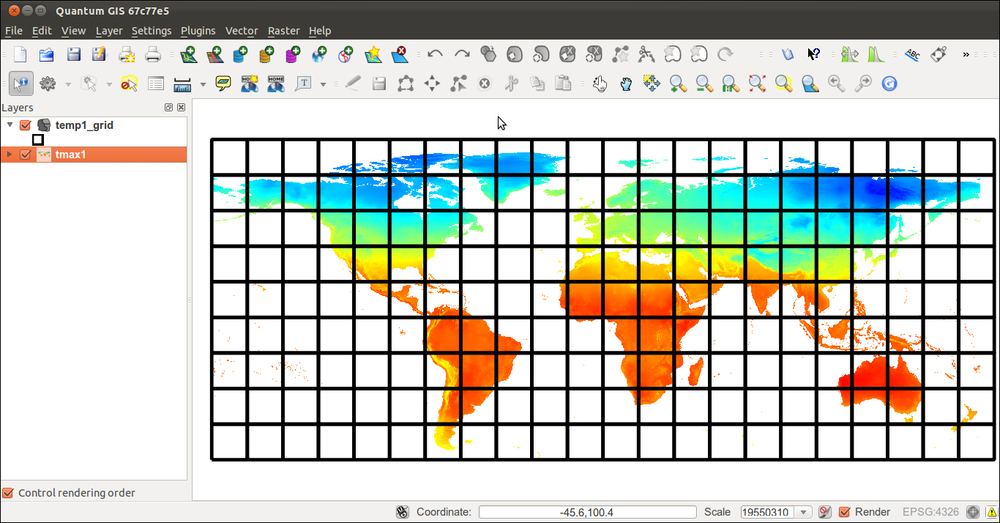
tmax01 table (each representing a raster block) to a shapefile using ogr2ogr:$ ogr2ogr temp_grid.shp PG:"host=localhost port=5432 dbname='postgis_cookbook' user='me' password='mypassword'" -sql "SELECT rid, filename, ST_Envelope(rast) as the_geom FROM chp01.tmax01"
temp_grid.shp). You should see something like the following screenshot:
If you are using QGIS, you need the PostGIS raster QGIS plugin to read and write the PostGIS raster. This plugin makes it possible to add single rows of the tmax01 table as a single raster or the whole table. Try to add a couple of rows.
SELECT * FROM ( SELECT c.name, ST_Value(t.rast, ST_Centroid(c.the_geom))/10 as tmax_jan FROM chp01.tmax01 AS t JOIN chp01.countries AS c ON ST_Intersects(t.rast, ST_Centroid(c.the_geom)) ) AS foo ORDER BY tmax_jan LIMIT 10;
The output is as follows:
name | tmax_jan --------------------------------------------+---------- Greenland | -29.8 ... Korea | -8.5 Democratic People's Republic of Kyrgyzstan | -7.9 Finland | -6.8 (10 rows)
The raster2pgsql command is able to load any raster formats supported by GDAL in PostGIS. You can have a format list supported by your GDAL installation by typing the following command:
$ gdalinfo –formats
In this recipe, you have been importing one raster file using some of the most common raster2pgsql options:
$ raster2pgsql -I -C -F -t 100x100 -s 4326 worldclim/tmax01.bil chp01.tmax01 > tmax01.sql
The -I option creates a GIST spatial index for the raster column. The -C option will create the standard set of constraints after the rasters have been loaded. The -F option will add a column with the filename of the raster that has been loaded. This is useful when you are appending many raster files to the same PostGIS raster table. The -s option sets the raster's SRID.
If you decide to include the -t option, then you will cut the original raster in tiles, each inserted as a single row in the raster table. In this case, you decided to cut the raster in 100x100 tiles, resulting in 198 table rows in the raster table.
Another important option is -R, which will register the raster as out-of-db; in such a case, only the metadata will be inserted in the database, while the raster will be out of the database.
The raster table contains an identifier for each row, the raster itself (eventually one of its tiles, if using the -t option), and eventually the original filename, if you used the -F option, as in this case.
You can analyze the PostGIS raster using SQL commands or the gdalinfo command. Using SQL, you can query the raster_columns view for getting the most significant raster metadata (spatial reference, band number, scale, block size, and so on).
With gdalinfo, you can access the same information, using a connection string with the following syntax:
gdalinfo PG":host=localhost port=5432 dbname=postgis_cookbook user=me password=mypassword schema='chp01' table='tmax01' mode=2"
The mode parameter is not influential if you loaded the whole raster as a single block (for example, if you did not specify the -t option). But, as in the use case of this recipe, if you split it in tiles, gdalinfo will see each tile as a single subdataset with the default behavior (mode=1). If you want GDAL to consider the raster table as a unique raster dataset, you have to specify the mode option and explicitly set it to 2.
Change the font size
Change margin width
Change background colour