-
Book Overview & Buying
-
Table Of Contents
Excel Programming with VBA Starter
By :
Now that you have the basic understanding about VBA (recording a macro, adding modules, browsing objects, and declaring variables), it is time to get to work.
In this section you will learn how to:
Use loops
Dimension and instantiate objects
Create sub routines and user-defined functions
You will start your programming trip down the VBA lane by learning a bit about loops. Loops allow you to repeat a set of instuctions until a predetermined condition changes or a criterion is met.
Loops are extremely important, so you should study and practice this section carefully. You will now be introduced to different looping methods. We will start with For-Next loops.
If you need to count something or you need to loop through a series of predetermined elements within a given set, then you should look no further. This is because once you specify the start and end values and the loop takes place, the counter starts to run. Suppose that the start value is 1 and the end value is 10 (all values being integers). Then, assuming the loop goes from beginning to end, the counter value will be 11 when the loop finishes to run its course. This is so because the counter is inclusive, that is, it must include the last value when the loop was called. On the other hand, suppose the loop exits at the Exit For statement; then the counter value will depend on the condition that forced the exit. Suppose the condition states that if the counter is equal to 5, then it must exit. The counter value at the exit point will equal to 5. However, if the set condition is greater than 5 at the first value greater than 5, the loop will exit. This value will be 6 (assuming we are dealing with integers). The basic syntax for this loop type is as follows:
For counter = start To end [Step step] [statements] [Exit For] [statements] Next [counter]
In the Next [counter] part, there is no need to specify the [counter] label. In spite of this, whether you happen to have many nested loops (loops inside loops) or not, it is a good idea to explicitly specify which counter you refer to. This is so because it is quite easy to get confused as the code grows in complexity.
It may sound redundant, but the variable can increase or decrease in value each time it moves to the next value.
Here's a simple example:
Sub ForNextLoopExample()
' Dimensions (Declares) the "i" variable as an
' integer type
Dim i As Integer
' Dimensions (Declares) the "iCount" variable as an
' integer type
Dim iCount As Integer
' Loop from "i" equals 1 until
' it reaches the value equal to 100:
For i = 1 To 100
' Add 1 to the counter value.
' In order to keep the addition going
' iCount is added to itself plus 1:
iCount = iCount + 1
' Move to the next "i" variable in the loop
' Keep doing this until it reaches the value 100
Next i
' Display the counter in a message box
MsgBox iCount
End SubHere, the loop runs from the integer 1 to 100 and adds 1 to the counter variable each time the loop moves to the next value. You should notice that the variable iCount is not needed. Thus, your code could look as follows (it will be 1 larger than the previous code as it goes from 1 to 100 inclusive):
Sub ForNextLoopExample2()
' Dimensions the "i" variable as an
' integer type
Dim i As Integer
' Loop from "i" equals 1 until
' it reaches the value equal to 100
For i = 1 To 100
Next i
' Display the "i" variable in a message box
MsgBox i
End SubBy pressing F8 successively you will be able to more clearly see how the code actually works. As you move through the code, stop, and point the mouse pointer to the variable so that you can inspect its value at that given point.
You can obtain the exact same effect as the preceding loop as follows:
Sub SteppedLoopExample()
Dim i As Double
Dim iCounter As Integer
' Loop from 0 to 1 with a step
' equivalent to one-hundredth of 1 (0.01)
For i = 0 To 1 Step 0.01
iCounter = iCounter + 1
Next i
MsgBox iCounter
End SubWhat was done in the preceding code is similar to dividing one pound into 100 pence (or £ 0.01). Therefore, between 0 and 1 there are a hundred units, which is the same as counting from 1 to 100, as we did in the first loop.
One detail here is that the data type had to be changed from Integer to Double for the i variable. This change is necessary because the step is not an integer. If we leave the i variable as an integer, we will get an infinite loop, as the loop will never manage to move from 0 (zero) to the next step, as 0.01 will be taken to be 0 (zero).
This kind of loop will repeat a block of statements for each object in a collection or each element in an array. For example, you could loop through each Worksheet (object) in the Sheets (collection).Given that you will move through a series of objects in a collection, VBA will automatically set the variable each time the loop runs.
The syntax for this loop type is as follows:
For Each element In group [statements] [Exit For] [statements] Next [element]
The next sample code reads through each file in the folder where the workbook is located. It then lists each file in the active worksheet.
For this example, you will be introduced to an interesting programming concept – referencing . In VBA we can reference external libraries so that we can benefit from their Object Model (OM). The OM, in this context, refers to the collection of objects that belong to such a library. Does that sound confusing? Then imagine a real library with a collection of books (objects). There are thousands of libraries across the world and if you become a member, you will have access to their collections of books. In the same fashion, if you reference the Microsoft Outlook Object Library, you will have access to all its objects.
Here, we have to add a reference to the Windows Script Hosting Model. In order to do so, you must follow these steps:
Open the Visual Basic Editor (VBE) window.
Go to Tools | References.
Once the dialog box is open, scroll down until you find the Windows Script Hosting Model. Once you find it, select it and close the dialog box.
Sub ListFilesInThisFolder()
' Dimensions the File System object
Dim oFSO As New FileSystemObject
' Dimensions the Folder object
Dim oFSOFolder As Folder
' Dimensions the File object
Dim oFSOFile As File
' Dimensions the row counter and
' the string the will hold the path
' for this workbook
Dim lRowCount As Long
Dim sFilePath As String
' Sets the file path for this workbook
sFilePath = ThisWorkbook.Path
' Sets the folder, based on where this workbook
' is located, in order to pick the files containing
' in it.
Set oFSOFolder = oFSO.GetFolder(sFilePath)
' Sets the lower bound for the row counter
lRowCount = 1
' For each file in the folder
For Each oFSOFile In oFSOFolder.Files
' Get the file name and write it to the ActiveSheet
' in the cell whose row number is equal to lRowCount
' and column is equal to 1
ActiveSheet.Cells(lRowCount, 1) = oFSOFile.Name
' Add 1 to the row counter
lRowCount = lRowCount + 1
' Move to the next file found in the folder
Next oFSOFile
' Clean the objects from memory
Set oFSOFile = Nothing
Set oFSOFolder = Nothing
Set oFSO = Nothing
End SubThese two loop types will run while a condition is true or until the condition becomes true. The syntax for these two types of loops is as follows:
Do [{While | Until} condition]
[statements]
[Exit Do]
[statements]
LoopIn the preceding example, the condition was specified before entering the loop. However, these two methods also give the flexibility to determine the condition after the loop has started. For example:
Do
[statements]
[Exit Do]
[statements]
Loop [{While | Until} condition]Unlike the For-Next loop mentioned in the previous section that executes until it reaches the last "next number" or object in the sequence, a Do While or Do Until must reach a true condition before it stops looping. This can obviously result in an infinite loop if a true value cannot be attained.
So, let us suppose you have a series of values in the first column of the active worksheet and you need to determine the address of the last empty cell. You could do so using the following code:
Sub DoUntilLoop()
' Dimensions the row counter
Dim lRowCounter As Long
' Sets the lower bound of the row counter
lRowCounter = 1
' Run the loop until it finds the first empty cell
' in the first column of the active sheet
Do Until IsEmpty(ActiveSheet.Cells(lRowCounter, 1))
lRowCounter = lRowCounter + 1
Loop
' When the first empty cell in column 1 is found,
' display its address in a message box
MsgBox ActiveSheet.Cells(lRowCounter, 1).Address
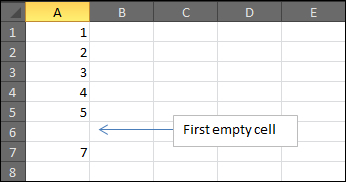
End SubBear in mind that this code will return the first empty cell (see the following screenshot):

It does not mean that below this particular cell there is nothing else. If you really needed to determine the last cell with data, a better option would be as follows:
Sub GetLastRowAddress()
' Display the address of the last non-empty row
' in a message box. This is equivalente to pressing
' CTRL + Up Arrow
MsgBox ActiveSheet.Range("A1048000").End(xlUp).Address
End SubDownloading the example code
You can download the example code files for all Packt books you have purchased from your account at http://www.packtpub.com . If you purchased this book elsewhere, you can visit http://www.packtpub.com/support and register to have the files e-mailed directly to you.
The following example will be executed while the random number is smaller than 80. Once the condition is true, the loop exits and displays a message telling us the number found and how many times the loop was executed before exiting.
Sub DoWhileLoop()
Dim iMyRandomInteger As Integer
Dim lLoopCounter As Long
' Randomize so that a new seed value is set;
' for the Rnd() function
Randomize
iMyRandomInteger = Int((100 * Rnd) + 1)
' Do the loop while the random number is
' not greater than 80
Do While (Not (iMyRandomInteger > 80))
iMyRandomInteger = Int((100 * Rnd) + 1)
lLoopCounter = lLoopCounter + 1
Loop
' Display a message box showing the random value that
' caused the loop to exit. It also shows the number of
' times that the loop ocurred before it exited.
MsgBox "Loop exited... The exit value is equal to: " & _
iMyRandomInteger & ". Loop was executed " & _
lLoopCounter & " times before exiting.", vbInformation
End SubIt is important to emphasize that if we omit the Randomize statement, the Rnd function will use the same number as a seed whenever it is called for the first time. This will give the impression that you are not getting a random number, which will be true if you are using the first number, and thereafter uses the last generated number as a seed value.
The While loop type can also end with the keyword Wend:
While
[statements]
WendThis loop construct does exactly the same thing as the previous example. The usage depends on the programmer and his/her preferences.
You already know how to dimension a variable. You basically add the keyword Dim before your variable and then define its type. When you studied the second looping method you were introduced to referencing libraries. However, nothing was said about the object used, to be exact, the FileSystemObject
.
When we work with objects we can dimension them explicitly or implicitly by using either the true object or by using the generic class, namely, Object.
Here's how it looks explicitly:
Sub DimensioningAnObject()
Dim objFSO As FileSystemObject
End SubAnd generically, it will look like this:
Sub DimensioningAnObject()
Dim objFSO As Object
End SubIt should be clear from the preceding code that the first method is preferred to the second, given that anyone reading your code would immediately identify what the object (objFSO) is. Notice that in the second example the object can be set to be any kind of object even though its dimension name may suggest something else. Therefore, you could set it to be he application object, if that was your desire.
However, it is important to point out that you can only dimension an object in this way (first example, just covered) if it belongs to the project. Objects that belong to the Excel application will always be available though. Other objects, such as FileSystemObject, must be referenced.
Whether you reference an object or you are using the default objects belonging to the application, this is known as early binding , that is, you bind (expose) the objects to the VBA project from the outset.
Therefore, EarlyBinding could look as follows (the explanation is embedded in the following code):
Sub EarlyBinding()
' Dimension the object explicitly
Dim objAppExcel As Excel.Application
' On error the code should resume the next line
' This is because we are trying to "get" the
' Excel Application Object, but it does not exist
' an error will be thrown
On Error Resume Next
Set objAppExcel = GetObject(, "Excel.Application")
' If the objAppExcel is still nothing (it was not set
' in the previous line), then the object should be created
If objAppExcel Is Nothing Then _
Set objAppExcel = CreateObject("Excel.Application")
' Show the caption of window 1
MsgBox objAppExcel.Windows(1).Caption
' Destroys the object
Set objAppExcel = Nothing
End SubNow, let us suppose you are developing a VBA application that will work with different versions of Excel. In this case, a late binding
is more appropriate. Why? Because the generic object can take any shape and form. Therefore, it will not matter whether you are working with Excel 97, Excel 2010, or future releases. In fact, it does not matter for any object type, as Object is just an abstraction.
To make matters clearer, try to describe a bird. Most people would describe a feathery animal that sings and flies. However, a bird is an abstraction because not all birds sing or fly. Until you get down to the specifics, that is, set (define) which bird you are talking about, it could be a prehistoric bird for all anyone knows.
This is why late binding is great, as you do not need to specify what it is until it is really necessary.
The following example shows how late binding could be attained:
Sub LateBinding()
' Dimension the object implicitly
Dim objAppExcel As Object
' On error the code should resume the next line
' This is because we are trying to "get" the
' Excel Application Object, but it does not exist
' an error will be thrown
On Error Resume Next
Set objAppExcel = GetObject(, "Excel.Application")
' If the objAppExcel is still nothing (it was not set
' in the previous line), then the object should be created
If objAppExcel Is Nothing Then _
Set objAppExcel = CreateObject("Excel.Application")
' Show the caption of window 1
MsgBox objAppExcel.Windows(1).Caption
' Destroys the object
Set objAppExcel = NothingEnd SubThe code is basically the same presented previously, but the Excel application object is defined from the outset.
Another important point you should know about working with objects is that they need to be set. In the previous examples this is done at the following line of code:
Set objAppExcel = GetObject(, "Excel.Application")
However, if you are using early binding, you can also set the object at the same time you dimension it:
Dim objAppExcel As New Excel.Application
Notice the keyword New just before the object. When an object is created like this, there is no need for you to set it.
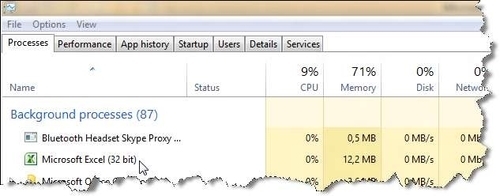
When you set an object using the preceding method, memory is allocated to handle calls to its library. In the preceding example, the Excel application starts to run in the background. You can view this by accessing the Task Manager. You can open the Task Manager by pressing the keys Ctrl + Shift + Esc simultaneously.

In the previous topics, you were indirectly introduced to subroutines, but you were not taught their true meaning and function.
In this topic you will learn a bit about subroutines and user-defined functions specifically.
Routines, also known as procedures, are defined as a set of logical instructions (methods) that are used to regulate an activity or how something should behave.
For example, you could create a procedure (routine) that instructs the Excel application to add a new workbook to its workbook collection or add a new worksheet to an existing workbook in the worksheet collection.
Collections are written in the plural. Thus, the Workbooks collection represents a collection of Workbook objects. By analogy, the Worksheets collection represents a collection of Worksheet objects.
The following code snippet instructs Excel to add a new worksheet to the active workbook:
Sub AddWorksheet()
Application.ActiveWorkbook.Sheets.Add Before:=Worksheets(1)
End Sub
Add
is called a method and it will always be a verb. In the preceding instruction, the method can take arguments that determine how the instruction should take place. In this case, the new worksheet should be added before the first worksheet in the workbook.
If for any reason you need to abandon the instruction, you can use the Exit Sub statement:
Sub AddWorksheet()
Exit Sub
Application.ActiveWorkbook.Sheets.Add Before:=Worksheets(1)
End SubIn the preceding example, the subroutine is exited before any worksheet is added to the workbook. Notice that here the worksheet index 1 was explicitly defined in the code. However, it is never a good idea to hardcode things into your procedures.
A better option is to pass such values as arguments of the procedure. Arguments can be optional or not. So, let us adapt the previous example so that we have two scenarios:
A required argument
An optional argument
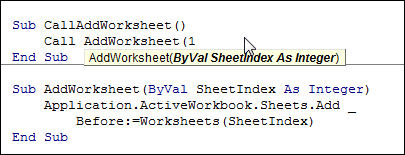
The following screenshot shows what goes on in the code window:

The original subroutine now has an argument called SheetIndex
whose value must be an integer. If the argument is anything other than an integer or is missing, VBA will throw an error. The argument of our procedure is then used as argument of the Worksheets collection.
We also need a secondary procedure from where we call the main procedure.
In order to avoid an error, we can make the argument optional. This is done as follows:
Sub CallAddWorksheet()
Call AddWorksheet
End Sub
Sub AddWorksheet(Optional SheetIndex As Variant)
If IsMissing(SheetIndex) Then SheetIndex = 1
Application.ActiveWorkbook.Sheets.Add _
Before:=Worksheets(SheetIndex)
End SubThe first thing you will notice is that the Integer data type is not used. Instead, Variant was. The reason for this is that Variant is the only data type that can be missing. If Integer had been used, then the first value in the series would be returned, that is, a missing argument would actually be 0 (zero).
Functions, as the name suggests, return values. This contrasts to a subroutine, which is an instruction to perform an action.
Just like a subroutine, a function is also a method and it serves to supplement any missing function in Excel. Again, just like a subroutine, it may or may not have an argument. In the case it has an argument, it can also be optional.
Consider the following example:
Function CountWords(ByVal Text As String) As Long
CountWords = UBound(Split(Text, " ")) + 1
End FunctionSimilar to the procedure example, here the text separator (which is an empty space given as " ") has been hardcoded into the function. In this scenario, it may not make a difference given that we are counting words and the space will be the delimiter between words. However, you can use the same method used in the procedure to pass the delimiter as an argument.
The trick in this UDF is to use the internal function named Split to split the input text into an array of words. Then, using the UBound (upper bound) function, we count the upper limit of this array. We add one to the value returned by the function; otherwise the result will be less by one word, given the lower bound of arrays.
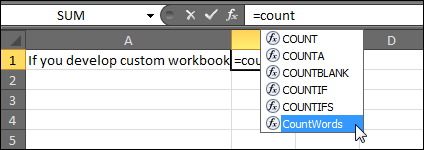
If your function is placed in a standard module, then it will be available in your worksheet as well. When you start typing the name of functions that start with the same letters, you will be presented with a list of options as shown in the following screenshot:

If you are not presented with the preceding screenshot, it means that Formula AutoComplete is not selected. In order to activate this option, you must go to File | Excel Options | Formulas. Then, under the Working with formulas group (second group from top), select the Formula AutoComplete option.
Functions are very versatile, which means you can use the function to calculate values in forms, worksheets, or call them from another procedure within the VBA project. Furthermore, you also call the function from another function whose final value depends on an intermediate calculation or that performed by this particular function.
In this way, you can compartmentalize the job performed by each function you create, instead of packing all calculations with a single function.
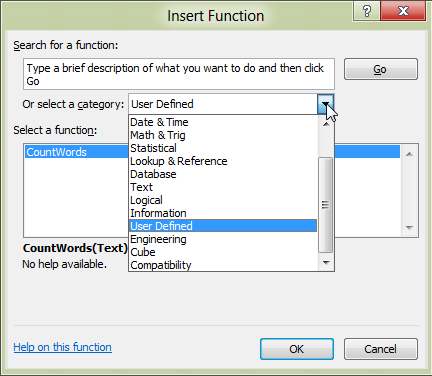
If you plan to use your custom functions in a worksheet, then the next important step is related to categorizing your function. If you open Excel's Insert Function dialog box (you can click on fx on the Formula bar or press Alt + I + F) you will see that all functions go into a specific category. In fact, even our custom function goes into a category (the User Defined category).
However, you may want to give more meaning to your function by placing it into a "proper" category.

The following table shows the list of all the categories of Excel's built-in functions:
|
Integer value |
Category name |
|---|---|
|
1 |
Financial |
|
2 |
Date & Time |
|
3 |
Math & Trig |
|
4 |
Statistical |
|
5 |
Lookup & Reference |
|
6 |
Database |
|
7 |
Text |
|
8 |
Logical |
|
9 |
Information |
|
10 |
Commands (hidden) |
|
11 |
Customizing (hidden) |
|
12 |
Macro (hidden) |
|
13 |
DDE/External (hidden) |
|
14 |
User-Defined (default for custom functions) |
|
15 |
Engineering |
Given that the function presented here deals with text, you may want to put it in the Text category. We will take the opportunity to add a description to it as well.
The code will run when the workbook is opened. Therefore, we will add the code to the Open event of the workbook. In order to do so, you must open the code window for ThisWorkbook. With the code window open, we will insert the following procedure:
Private Sub Workbook_Open()
Application.MacroOptions "CountWords", _
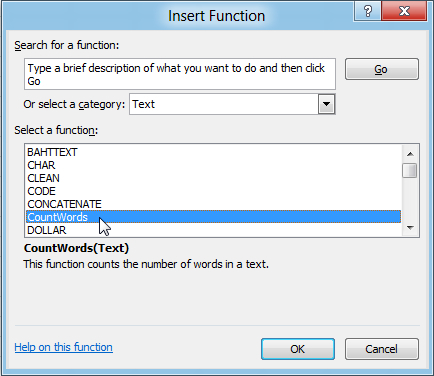
"This function counts the number of words in a text.", , , , , 7
End SubAfter executing the preceding code, the function will be categorized as Text and the description will be added to it. The following screenshot shows the result:

Prior to Excel 2010, we could not add description to the arguments of our functions. This has changed, which makes UDFs look much more professional than before.
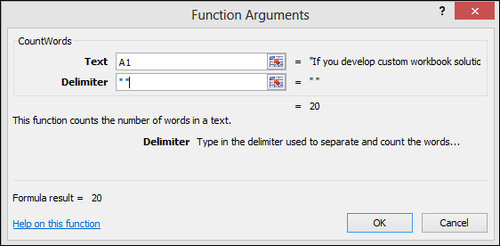
Basically, we will use the same code as before, but we will add a list of arguments and the respective descriptions. It is done as follows:
Private Sub Workbook_Open()
' Declare a string array with two positions
Dim CountWordsArgs(1 To 2) As String
' Define the value for each position within the array
CountWordsArgs(1) = "Type in or select the text containing " & _
"the words you want to count..."
CountWordsArgs(2) = "Type in the delimiter used to separate " & _
"and count the words..."
' Set the MacroOptions value
Application.MacroOptions _
macro:="CountWords", _
Description:="This function counts the number of " & _
"words in a text.", _
Category:=7, _
ArgumentDescriptions:=CountWordsArgs
End SubThe following screenshot shows the Function Arguments dialog box with the respective arguments and their descriptions:

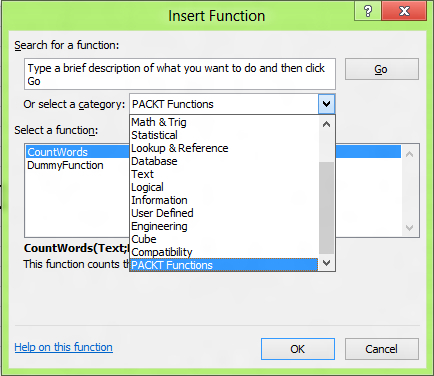
Now, let us suppose you want to have your own category, that is, instead of using any of the built-in function categories (including the User Defined category), you wish to have something like "PACKT Functions".
The following screenshot shows exactly this scenario. This is a great way to take your personalization to the next level.

This is done as follows:
Right-click on any sheet and then click on Insert….
On the dialog box that opens, select MS Excel 4.0 Macro.
Next, activate the Formulas tab and the click on Define Name.
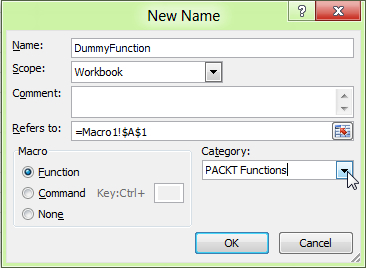
In the New Name dialog box, enter a name for your first function. In this case, I will name DummyFunction.
Now, select Function from the Macro group. In the category drop-down list, enter whatever name you've decided to give to your custom category (here, I chose PACKT as the prefix, but it could be your company name, for example).

That's it, you are done. In order for you to add your custom functions to this new category, you will need to know which index represents it. Given the built-in categories, this number should start at 16. So, you should try indexes starting at 16.

In this section, you have learned some more advanced programming techniques in VBA. You started with looping techniques where you learned different ways to loop through different types of variables such as numeric variables and objects. You also learned the importance of clearing objects from memory in order to avoid the unnecessary allocation of memory to objects which no longer need such resources. Finally, you learned how to create user-defined functions and how to set their attributes. In the next section, you will learn more specialized features such as enumeration and classes.
Change the font size
Change margin width
Change background colour