
Authorization using RBAC and ABAC
So far, we’ve talked mostly about objects in Entra ID, which can be authenticated. Before we take a step forward, let’s quickly recap what authentication and authorization are. Understanding this distinction is important to fully understand the concepts we’re about to cover:
- Authentication – This answers the question of Who/what wants to access a resource? It’s a process that tells you what object is behind a request.
- Authorization – This answers the question of Is that object allowed to access that resource? This process is responsible for making sure that an authenticated object has the necessary permissions to make a request.
As you can see, most of the time, authorization cannot exist without authentication. Alternative scenarios are possible (mostly in cases where we don’t care who or what makes a request and base the authorization mechanism on a key or certificate passed along). However, in this book, all the scenarios we’re going to cover will follow the authentication and authorization process.
We know the difference between key concepts related to authorization, so let’s now talk a little bit about RBAC and ABAC. These abbreviations (or concepts) are not unique to Azure – in fact, you can find them in other cloud providers and even on-premises environments. If you don’t know what they mean, here’s a short introduction:
- Role-based access control (RBAC): This is an authorization mechanism that is based on roles assigned to an object. Each role consists of one or many permissions that define granular access to multiple operations.
- Attribute-based access control (ABAC): This concept is like RBAC, but instead of explicitly assigned roles, it works based on attributes, which can be assigned to resources and objects. Then, authorization is based on checking whether an object and resource have the same attribute.
While initially, both RBAC and ABAC will look similar, you’ll quickly realize that though they serve the same purpose, they allow different security models.
RBAC
In Azure, RBAC works by combining a role definition, a role assignment, and a security principal, which gets a role assigned to it. Each role is assigned on a specific level (a scope, as we discussed when talking about ARM). This can be visualized with the following diagram:
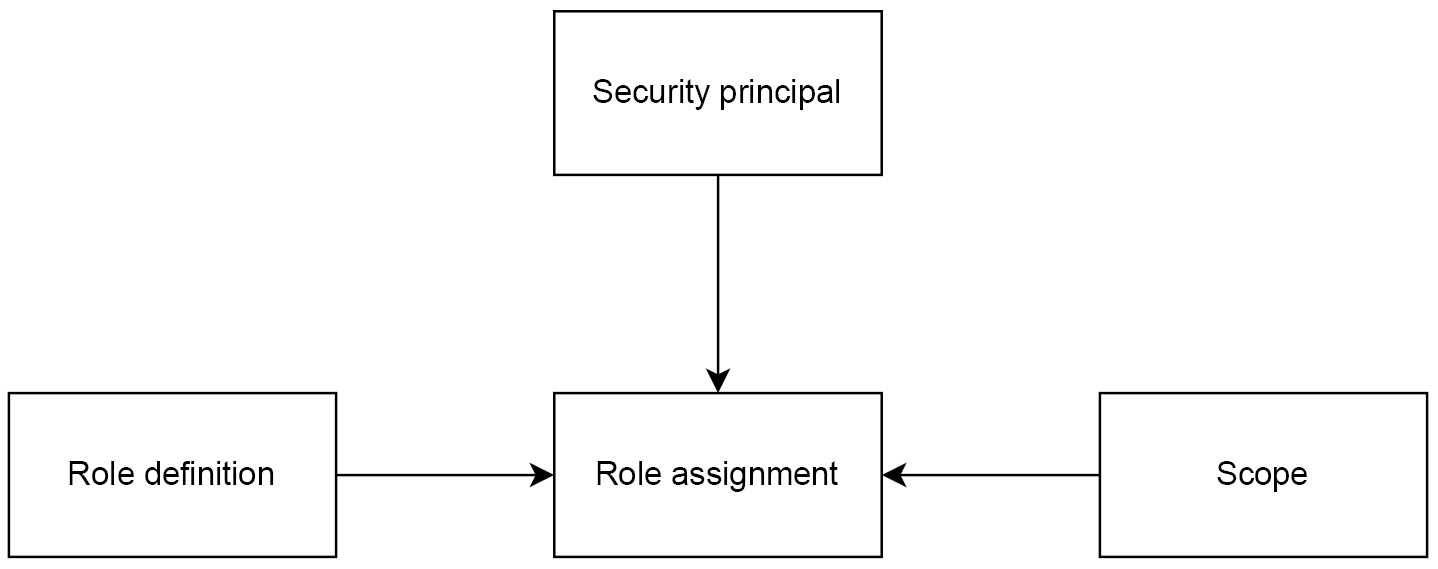
Figure 1.3 – Diagram of RBAC in Azure
Let’s discuss these concepts in detail now.
Role definition
Each role has its own definition. A definition is represented as a JSON document containing allowed actions that can (or cannot) be performed when the role is assigned to a security principal. An example definition of a Reader role (one of many in-built roles available) looks like this:
{
    "assignableScopes": [
      "/"
    ],
    "description": "View all resources, but does not allow you to make any changes.",
    "id": "/subscriptions/cf70b558…-9048-ebcefb926adf/providers/Microsoft.Authorization/roleDefinitions/acdd72a7-3385-48ef-bd42-f606fba81ae7",
    "name": "acdd72a7-3385-48ef-bd42-f606fba81ae7",
    "permissions": [
      {
        "actions": [
          "*/read"
        ],
        "dataActions": [],
        "notActions": [],
        "notDataActions": []
      }
    ],
    "roleName": "Reader",
    "roleType": "BuiltInRole",
    "type": "Microsoft.Authorization/roleDefinitions"
  }
As you can see, each definition has a couple of fields, which define how the role is interpreted:
- assignableScopes – tells us what scope a role can be assigned
- description – human-friendly description of a role
- id – unique identifier of a role (role definitions, like many other Azure concepts, are resources themselves)
- name – unique name of a role definition (do not confuse it with roleName, which is a human-friendly name of a role)
- permissions – an array of available permissions that define allowed/disallowed operations
- roleName – human-friendly name of a role
- roleType – information about the origin of a role (whether it’s an in-built/custom role)
- type – resource type (the same for each role definition)
It may be a little bit overwhelming for now, but you’ll quickly learn how to handle definitions and even build custom ones. For now, the only clarification needed is on permissions. As you probably realized, there are four different fields defining them:
- actions – operations allowed on the Azure control plane
- dataActions – operations allowed on the Azure data plane
- notActions – operations disallowed on the Azure control plane
- notDataActions – operations disallowed on the Azure data plane
Before we proceed, we need to define what the control and data planes are.
Control and data planes
In Azure, when performing operations on a resource level, you can interact with one of the available planes:
- Control plane
- Data plane
The control plane consists of operations that work on the ARM level. As each operation performed against it ends up sending a request to the REST endpoint, you can easily find it by investigating the underlying URL. If it starts with https://management.azure.com, you know that it’s a control plane you’re working with.
Important note
The ARM URL may be different depending on your Azure environment. Azure Government, Azure Germany, and Azure China have different endpoints available. While we’re not going to describe alternative environments in this book, most of the examples will be relevant no matter which one you’re using on a daily basis.
On the other hand, when the data plane is in play, it’s not limited to REST API requests. While many operations performed on the data plane in Azure will be standard HTTP calls (such as managing secrets in Azure Key Vault or many operations in Azure Cognitive Services), there will still be some actions that don’t use a typical REST endpoint. That includes logging in to Azure Virtual Machines and managing Azure SQL Database via SQL queries.
You may wonder how control and data plane operations affect your work. Well, depending on the plane type, you may need to implement different means to manage, control, and secure Azure resources. As many data plane operations may skip policies configured in your cloud environment, additional tools and processes will be needed to keep everything in control.
Creating a custom role
Azure has lots of built-in roles such as Reader, Contributor, and Owner. Many services also provide their own roles, which can be used to limit granted permissions. When talking about role definition, we used the Reader role as an example. Let’s compare it with another role that is also built in but much more specialized. Here’s a definition of the Storage Blob Data Reader role:
{
    "assignableScopes": [
      "/"
    ],
    "description": "Allows for read access to Azure Storage blob containers and data",
    "id": "/subscriptions/cf70b558-…-9048-ebcefb926adf/providers/Microsoft.Authorization/roleDefinitions/2a2b9908-6ea1-4ae2-8e65-a410df84e7d1",
    "name": "2a2b9908-6ea1-4ae2-8e65-a410df84e7d1",
    "permissions": [
      {
        "actions": [
          "Microsoft.Storage/storageAccounts/blobServices/containers/read",
          "Microsoft.Storage/storageAccounts/blobServices/generateUserDelegationKey/action"
        ],
        "dataActions": [
          "Microsoft.Storage/storageAccounts/blobServices/containers/blobs/read"
        ],
        "notActions": [],
        "notDataActions": []
      }
    ],
    "roleName": "Storage Blob Data Reader",
    "roleType": "BuiltInRole",
    "type": "Microsoft.Authorization/roleDefinitions"
  }
As you can see, when compared to the Reader role, it offers a much more narrowed set of assigned permissions. While Reader defines actions as */read, Storage Blob Data Reader is designed mostly to allow the reading of data stored in blob containers. However, sometimes, even specialized built-in roles are not enough. In that case, we need to create our own definition and then assign it to desired security principals.
Roles in Azure can be created in a variety of ways. We can use the Azure portal; alternatively, we can create them using ARM templates/Azure Bicep (as we mentioned previously, each role definition is also a resource). We can also create them using the Azure CLI or Azure PowerShell. We’ll go for the latter as it will be the simplest approach.
To create a role, we need to construct its definition. The easiest way to do that is to fetch it using an already existing role and use it as a template. You can obtain the role definition with the following command:
az role definition list -–name <role-name>
It’ll return a JSON object, which you can copy to your favorite editor and modify. For this exercise, let’s create a role that allows the reading of all resource data except the storage account:
{
    "assignableScopes": [
        "/subscriptions/<subscription-id>"
    ],
    "description": "Allows reading all data except storage account",
    "actions": [
        "*/read"
    ],
    "dataActions": [],
    "notActions": [
        "Microsoft.Storage/storageAccounts/*/read"
    ],
    "notDataActions": [],
    "name": "Custom Resource Reader"
}
As you can see, the role definition to be created differs slightly when compared to an existing one. We’re missing id and type, and the name is equivalent to roleName. The whole structure is also flattened. I defined this role in a way that will forbid performing a read action on any storage account within the used scope.
Important note
The prior definition blocks read operations only. This means that with that role assigned, it’s not possible to create/delete/modify any Azure resources. It’s caused by the fact that our actions block specifies only read operations. If we ever decide to change the definition, once changes are applied, they will immediately affect all the security principals.
To create a role definition, you can use one of the following commands:
// Azure CLI
az role definition create --role-definition @<file-name>.json
// Azure PowerShell
New-AzRoleDefinition -InputFile "<file-name>.json"
The preceding commands assume that you’re running them in the same directory where you placed your JSON with the role definition.
Assigning a role
We’ve learned about custom and built-in roles. We’ve also talked about security principals and scopes. To complete the RBAC picture, we need to create a role assignment. Once a role is assigned to a chosen security principal on the selected scope, Azure will start to evaluate it, meaning the role will become active.
Creating an assignment is actually a very simple process. It can be quickly done with one of the following commands:
// Azure CLI
az role assignment create --assignee "<assignee-name>" --role "<role-name>"
// Azure PowerShell
New-AzRoleAssignment -ObjectId <object-id>
-RoleDefinitionName <role-name>
These are the simplest versions of commands you can use. Optionally, you can pass the --scope (-Scope in PowerShell) parameter, so you can define which scope should be used for that assignment.
ABAC
When using RBAC, you can easily control who or what can access resources by assigning a role with linked permissions. This security model is enough for most scenarios but can become a little bit cumbersome when you need to manage many assignments or provide more granular access. This is where ABAC comes in handy, as it combines RBAC with additional means of security by adding an additional layer.
As of now, ABAC works only with Azure Blob Storage and Azure Queue Storage data actions. This list will expand in the future.
Assignment with conditions
Assigning proper roles can be a lengthy process, especially if you have hundreds of resources to browse. The more resources, the more time it’ll take to create assignments, and the easier it is to make a mistake. In Azure, it’s possible to create a role assignment that is based on conditions, making it easier to manage and configure access.
Important note
Some of the features used in conditions (such as security principal attributes) are currently in preview. They might still change until they reach general availability in the future.
When using ABAC, we need to use an additional parameter when creating an assignment, such as in the following example:
az role assignment create --role "Custom Resource Reader" --assignee "<assignee-name>" --condition
"@Resource[Microsoft.Storage/storageAccounts/blobServices/containers:Name] stringEquals '<container-name>'"
As you can see, here we have a --condition parameter used, where we’re passing a string containing a condition. A condition is a special syntax that provides logic used for checking whether that role assignment should be respected.
Conditions can be combined by using AND/OR operators, like so:
(@Resource[Microsoft.Storage/storageAccounts/blobServices/containers:Name] stringEquals '<container-name>')
OR | AND
(@Resource[Microsoft.Storage/storageAccounts/blobServices/containers/blobs/tags:Project StringEquals 'AzureAdministratorBook')
In fact, conditions are based on properties that are exposed to ARM (and are accessible for other tools, such as filtering in the Azure CLI/Azure PowerShell or expressions in ARM templates/Azure Bicep). You can also access other sources:
- @Resource is for accessing given resource properties
- @Request is for obtaining information from the request performed on a resource level (so it’ll be evaluated for each GET/POST/PUT/DELETE operation)
- @Principal is for accessing the properties available for a security principal performing an operation
As you can see, this functionality allows for building a much more advanced security mechanism than RBAC alone. Even though there are still many limitations in place, it can be used to extend security for Azure Storage if needed.
Let’s focus now on the last topic of this chapter – a detailed introduction to the Azure CLI, Azure PowerShell, and Cloud Shell.