
Basic toolset – the Azure CLI, Azure PowerShell, and Cloud Shell
Many operations in Azure can be performed using various tools. People starting with the cloud favor using the Azure portal. When you are working as a more advanced user, the Azure CLI and Azure PowerShell will become much more useful, especially when building automation scripts. For infrastructure deployments, ARM templates and Azure Bicep will be tools used on a daily basis. This section aims to discuss them in detail and show the various tips and tricks available.
Azure CLI
The Azure CLI is a tool that was written in Python and can be used on any machine that has that runtime installed. It’s a cross-platform solution that can be used in many places – from your local machine to remote machines and CI/CD agents. Making yourself familiar with it will not only improve your knowledge of Azure but will also help when reading the documentation, as many examples are based on the Azure CLI.
Logging in
When the Azure CLI is installed, you can immediately get started working with it by running the az login command in your terminal. Depending on the scenario (authenticating as a user/service principal/managed identity), you’ll see a slightly different path for obtaining credentials:
- When authenticating as a user, most of the time a browser window will appear where you can enter your username and password. If MFA is enabled for the account, you’ll be asked to confirm your identity.
- For authenticating as a service principal, you’ll need a password/certificate.
- To use managed identity, you need to have that feature enabled on a machine/service where the command is being executed. That scenario is meant for Azure resources, and we’ll discuss it later in the book.
No matter which scenario we cover, az login will be the first command we need to execute when using the Azure CLI for the first time.
Checking the current account
To see what account was used to authenticate in the Azure CLI, you can use the az account show command. When run, it’ll display a result like this:
{
  "environmentName": "AzureCloud",
  "homeTenantId": "c2d4fe14-…-5a65748fd6c9",
  "id": "cf70b558-…-ebcefb926adf",
  "isDefault": true,
  "managedByTenants": [],
  "name": "PAUG",
  "state": "Enabled",
  "tenantId": "c2d4fe14-…-5a65748fd6c9",
  "user": {
    "name": "[email protected]",
    "type": "user"
  }
}
The result contains the currently used account with the selected subscription. Note that it also describes the context that will be used for most of the Azure CLI commands. While it’s not always applicable (as there are commands that work no matter which context is chosen), it’s important to always double-check which subscription was selected. It’ll prevent you from making accidental changes to resources that shouldn’t be modified.
Logging in to another tenant
Sometimes, you may need to switch tenants when performing the Azure CLI commands. We have already discussed the fact that most operations are performed using a currently selected context. As context selection is an implicit thing (i.e., you don’t choose it directly – it’s evaluated based on the account you used for signing in), you need to remember to not only choose a subscription, but also a tenant if needed.
Important note
When logging in to your default tenant, you don’t need to pass tenantId as a parameter. It’s required only if there are additional tenants where you have the same username as in your default one.
To log in with a non-default tenant, we will use the same command we used previously, but with an additional parameter:
az login --tenant <tenant-id>
Once this has been run, the login process will run as usual, but the request will be forwarded to the correct Entra ID tenant. The same parameter is used no matter whether you want to log in as a user, service principal, or managed identity (though for principals other than user, there will rarely be a valid scenario).
Azure PowerShell
An alternative to the Azure CLI is Azure PowerShell, which will be useful for anybody who’s already worked with PowerShell. A few years ago, the main advantage of the Azure CLI over Azure PowerShell was the ability to run it on multiple platforms. Nowadays, with PowerShell Core, that benefit is no longer valid.
You may find Azure PowerShell useful in all the places where you need more structured language and capabilities for scripting when compared to shell scripts using the Azure CLI. What’s more, as PowerShell allows you to use .NET libraries, it opens many interesting, advanced scenarios for authentication, and interacting with the operating system or external services.
Logging in
Like the Azure CLI, to start working with Azure PowerShell, you need to authenticate. The easiest way is to use the following command:
Connect-AzAccount
This is the equivalent of az login as described previously. It’ll log you in to the default tenant and subscription of the account you selected.
An alternative authentication mode is to use device code authentication as follows:
Connect-AzAccount -UseDeviceAuthentication
This will ask you to provide a one-time code displayed in your terminal instead of authenticating using the provided credentials. It’s also possible to authenticate using the service principal:
$credential = Get-Credential -UserName <application-id>
Connect-AzAccount -ServicePrincipal -Credential $credential
As you can see, in Azure PowerShell, it’s a little bit more complicated when compared to the Azure CLI, as we need to create a PSCredential object first. Still, there’s a downside to that approach – it’ll ask us for a username and password (which, in our case, will be applicationId and a secret generated for that service principal). Such functionality will be difficult to handle in automated scenarios, so we’d need to change the code a little bit:
$sp = Get-AzureADServicePrincipal -ObjectId <object-id>
$password = $sp.PasswordCredentials.SecretText | ConvertTo-SecureString -AsPlainText -Force
$credential = New-Object -TypeName System.Management.Automation.PSCredential -ArgumentList $sp.AppId, $password
Connect-AzAccount -ServicePrincipal -Credential $credential
This will ensure that we’re not using a plain text password while preserving the desired functionality. The last option for authentication would be using managed identity:
Connect-AzAccount -Identity
Depending on the configuration (system-assigned or user-assigned identity), it’s possible that you’d need to pass an additional parameter, -AccountId, with a value of clientId assigned to the underlying security principal. Don’t worry, we’ll cover that later in the book.
Checking the current account
To identify what context will be used for Azure PowerShell commands, use the following command:
Get-AzContext
It’ll display information about the subscription, your username, the environment, and the tenant. If you want to switch the selected context, you’ll need the name or identifier of a subscription and these commands:
// List all the subscriptions your principal has access to
Get-AzSubscription
// Select a subscription
Select-AzContext -Subscription <subscription-id-or-name>
This will switch the current context to the selected subscription. Remember that for using subscriptions from different tenants, you may need to re-authenticate.
Logging in to another tenant
In Azure PowerShell, you can easily select a tenant to sign into by using the -Tenant parameter:
Connect-AzAccount -Tenant <tenant-id>
This functionality works in the same way as the one in the Azure CLI – without passing that identifier, you’ll log in to your default tenant. If there’s any other tenant where you can use the same username, use the presented parameter to redirect the authentication request.
Cloud Shell
As of now, we’ve mostly talked about using the Azure CLI or Azure PowerShell on your local computer (or, at least, that was our assumption). To complete the picture, we’ll discuss a functionality called Cloud Shell. Let’s characterize its main features:
- It’s a built-in shell available in the Azure portal, the Azure mobile app, and at https://shell.azure.com
- It’s a managed service, so you don’t need to worry about maintaining its infrastructure
- It automatically authenticates you in Azure (though it’s possible to change the context if needed)
- It’s offered with a simple graphical editor and mounted storage for persistence
- It’s free of charge – the only cost is the storage account deployed in your subscription
In this section, you’ll learn how to use the basic and advanced features of this component.
Getting started with Cloud Shell
For the exercises in this section, we’ll use https://shell.azure.com, though, in fact, it won’t matter which environment is used. Once Cloud Shell is set up, its capabilities are the same in each place it’s available.
The first time you use Cloud Shell, you will be asked to set up a storage account for it. However, in some scenarios (such as when Cloud Shell is used for the very first time), you may need to register its resource provider like so:
az account set --subscription <subscription-name-or-id>
az provider register --namespace Microsoft.CloudShell
Note that you need to do it once for each subscription you want to work with. What’s more, those commands need to be run in your terminal as without a registered resource provider, Cloud Shell won’t start.
The next step is to set up a storage account:
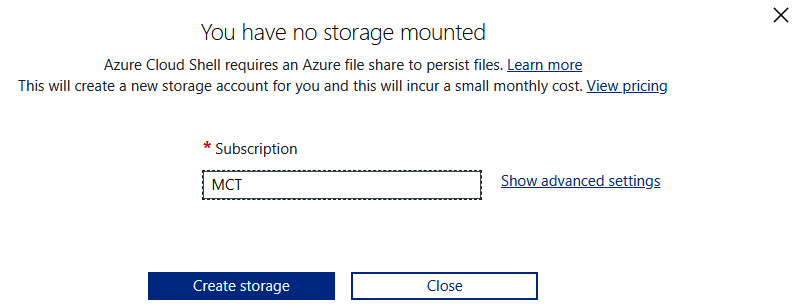
Figure 1.4 – Mounting storage for Cloud Shell
For configuration, there are two methods – you either go for a basic configuration (and select only a subscription where a storage account should be created) or use advanced settings. To simplify things for now, we’ll use the basic configuration by clicking on the Create storage button. After several seconds, a storage account will be provisioned for you and Cloud Shell will be ready to use.
Selecting the command-line tool
Cloud Shell allows you to work with either the Azure CLI or Azure PowerShell. It’s up to you which tool will be used – what’s more, you can change it at any time. A selection is made by choosing the Azure CLI or Azure PowerShell from the dropdown:
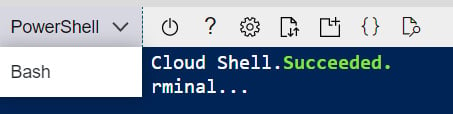
Figure 1.5 – Selecting a tool in Cloud Shell
PowerShell will allow you to use Azure PowerShell, while Bash will be a standard bash environment with the Azure CLI installed. The main difference between these two modes is the ability to use different tools compatible with the one you selected.
Working with Cloud Shell
When you’re using Cloud Shell, you should treat it as any other command-line environment where you can use different tools and commands. The availability of commands will differ depending on the selected mode (PowerShell or Bash). Still, for many scenarios, the user experience while working with Cloud Shell will stay the same, as you can use many commands no matter which mode is selected:
- You can list files in the directory with both dir and ls
- To read the contents of a file, you can use both type and cat
- You can easily use chmod in both PowerShell and Bash modes
What’s more, Cloud Shell comes with preinstalled tools and libraries that you can use out of the box. These include, but are not limited to, the following:
- Terraform
- Git
- .Net
- Java
- Python
- Node.js
This gives you a robust and useful sandbox environment for day-to-day work.
Persisting files in Cloud Shell
Once the storage account is mounted in Cloud Shell, you can use the underlying storage for file persistence. It works as your personal disk that can be used for storing the output of your work.
Important note
In general, sharing the same storage account among various users is a bad security practice. However, you need to remember that if a user has appropriate access to one of the higher scopes (resource group/subscription/management group), they will be able to read the contents of each storage account within that scope.
The mechanism of file persistence is based on the following functionalities:
- Your file share includes a disk image that is automatically synced whenever a change is persisted to the filesystem
- File shares are automatically mounted and mapped to the underlying Azure storage
You can check that very easily by running ls -la in Cloud Shell in your user’s directory. It’ll give you a list of files, directories, and mounts, where one of the elements should look like this:
lrwxrwxrwx 1 john john 22 Mar 8 14:14 clouddrive -> /usr/csuser/clouddrive
Additionally, we could check the contents of our file share:
az storage file list --share-name <file-share-name> --account-name <cloud-shell-storage-account-name> --path .cloudconsole
The result of the preceding command will be a JSON object, which should look like this:
[
  {
    "metadata": null,
    "name": "acc_john.img",
    "properties": {
      "contentLength": 5368709120,
      "contentRange": null,
      "contentSettings": {
        …
      },
      "copy": {
        …
      },
      "etag": null,
      "lastModified": null,
      "serverEncrypted": null
    },
    "type": "file"
  }
]
As you can see, it contains a file named acc_<user>.img, which is the image we talked about.
That’s all for now! Let’s summarize what you’ve learned in the very first chapter.