

EC2 is the most basic web service provided by AWS. It allows you to launch instances of various capacities. You can get complete control over the lifetime of this instance, and you also have the root access.
After you sign in to your AWS console, you can start a machine in a few steps. Go to the EC2-specific console view from your AWS console. Select the region in which you want to launch your instance. This can be selected from the top-right corner of the page.
Click on Launch Instance. Let's walk through the simple steps you need to follow after this.
Amazon Machine Image (AMI) is a set of predefined software configuration and applications. It is basically a template that contains the details about operating system, application server, and initial set of applications required to launch your instance. There are a set of standard AMIs provided by AWS, there are AMIs contributed by the user community, and also there are AMIs available in the AWS marketplace. You can select an AMI from among them. If you are confused, select one of the AMIs from the Quick Start section.
AWS EC2 provides various instance types optimized to fit different use cases. A virtual machine launched on AWS is called as an instance. They have varying combinations of CPU, memory, storage, and networking capacity giving you the liberty to decide on the right set of computing resources for your applications.
Choose the instance type that fits your needs and budget. If you are just trying out things, you may go for t1.micro, which is available under Free Tier. We will discuss about instance types in more detail in our next section.
At this stage, you may skip other steps and go ahead and launch your instance. However, that is not recommended, as your machine would be open to the world, that is, it will be publicly accessible. AWS provides with a feature for creating security groups, wherein you can create inbound and outbound rules restricting unwanted traffic and only allowing some trusted IPs to connect to your instance.
In this step, you may instruct AWS to launch multiple instances of the same type and with the same AMI. You may also choose to request for spot instance. Additionally, you can add the following configurations to your instance:
The network your instance will belong to. Here, you choose the VPC of which you want your instance to be a part of. After selecting a VPC, if you want, you may also let AWS automatically assign a public IP address to your instance. This IP will only be associated with your instance until it is stopped or terminated.
The availability zone your instance will belong to. This can be set if you do not select a VPC and go with the default network, that is, EC2-Classic.
The IAM role, if any, you want to assign to your instance.
The instance behavior when an OS-level shut down is performed. It is recommended to keep this configuration to Stop. Instances can be either terminated or stopped.
You can also enable the protection from accidental termination of the instance. Once this is enabled, you cannot terminate it from the AWS management console or using AWS APIs until you disable this. You can also enable CloudWatch detailed monitoring for this instance.
Every instance type comes with a definite instance storage. You can attach more instance storage volumes or may decide to add EBS volumes to your instance. EBS volumes can also be attached later after launching the instance. You can also edit the configurations of the root volume of your instance.
For better book-keeping purposes, it is always good to give a name to your instance, for example, MyApplicationWebserverBox. You can also create custom tags suiting your needs.
You can create a new security group for your instance or you can use an already defined security group. For example, if you already have a few web servers and you are just adding another instance to that group of servers, you wouldn't want to create a separate security group for that, rather you can reuse the existing security group that was created for those web servers.
While creating a new security group, you will see that one entry is prefilled to enable remote login to that machine via SSH from anywhere. If you want, you can constrain that rule to allow SSH traffic only via fixed IPs or IP ranges. Similarly, you can add rules for other protocols. If you have a web server running and you want to open the HTTP traffic for the world or if you have a MySQL database running on this machine, you would want to select MySQL from the type while adding a new rule and set the Source setting to your machines from where you would want your MySQL to be accessible.
You can now review your configurations and settings and launch your instance. Just one small thing before your instance is launched: you need to specify the key pair in order to access this instance remotely. You can choose an existing key pair or can create a new key pair. You must download the private key file (*.pem) and keep it securely. You would use this to SSH into this instance.
Note
It is very important to note that if this private key file is lost, there is no way to log in to the instance after it is launched. As AWS doesn't store the private key at its end, keep it securely.
That's all. Click on Launch Instances. Your instance should be up and running within minutes.
If you go back to the EC2 dashboard of your AWS management console, you will see that your instance is added to the number of running instances. Your EC2 dashboard view will look as follows:
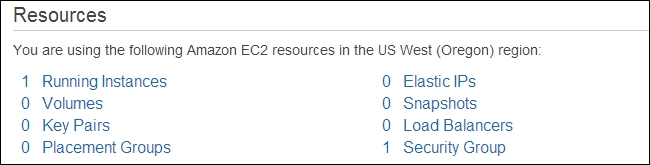
After launching your instance, when you click on the link saying n Running Instances, where n is the number of instances running, you will be taken to a page having all the running instances listed. There, you should select the instance you had launched; you can identify it from the name you had given while launching the instance. Now, in the bottom pane, you can see the Public DNS and Public IP values listed for the selected instance (let's assume that you had configured your instance to be provided a public IP while launching). You will use either of these values to SSH into your instance.
Let's assume the following before moving ahead:
Public IP of your machine is
51:215:203:111(this is some random IP just for the sake of explanation)Public DNS of your machine is
ec2-51-215-203-111.ap-southeast-1.compute.amazonaws.com(your instance's public DNS will look like this given the above IP and that your instance was launched in the Singapore region)Private key file path in the machine from where you want to connect to newly launched instance is /
home/awesomeuser/secretkeys/my-private-key.pem
Now that you have all the information about your instance, connecting to the instance is only a matter of one SSH command. You should ensure that you have an SSH client installed on the machine from where you will connect to your AWS instance. For Linux-based machines, a command-line SSH client is readily available.
As the private key pair is very critical from security point of view, it is important to set the appropriate access control to this file so that it isn't publicly viewable. You can use the chmod command to set appropriate permissions over the .pem file:
chmod 400 my-key-pair.pem
You can connect to your instance by executing the following command from the command line:
$ssh -i /home/awesomeuser/secretkeys/my-private-key.pem [email protected]
Alternatively, you can also connect using the public IP:
$ssh -i /home/awesomeuser/secretkeys/my-private-key.pem ec2-user@51:215:203:111
You may note that the username to log in is ec2-user. You can assume root access by simply switching user by the following command, you won't be prompted for a password:
$ sudo su
EC2 has several predefined capacity packages that you can choose to launch an instance with. Instance types are defined and categorized based on the following parameters:
CPU
Memory
Storage
Network Capacity
Each instance type in turn includes multiple instance sizes for you to choose from. Primarily, there are three most commonly used instance types:
General purpose: M3
Memory optimized: R3
Compute optimized : C3
The general purpose set of instances consists of M3 instance types. These types of instances have a balance of compute, memory, and network resources. They have SSD-based instance storage.
This set of instances consists of R3 instance types. These types of instances are best fit for memory-intensive applications. R3 instances have the lowest cost per GB of RAM among all EC2 instance types.
These types of instances are suitable for in-memory analytics, distributed-memory-based caching engines, and many other similar memory-intensive applications.
This set of instances consists of C3 instance types. These types of instances are best fit for compute-intensive applications. C3 instances have the highest performing processors and the lowest price / compute performance available in EC2 currently.
These types of instances are suitable for high performance applications such as on-demand batch-processing, video encoding, high-end gaming, and many other similar compute-intensive applications.
The following table lists the instances sized for C3 instance types:
|
Instance size |
vCPU |
Memory (GB) |
Storage (GB) |
|---|---|---|---|
|
|
2 |
3.75 |
2 * 16 |
|
|
4 |
7.5 |
2 * 40 |
|
|
8 |
15 |
2 * 80 |
|
|
16 |
30 |
2 * 160 |
|
|
32 |
60 |
2 * 320 |
There are other instance types such as GPU, which are mainly used for game streaming, and storage optimized instance types, which are used to create large clusters of NoSQL databases and house various data warehousing engines. Micro instance types are also available, which are the low-end instances.