
As you now know, VCM depends on SQL, and if we have a medium-sized infrastructure, it becomes too much load–the SQL, SSRS, web, and Collector server components–to carry on a single server. We can split the load in two by moving SQL databases to a dedicated server and the web and Collector components on another server.
This is how the two-tier deployment will look:
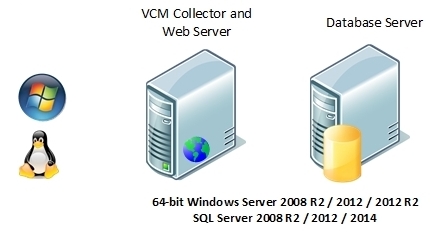
We will need two servers; on one, SQL Server 2012 should be installed with SSRS, and SSRS should be configured as per previous recipes.
Install all the prerequisites on both the SQL and Collector servers. Have all the mentioned service accounts ready and firewall ports open wherever required.
Install and configure IIS as per the Preparing our VCM deployment - installing and configuring IIS recipe.
As this is a two-tier VCM deployment recipe, you must have guessed that we need to perform the installation on two servers–not exactly correct; we just need to install SQL, configure SSRS, and install the prerequisites on the SQL Server; all the action happens on the VCM Collector server.
Log in to the collector server with a domain account that has local admin privileges; this is the account on which you want to have admin access on the VCM application.
Copy the downloaded ISO to the server and mount it.
Start the installation by double-clicking on setup.exe on the installer disk, and follow the wizard to install VCM, like this:
In this recipe, we will choose Advanced Installation.
Click on Next for the introduction page.
Click on Next for the patent information page.
Read and accept the license agreement and select "I am an authorised agent and/or representative of the customer/end user" and "I have read the terms and conditions stated above".
Under Select Installation Type, select the following:
VMware vRealize Configuration Manager
VCM Web Console
VCM Collector Components
Tools
ImportExport Utility
Foundation Checker
VMware VCM Package Manager for Windows
VMware VCM Package Studio

The installer will perform a prerequisite check and present the results; after the checks are successful, click on Next; if there are errors, click on View Results, remedy any errors and warnings, and perform a recheck.
Do not proceed further unless there are no errors; you can proceed if there are warnings, but it is not recommended. This is what a successful check looks like:

On the next page, enter the serial key.
On the Configure Components page, provide the hostname of the SQL Server and enter
VCMas the database name; click on Validate.If the validation is successful, it will provide you with the path for the data and log files, along with the Size and Auto Grow options. You can go with the defaults.

On the next page, provide the Tomcat service account and its password.
On the next page, provide the URL in WebService URL; credentials to validate the details include the Domain, User Name, and Password. Click on Validate. Accept the warning about insecure SRS, as we had configured it with port
80.
Provide the path to install the web console to.
Provide a URL to the application; the default
/VCMis a good option.We can provide an SMTP address; the default is the collector server. If you don't know it now, it can be configured in the VCM console.
Provide a path to install the collector component to, and accept the SSL3 warning.
Provide a path to store the staging data to; this is the path where data is temporarily stored before being added to the database.
Provide the details of the Collector service account. This account will be given rights to log in as a service; accept the confirmation dialog.
Provide details of network authority accounts. We can add as many accounts as we want later, but we need at least one for the time being. More details about this can be found in the Service accounts subsection of this chapter's introduction.
The next page is about certificates. Click on Generate and then on Next.

On the next page, which lets you select domains to run the discovery, select specific NetBIOS and AD domains.
Note
If you have multiple AD or NetBIOS domains, it will take more than 24 hours to detect all the domains, and the installation could eventually fail. To avoid such a scenario, select a few domains to start with and add the rest of them once VCM is ready.

Provide details about the virtual directory and credentials to access it.
Provide the credentials for the Virtualization Client plugin.
On the next page, provide the path to install package manager components to.
On the next page, provide the path to the local package cache.
On the next page, provide the path to the software repository and local cache.
Provide the name of the virtual directory.
Provide the path to the Package Studio components.
Finally, we will have reached the summary page; check the options and click on Install.

Log in to the portal and make sure the installation was successful.

We installed VCM on two servers; we had already installed SQL and SSRS on the SQL Server, while IIS for the web and collector components are on the Collector server. The console can then be used to manage the infrastructure. We will use this console to perform patching, compliance checking, publishing software exporting reports, and a lot more in upcoming chapters.