
An in-place upgrade is not possible if the vCenter Server that you are trying to upgrade is installed on a 32-bit machine. This is because vCenter Server 5.1 is a 64-bit application. All the vCenter versions prior to vCenter 4.1.x were 32-bit, with vCenter 4.0 being an exception because it could be installed either on a 32-bit or a 64-bit machine.
For an upgrade to vCenter 5.0, we had an option to use the Data Migration tool. Unfortunately, vCenter 5.1 does not support the use of it. You can work around this limitation by using the Data Migration tool to migrate the data first to a 64-bit Windows machine, then install vCenter 5.0 on it, and finally perform an in-place upgrade to vCenter 5.1.
The Data Migration tool can be used to migrate data from the following versions of vCenter:
Virtual Center 2.6 Update 6 or later
vCenter Server 4.0 and its updated releases
The Data Migration tool is not supported for migrating vCenter 4.1 configurations or databases, because vCenter 4.1 is 64-bit; hence, it would be already installed on a 64-bit machine. It is only used to migrate vCenter data from a 32-bit machine.
The Data Migration tool can migrate the following configuration settings:
Port settings for HTTP and HTTPS
Port settings for vCenter Heartbeat and vCenter Web Services
LDAP data
Port settings for LDAP and LDAP SSL ports
SSL certificates from the SSL folder
License data
Database data, for SQL Express database only
Migrating the vCenter data and database is a two-step procedure:
Back up the setting from the 32-bit vCenter Server.
Restore the settings on to the new 64-bit machine.
The following steps are required to back up the settings on the 32-bit vCenter Server using the Data Migration tool:
Stop the vCenter Server service.
Extract the contents of the ZIP file,
datamigration.zip, available on the vCenter installer ISO/ZIP/DVD to a hard disk location on the same machine. Thedatamigration.zipfile can located under thedatamigrationfolder on root the vCenter installer ISO/ZIP/DVD. The location for the file can be as follows:DVD/CDROM:\datamigration\datamigration.zipThe following screenshot shows the contents of the
datamigration.zipfile once it is extracted:
Once the
datamigration.ziparchive is extracted, use the Windows command line and navigate to thedatamigrationfolder; then run thebackup.batbatch file to initiate the backup process.For example, if the ZIP archive was extracted to
C:\, then at the command line, change to theC:\Datamigationdirectory, typebackup.batand hit Enter.
Now that you have backed up the needed data, it needs to be transferred to the intended destination machine (64-bit):
Once the
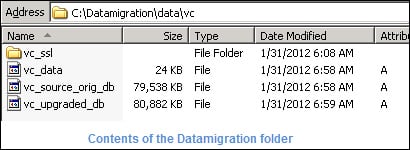
backup.batfile is finished with its job, it will dump all the backed up data to the./data/vc/folder. To initiate a restore, copy the entiredatamigrationfolder to the 64-bit machine.Make sure that you have the vCenter Server's installation DVD in the DVD drive or the ISO mounted to the VM (if the destination vCenter Server is virtual machine).
Navigate to the
datamigrationfolder using the Windows command prompt, and run theinstall.batbatch script.
In this section, I will explain how the backup.bat and install.bat batch scripts work, when run on the 32-bit source and the 64-bit destination machines respectively.
What happens when you run the backup.bat batch script on the 32-bit vCenter Server?
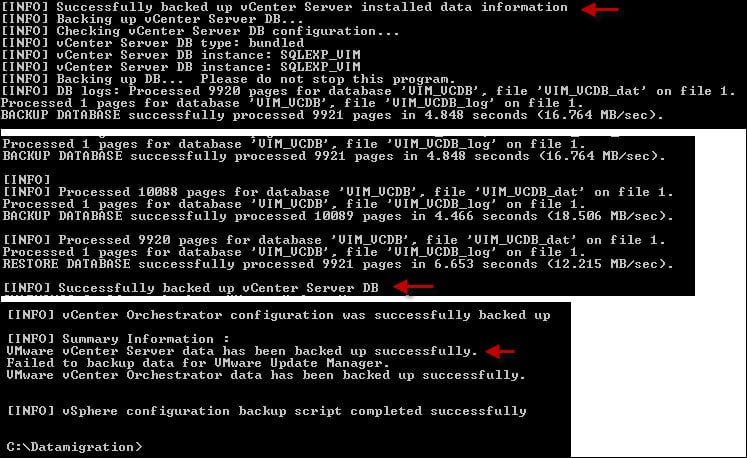
When you run this script on the machine running the 32-bit vCenter Server, it will first check the vCenter Server's version and the database's compatibility with the Data Migration tool, and then backs up the configuration setting files. Subsequently, it will upgrade the database schema to Version 5. This is a four-step process:
The original database is backed up.
The database schema is upgraded to Version 5.0.
The upgraded database is backed up.
Restore the original database from the backup that was taken earlier.

It will also try to detect the version of VMware Update Manager installed. If it encounters a version that is not supported then it would let you know that the Update Manager's version prerequisite is not met and it will seek your confirmation to continue with the backup. Such a backup will not include the Update Manager data. It does the same if it does not detect the presence of Update Manager.
Next, the backup script will start backing up the vCenter data (configuration files) and then the database.
The backed-up information will be stored at the DataMigration\Data\vc location, as shown in the following screenshot:
What happens when you run the install.bat batch script on the 64-bit Windows machine where you intend to install vCenter 5.1?
On invoking the migration installer script install.bat, it would access the data from the datamigration directory and start verifying it.
If the machine has a different system name when compared to the source machine, then it will indicate the same and will seek your confirmation to continue. In such cases, once the installation is complete, you will have to modify the <url> tag in the XML file to supply a new system name and re-enable the plugins in the vCenter Plugin Manager. The location of the XML file is as follows:
c:\Program files\VMware\Infrastructure\VirtualCenter Server\extensions\plugin-name
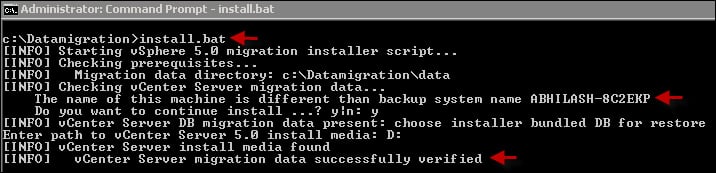
Once the data migration has been successfully verified it will call the vCenter Server installer with the backed-up installation data configuration.