Book Image

Mastering Ext JS

By : Loiane Groner
Book Image

Mastering Ext JS

By: Loiane Groner

Overview of this book

<p>Ext JS 4 is a JavaScript framework that provides you with the resources to build multi-browser, high-performance, and rich Internet applications.<br /><br />Mastering Ext JS is a practical, hands-on guide that will teach you how to develop a complete application with Ext JS. You’ll begin by learning how to create the project’s structure and login screen before mastering advanced level features such as dynamic menus and master-detail grids, before finally preparing the application for production.<br /><br />Mastering Ext JS will help you to utilize Ext JS to its full potential and will show you how to create a complete Ext JS application from the scratch, as well as explaining how to create a Wordpress theme.</p> <p><br />You will learn how to create user and group security, master-detail grids and forms, charts, trees, and how to export data to excel including PDF and images, always focusing on best practices.</p> <p><br />You will also learn how to customize themes and how to prepare the application to be ready for deployment upon completion. Each chapter of the book is focused on one task and helps you understand and master an individual aspect of the application.</p> <p><br />By the end of the book, you will have learned everything you need to know to truly master Ext JS and to start building advanced applications.</p>
Table of Contents (20 chapters)
Mastering Ext JS
Credits
About the Author
Acknowledgement
About the Reviewers
www.PacktPub.com
Preface
Index

Creating a new message


Now comes the final part of the window where the user can write a new e-mail that is to be sent. Before we start coding, let's take a look at the output of the code that we will implement in this topic:

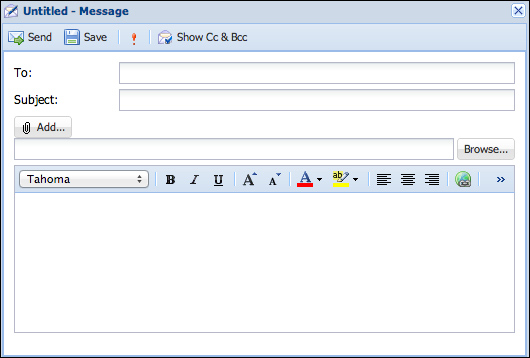
First, we need to create the window that is going to wrap the new message form:

Ext.define('Packt.view.mail.NewMail', {
    extend: 'Ext.window.Window',
    alias: 'widget.newmail',

    height: 410,
    width: 670,
    autoShow: true,
    layout: {
        type: 'fit'
    },
    title: 'Untitled - Message',
    iconCls: 'new-mail'
});

So far we are OK. Let's declare the dockedItems, in which we will declare a toolbar with Send, Save, Importance, and Show Cc & Bcc buttons:

dockedItems: [
    {
        xtype: 'toolbar',
        dock: 'top',
        items: [
            {
                xtype: 'button',
                text: 'Send',
                iconCls: 'send-mail',
                itemId: 'send'
            },
            {
                xtype: 'button',
    ...