

A web page is comprised of many different HTML elements, such as buttons, links, a body, labels, forms, and so on, that are named WebElements in the context of WebDriver. Together, these elements on a web page will achieve the business functionality. For example, let's look at the HTML code of the login page of a website.
<html>
  <body>
    <form id="loginForm">
      <label>Enter Username: </label>
      <input type="text" name="Username"/>
      <label>Enter Password: </label>
      <input type="password" name="Password"/>
      <input type="submit"/>
    </form>
    <a href="forgotPassword.html">Forgot Password ?</a>
  </body>
</html>
In the preceding HTML code, there are different types of WebElements such as <html>, <body>, <form>, <label>, <input>, and <a>, which together make a web page. Let's analyze the following WebElement:
<label>Enter Username: </label>
Here, <label> is the start tag of the WebElement label. Enter Username: is the text present on the label element. Finally, </label> is the end tag, which indicates the end of WebElement.
Similarly, take another WebElement:
<input type="text" name="Username"/>
In the preceding code, type and name are the attributes of the WebElement input with values text and Username, respectively.
UI Automation is mostly about locating these WebElements on a web page and executing user actions on them. In the rest of the chapter, we will use various ways to locate WebElements and execute relevant user actions on them.
Let's start this section by automating the Google Search page, which involves opening the Google Search page, typing the search text in the textbox, and executing the search. The code for that is as follows:
 public class GoogleSearch {
   public static void main(String[] args){
     WebDriver driver = new FirefoxDriver();
     driver.get("http://www.google.com");
     WebElement searchBox = driver.findElement(By.name("q"));
     searchBox.sendKeys("Packt Publishing");
     searchBox.submit();
   }
}
In the preceding code, lines 1 to 4 are same as the example discussed earlier. When you look at line 5, there are three new things that are highlighted as follows:
WebElement searchBox = driver.findElement(By.name("q"));
They are the findElement() method, By.name() method, and the WebElement interface. The findElement() and By() methods instruct WebDriver to locate a WebElement on a web page, and once found, the findElement() method returns the WebElement instance of that element. Actions such as click, type, and so on, are performed on a returned WebElement using the methods declared in the WebElement interface, which will be discussed in detail in the next section.
In UI automation, locating an element is the first step before executing any user actions on it. WebDriver's findElement() method is a convenient way to locate an element on the web page. According to WebDriver's Javadoc (http://selenium.googlecode.com/git/docs/api/java/index.html), the method declaration is as follows:
WebElement findElement(By by)
So, the input parameter for the findElement() method is the By instance. The By instance is a WebElement-locating mechanism. There are eight different ways to locate a WebElement on a web page. We will see that when we discuss By, shortly.
The return type of the findElement() method is the WebElement instance that represents the actual HTML element or component of the web page. The method returns the first WebElement that the driver comes across which satisfies the locating-mechanism condition. This WebElement instance will act as a handle to that component from then on. Appropriate actions can be taken on that component by the test script developer using this returned WebElement instance.
If WebDriver doesn't find the element, it throws a runtime exception named NoSuchElementException, which the invoking class or method should handle. The test script developer is advised to avoid using this method if he/she thinks the WebElement will not be present on the web page. For those purposes, we can use another method of WebDriver named findElements.
If developers think that they may encounter zero or more number of WebElements for a given locating mechanism on a web page, they should rather use the findElements() method than the findElement() method. Because the findElement() method throws NoSuchElementException in case of zero occurrences of WebElement and on the other hand, only the first occurred WebElement that satisfies the locating mechanism condition though the web page contains multiple WebElements. The method declaration of the findElements
() method is as follows:
java.util.List<WebElement> findElements(By by)
The input parameter is same as the findElement() method, which is an instance of the By class. The difference lies in the return type. Here, if no element is found, an empty list is returned and if there are multiple WebElements present satisfying the locating mechanism, all of them are returned to the caller in a list.
Before we discuss about locating mechanism using the By class, we have to see how Firebug works. Firebug is an add-on/plugin for Firefox, which we have installed earlier. This is used to inspect the HTML elements on a web page loaded in Firefox. Let's load www.google.com on Firefox. To inspect the search button element, launch the firebug plugin by clicking on the firebug icon close to the top-right corner, as shown in the following screenshot:

Once launched, click on the Inspect Element icon, which looks like the following screenshot:

Now move the cursor to the search button element and click on it. Firebug will highlight the HTML code that represents the element on the web page. In this case, it will be:
<button class="gbqfba" name="btnK" aria-label="Google Search" id="gbqfba"><span id="gbqfsa">Google Search</span></button>
As Firebug shows the respective HTML code for the WebElement, now it's the developer's choice to select the attribute of the element used to locate the element and pass it to the findElement() method. For example, in this case, the element has name, class, and id attributes declared. So it is up to the developer to choose one attribute of the WebElement to identify the element uniquely.
By is the locating mechanism passed to the findElement() method or the findElements() method to fetch the respective WebElement(s) on a web page. There are eight different locating mechanisms; that is, eight different ways to identify an HTML element on a web page. They are located by Name, ID, TagName, Class, LinkText, PartialLinkText, XPath, and CSS.
As seen earlier, every element on a web page has many attributes. Name is one among them. For instance, the HTML code for the Google Search button will be:
<button id="gbqfba" aria-label="Google Search" name="btnK" class="gbqfba"><span id="gbqfsa">Google Search</span></button>Here name is one of the many attributes of the button, and its value is btnK. If we want to identify this button and click on it in your test script, the code will look as follows:
 public class GoogleSearchButtonByName {
  public static void main(String[] args){
    WebDriver driver = new FirefoxDriver();
    driver.get("http://www.google.com");
    WebElement searchBox = driver.findElement(By.name("btnK"));
    searchBox.submit();
  }
}
If you observe line 5, the locating mechanism used here is By.name and the name is btnK. So, from where did we get this name? As discussed in the previous section, it is the firebug that helped us get the name of the button. Launch the Firebug and use the inspect elements widget to get the attributes of an element.
On a web page, each element is uniquely identified by an ID, if provided. An ID can be assigned manually by the developer of the web application or, most of the times, left to be dynamically generated by the server where the web application is hosted, and this ID can change over a period of time.
Now, if we consider the same HTML code of the Google Search button:
<button id="gbqfba" aria-label="Google Search" name="btnK" class="gbqfba"><span id="gbqfsa">Google Search</span></button>In the preceding code, the id value of this button is gbqfba. This might change by the time you read this book, because this could be a server-generated ID.
Let us see what changes need to be made to our test script to use id instead of name:
 public class GoogleSearchButtonById {
  public static void main(String[] args){
    WebDriver driver = new FirefoxDriver();
    driver.get("http://www.google.com");
    WebElement searchBox = driver.findElement(By.id("gbqfba"));
    searchBox.submit();
  }
}
We have changed the locating mechanism from the By.name() method to the By.id() method, and used the search button's id value instead of name. Here, try to use the By.id identifier, and use the name value (that is. btnK) instead of the id value (that is. gbqfba). Modify line 5 as follows:
WebElement searchBox = driver.findElement(By.id("btnK"));
The test script will fail to throw an exception as follows:
Exception in thread "main" org.openqa.selenium.NoSuchElementException: Unable to locate element: {"method":"id","selector":"btnK"}WebDriver couldn't find an element by id whose value is btnK. Thus, it throws an exception saying it couldn't find any such element with id as btnK.
Locating an element by tag name is slightly different from name and id locating mechanisms. The reason being it can return zero or more results. For example, on a Google Search page, if you search for an element with the tag name button, it will result in three WebElements because there are three buttons present on the search page. So it is always advisable to use the findElements
() method rather than the findElement() method when trying to locate elements using tag names.
Let's see how the code looks like when a search for the number of buttons present on a Google Search page is made.
 public class GoogleSearchPageByTagName{
  public static void main(String[] args){
    WebDriver driver = new FirefoxDriver();
    driver.get("http://www.google.com");
    List<WebElement> buttons =   driver.findElements(By.tagName("button"));
    System.out.println(buttons.size());
  }
}
In the preceding code, we have used the By.tagName locating mechanism and findElements() method, which returns a list of all the buttons available on the page. On line 6, when we printed the size of the list, it returns 3.
If you are wondering how there are three buttons on the Google Search page while only two are visible, the following are all the buttons available on the search page:
<button id=gbqfb aria-label="Google Search" class=gbqfb name=btnG><span class=gbqfi></span></button>
<button id=gbqfba aria-label="Google Search" name=btnK class=gbqfba><span id=gbqfsa>Google Search</span></button>
<button id=gbqfbb aria-label="I'm Feeling Lucky" name=btnI class=gbqfba onclick="if(this.form.q.value)this.checked=1;else window.top.location='/doodles/'"><span id=gbqfsb>I'm Feeling Lucky</span></button>
This is why WebDriver is so helpful to reveal things that are difficult to figure out manually.
Some commonly used HTML elements are mentioned as follows, and they can be used by tag names (also mentioned).
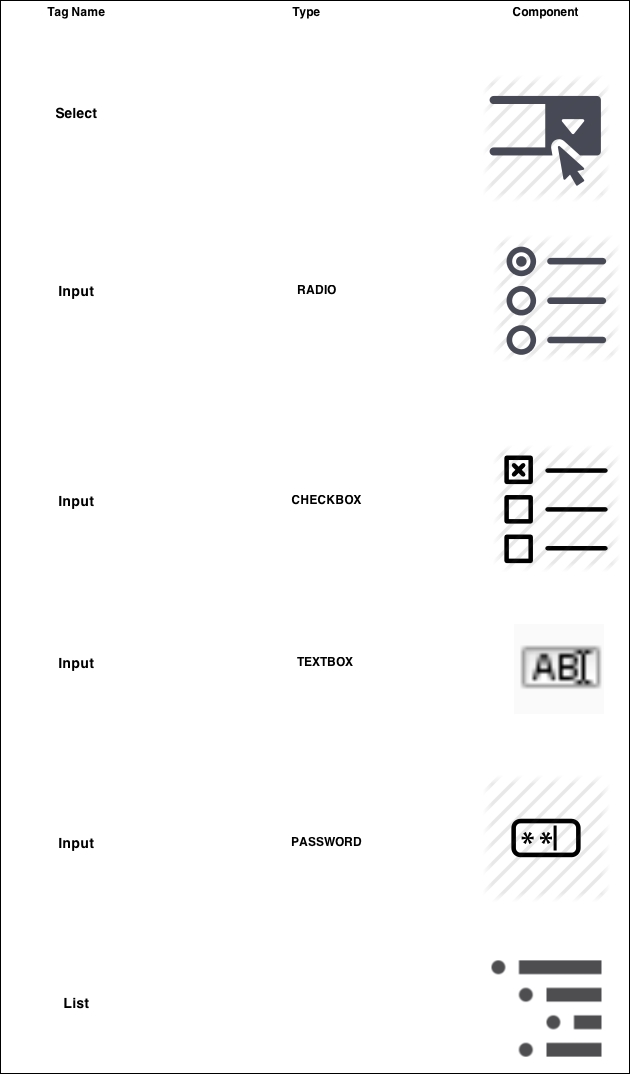
There are many tags whose names are input. For those, you have to further filter them by using the type attribute. We will learn that in the next section.
Before we discuss about the className() method, we have to talk a little about style and CSS. Every HTML element on a web page, generally, is styled by the web page developer or designer. It is not mandatory that each element should be styled, but it is generally followed to make it appealing to the end user.
So, in order to apply styles to an element, they can be declared directly in the element tag or placed in a separate file called the CSS file and can be referenced in the element using the className() method. For instance, a style attribute for a button can be declared in a CSS file as follows:
.buttonStyle{
    width: 50px;
    height: 50px;
    border-radius: 50%;
    margin: 0% 2%;
}
Now, this style can be applied on the button element in a web page as follows:
<button name="sampleBtnName" id="sampleBtnId" class="buttonStyle">I'm Button</button>So, buttonStyle is used as value for the class attribute of the button element, and it inherits all the styles declared in the CSS file. Now, let's try this on our Google search page. We will try to make WebDriver identify the search box using its class name and type some text into it. First, in order to get the class name of the search box, as we know, we will use Firebug and fetch it. After getting it, change the location mechanism to By.className and specify the class attribute value in it. The code for that is as follows:
 public class GoogleSearchByClassName{
  public static void main(String[] args){
    WebDriver driver = new FirefoxDriver();
    driver.get("http://www.google.com");
    WebElement searchBox = driver.findElement(By.className("gbqfif"));
    searchBox.sendKeys("Packt Publishing");
  }
 }
In the preceding code, we have used the By.className locating mechanism by passing the class attribute value to it.
As the name suggests, the By.linkText locating mechanism can only be used to identify the HTML links. Before we start discussing about how WebDriver can be commanded to identify a link element using link text, let's see what an HTML link element looks like. The HTML link elements are represented on a web page using the <a> tag, abbreviation for the anchor tag. A typical anchor tag looks like this:
<a href="/intl/en/about.html">About Google</a>
Here, href is the link to a different page where your web browser will take you when clicked on the link. So, the preceding HTML code when rendered by the browser looks like this:

This About Google is the link text. So the locating mechanism By.linkText uses this text on an anchor tag to identify the WebElement. The code for this would look like this:
 public class GoogleSearchByLinkText{
  public static void main(String[] args){
    WebDriver driver = new FirefoxDriver();
    driver.get("http://www.google.com");
    WebElement aboutLink = driver.findElement(By.linkText("About Google"));
    aboutLink.click();
  }
}
Here, the By.linkText locating mechanism is used to identify the About Google link.
The By.partialLinkText locating mechanism is an extension to the previous one. If you are not sure of the entire link text or want to use only part of the link text, you can use this locating mechanism to identify the link element. So let's modify the previous example to use only partial text on the link, that is, About.
 public class GoogleSearchByPartialLinkText{
  public static void main(String[] args){
    WebDriver driver = new FirefoxDriver();
    driver.get("http://www.google.com");
    WebElement aboutLink = driver.findElement(By.partialLinkText("About"));
    aboutLink.click();
  }
}
What happens if there are multiple links whose text has About in it? That is a question to the findElement() method rather than to the locating mechanism. Remember when we discussed the findElement() method earlier, it will return only the first WebElement that it comes across. If you want all the WebElements which contain About in its link text, use the findElements() method, which will return a list of all those elements.
WebDriver uses XPath to identify a WebElement on the web page. Before we see how it does that, we will quickly look at the syntax for XPath. XPath is a short name for the XML path. The HTML for our web page is also one form of the XML document. So in order to identify an element on an HTML page, we need to use a specific XPath syntax as follows:
The root element is identified as
//To identify all the
divelements, the syntax will be//divTo identify the
linktags that are within thedivelement, the syntax will be//div/aTo identify all the elements with a tag, we use
*. The syntax will be//div/*To identify all the
divelements that are at three levels down from the root, we can use//*/*/divTo identify specific elements, we use attribute values of those elements, such as
//*/div/a[@id='attrValue'], which will return theanchorelement. This element is at third level from root within adivelement, and has anidvalueattrValue
So, we need to pass these kinds of XPath syntaxes to our WebDriver to make it identify our target element. But going through the HTML page figuring out the XPath for each element will be extremely difficult. For this, if you remember, we have installed a Firebug extension named FirePath. This will quickly give you the XPath of the target element that you can use in the WebDriver code. Following is the screenshot of the XPath of the Google Search button:
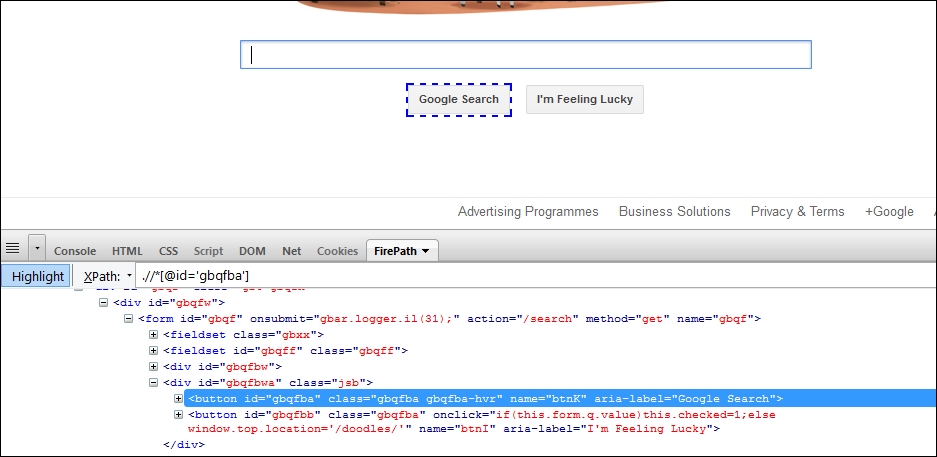
If you see the preceding image, the Google Search Button is selected and in the FirePath tab below the XPath, the value is displayed as //*[@id='gbqfba'].
Now, let us see the code example and how WebDriver uses this XPath to identify the element.
 public class GoogleSearchByXPath{
  public static void main(String[] args){
    WebDriver driver = new FirefoxDriver();
    driver.get("http://www.google.com");
    WebElement searchButton =  driver.findElement(By.xpath("//*[@id='gbqfba']"));
    System.out.println(searchButton.getText());
  }
 }
In the preceding code, we are using the By.xpath locating mechanism and passing the XPath of the WebElement to it.
One disadvantage of using XPath is it is costly in terms of time. For every element to be identified, WebDriver actually scans through the entire page that is very time consuming, and too much usage of XPath in your test script will actually make them too slow to be executed.
The By.cssSelector() method is similar to the By.xpath() method in its usage but the difference is that it is slightly faster than the By.xpath locating mechanism. Following are the commonly used syntaxes to identify elements:
Let's try to modify the previous code, which uses the XPath-locating mechanism to use the cssSelector mechanism.
 public class GoogleSearchByCSSSelector{
  public static void main(String[] args){
    WebDriver driver = new FirefoxDriver();
    driver.get("http://www.google.com");
    WebElement searchButton = driver.findElement(By.cssSelector("#gbqfba"));
    System.out.println(searchButton.getText());
  }
}
The preceding code uses the By.cssSelector locating mechanism that uses the css selector ID of the Google Search button.
Let's look at a slightly complex example. We will try to identify the About Google link on the Google Search page:
 public class GoogleSearchByCSSSelector{
  public static void main(String[] args){
    WebDriver driver = new FirefoxDriver();
    driver.get("http://www.google.com");
    WebElement searchButton = driver.findElement(By.cssSelector("#flrs>a[href='/intl/en/about.html']"));
    System.out.println(searchButton.getText());
  }
 }
The preceding code uses the cssSelector() method to find the anchor element identified by its href attribute[ ].
In the previous section, we have seen how to locate WebElements on a web page by using different locating mechanisms. Here, we will see all the different user actions that can be taken on a WebElement. Different WebElements will have different actions that can be taken on them. For example, in a textbox element, we can type in some text or clear the text that is already typed in it. Similarly for a button, we can click on it, get the dimensions of it, and so on, but we cannot type into a button, and for a link, we cannot type into it. So, though all the actions are listed in one WebElement interface, it is the test script developer's responsibility to use the actions that are supported by the target element. In case we try to execute a wrong action on a WebElement, we don't see any exception or error thrown and also we don't see any action that really gets executed; WebDriver ignores such actions silently.
Now, let's get into each of the actions individually by looking into their Javadocs and a code example.
The getAttribute action can be executed on all the WebElements. Remember we have seen attributes of WebElement in the WebElements section. The HTML attributes are modifiers of HTML elements. They are generally key-value pairs appearing in the start tag of an element. For example, in the following WebElement:
<label name="Username" id="uname">Enter Username: </label>In the preceding code, name and id are the attributes or attribute keys and Username and uname are the attribute values.
The API syntax of the getAttributes
() method is as follows:
java.lang.String getAttribute(java.lang.String name)
In the preceding code, the input parameter is String, which is the name of the attribute. The return type is again String, which is the value of the attribute.
Now let's see how we can get all the attributes of a WebElement using WebDriver. Here, we will make use of the Google Search button again. This is what the element looks like:
<button id="gbqfba" class="gbqfba" name="btnK" aria-label="Google Search">
We will list all the attributes of this WebElement using WebDriver. The code for that is as follows:
 public class GetAttributes{
  public static void main(String[] args){
    WebDriver driver = new FirefoxDriver();
    driver.get("http://www.google.com");
    WebElement searchButton = driver.findElement(By.name("btnK"));
    System.out.println("Name of the button is: "
                         +searchButton.getAttribute("name"));
    System.out.println("Id of the button is: "                         +searchButton.getAttribute("id"));
    System.out.println("Class of the button is: "
                         +searchButton.getAttribute("class"));
    System.out.println("Label of the button is: "
                         +searchButton.getAttribute("aria-  label"));
  }
 }
In the preceding code, the last four lines of code use the getAttribute() method to fetch the attribute values of the attribute name, id, class, and aria-label of the Google Search button WebElement. The output of the preceding code is shown in the following screenshot:

Going back to the By.tagName
() method of the previous section, if the search by locating mechanism, By.tagName, results in more than one result, you can use the getAttribute() method to further filter the results and get to your exact intended element.
The sendKeys action is applicable for textbox or textarea HTML elements. This is used to type text into the textbox. This will simulate the user keyboard and types text into WebElements exactly as would a user.
The API syntax for the sendKeys() method is as follows:
void sendKeys(java.lang.CharSequence...keysToSend)
The input parameter for the preceding method is CharSequence of text that has to be entered into the element. This method doesn't return anything.
Now, let's see a code example of how to type a search text into the Google Search box using the sendKeys() method.
 public class sendKeys{
  public static void main(String[] args){
    WebDriver driver = new FirefoxDriver();
    driver.get("http://www.google.com");
    WebElement searchBox = driver.findElement(By.name("q"));
    searchButton.sendKeys("Packt Publishing");
  }
}
In the preceding code, the sendKeys() method is used to type the required text in the textbox element of the web page. This is how we deal with normal keys, but if you want to type in some special keys, such as Backspace, Enter, Tab, Shift, and so on, we need to use a special enum class of WebDriver named Keys. Using the Keys enumeration, you can simulate many special keys while typing into a WebElement. Now let's see some code example, which uses the Shift key to type the text in uppercase in the Google Search Box:
 public class SendKeys{
  public static void main(String[] args){
    WebDriver driver = new FirefoxDriver();
    driver.get("http://www.google.com");
    WebElement searchBox = driver.findElement(By.name("q"));
    searchBox.sendKeys(Keys.chord(Keys.SHIFT,"packt publishing"));
  }
 }
In the preceding code, the chord() method from the Keys enum is used to type the key while the text specified is being given as an input to be the textbox. Try this in your environment to see all the text being typed in uppercase.
The clear action is similar to the sendKeys
() method, which is applicable for textbox and textarea elements. This is used to erase the text that is entered in a WebElement using the sendKeys
() method. This can be achieved using the Keys.BACK_SPACE enum, but WebDriver has given us an explicit method to clear the text easily.
The API syntax for the clear() method is as follows:
void clear()
This method doesn't take any input and doesn't return any output. It is simply executed on the target text entry element.
Now, let us see how we can clear text that is entered in the Google Search box. The code example for it is as follows:
 public class Clear{
  public static void main(String[] args){
    WebDriver driver = new FirefoxDriver();
    driver.get("http://www.google.com");
    WebElement searchBox = driver.findElement(By.name("q"));
    searchBox.sendKeys(Keys.chord(Keys.SHIFT,"packt publishing"));
    searchBox.clear();
  }
 }
We have used the WebElement's clear() method to clear the text after typing packt publishing into the Google Search box.
The submit action can be taken on a form or on an element, which is inside a form. This is used to submit a form of a web page to the server hosting the web application.
The API syntax for the submit() method is as follows:
void submit()
The preceding method doesn't take any input parameter and doesn't return anything. But a NoSuchElementException is thrown when this method is executed on a WebElement that is not present within a form.
Now, let's see a code example to submit the form on a Google Search page:
 public class Submit{
  public static void main(String[] args){
    WebDriver driver = new FirefoxDriver();
    driver.get("http://www.google.com");
    WebElement searchBox = driver.findElement(By.name("q"));
    searchBox.sendKeys(Keys.chord(Keys.SHIFT,"packt publishing"));
    searchBox.submit();
  }
}
In the preceding code, towards the end is where the Search form is submitted to the Google servers using the submit() method. Now, try to execute the submit() method on an element, let's say the About Google link, which is not a part of any form. We should see a NoSuchElementException being thrown.
So when you use the submit() method on a WebElement, make sure it is part of the form element.
The getCssValue action can be taken on all the WebElements. This is used to fetch the CSS properties' values of the given element. CSS properties can be font-family, background-color, color, and so on. This is useful when you want to validate the CSS styles that are applied to your WebElements through your test scripts.
The API syntax for the getCssValue() method is as follows:
java.lang.String getCssValue(java.lang.String propertyName)
In the preceding code, the input parameter is the String value of the CSS property name, and return type is the value assigned for that property name.
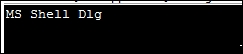
The following is the code example to retrieve the font-family of the text on the Google Search button:
 public class GetCSSValue{
  public static void main(String[] args){
    WebDriver driver = new FirefoxDriver();
    driver.get("http://www.google.com");
    WebElement searchButton = driver.findElement(By.name("btnK"));
    System.out.println(searchButton.getCssValue("font-family"));
  }
 }
The preceding code uses the getCssValue() method to find the font-family of the text visible on the Google Search button. The output of this is shown in the following screenshot:
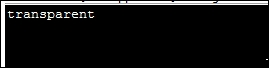
Similarly, we can retrieve the background color of an element using this method. Let us see a code for this:
 public class GetCSSValue2{
  public static void main(String[] args){
    WebDriver driver = new FirefoxDriver();
   driver.get("http://www.google.com");
    WebElement searchButton = driver.findElement(By.name("btnK"));
    System.out.println(searchButton.getCssValue("background-color"));
  }
 }
The output for the preceding code is shown in the following screenshot:
The getLocation action can be executed on all the WebElements. This is used to get the relative position of an element where it is rendered on the web page. This position is calculated relative to the top-left corner of the web page of which the (x, y) coordinates are assumed as (0, 0). This method will be of use if your test script tries to validate the layout of your web page.
The API syntax of the getLocation() method is as follows:
Point getLocation()
The preceding method obviously doesn't take any input parameter, but the return type is a Point class, which contains the (x, y) coordinates of the element.
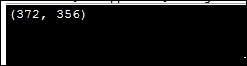
The following is the code to retrieve the location of the Google Search button:
 public class GetLocation{
  public static void main(String[] args){
    WebDriver driver = new FirefoxDriver();
    driver.get("http://www.google.com");
    WebElement searchButton = driver.findElement(By.name("btnK"));
    System.out.println(searchButton.getLocation());
  }
 }
The output for the preceding code is the (x, y) location of the Google Search button, as shown in the following screenshot:
The getSize action can also be applied on all the visible components of HTML. It will return the width and height of the rendered WebElement.
The API syntax of the getSize() method is as follows:
Dimension getSize()
The preceding method doesn't take any input parameters, and the return type is a class instance named Dimension. This class contains the width and height of the target WebElement.
The following is the code to get the width and height of our favorite Google Search button:
  public class GetSize{
  public static void main(String[] args){
    WebDriver driver = new FirefoxDriver();
    driver.get("http://www.google.com");
    WebElement searchButton = driver.findElement(By.name("btnK"));
    System.out.println(searchButton.getSize());
   }
  }
The output for the preceding code is the width and height of the Google Search button, as shown in the following screenshot:

The getText action can be taken on all the WebElements. It will give the visible text if the element contains any text on it or else will return nothing.
The API syntax for the getText() method is as follows:
java.lang.String getText()
There is no input parameter for the preceding method, but it returns the visible innerText string of the WebElement if anything is available, else will return an empty string.
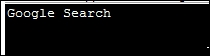
The following is the code to get the text present on the Google Search button:
 public class GetText{
  public static void main(String[] args){
    WebDriver driver = new FirefoxDriver();
    driver.get("http://www.google.com");
    WebElement searchButton = driver.findElement(By.name("btnK"));
    System.out.println(searchButton.getText());
  }
 }
The preceding code uses the getText() method to fetch the text present on the Google Search button, which returns the following:
The getTagName action can be taken on all the WebElements. This will return the tag name of the WebElement. For example, in the following HTML code, button is the tag name of the HTML element:
<button id="gbqfba" class="gbqfba" name="btnK" aria-label="Google Search">
In the preceding code, button is the tag name of the HTML element.
The API syntax for the getTagName() method is as follows:
java.lang.String getTagName()
The return type of the preceding method is String, and it returns the tag name of the target element.
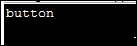
The following is the code that returns the tag name of the Google Search button:
 public class GetTagName{
  public static void main(String[] args){
    WebDriver driver = new FirefoxDriver();
    driver.get("http://www.google.com");
    WebElement searchButton = driver.findElement(By.name("btnK"));
    System.out.println(searchButton.getTagName());
  }
}
The preceding code uses the getTagName() method to get the tag name of the Google Search button element. The output of the code is as expected:
The isDisplayed action verifies if an element is displayed on the web page and can be executed on all the WebElements.
The API syntax for the isDisplayed
() method is as follows:
boolean isDisplayed()
The preceding method returns a Boolean value specifying whether the target element is displayed or not displayed on the web page.
The following is the code to verify if the Google Search button is displayed or not, which obviously should return true in this case:
 public class isDisplayed{
  public static void main(String[] args){
    WebDriver driver = new FirefoxDriver();
    driver.get("http://www.google.com");
    WebElement searchButton = driver.findElement(By.name("btnK"));
    System.out.println(searchButton.isDisplayed());
  }
 }
The preceding code uses the isDisplayed() method to determine if the element is displayed on a web page. The preceding code returns true for the Google Search button.
The isEnabled action verifies if an element is enabled on the web page and can be executed on all the WebElements.
The API syntax for the isEnabled() method is as follows:
boolean isEnabled()
The preceding method returns a Boolean value specifying whether the target element is enabled or not enabled on the web page.
The following is the code to verify if the Google Search button is enabled or not, which obviously should return true in this case:
 public class isEnabled{
  public static void main(String[] args){
    WebDriver driver = new FirefoxDriver();
    driver.get("http://www.google.com");
    WebElement searchButton = driver.findElement(By.name("btnK"));
    System.out.println(searchButton.isEnabled());
  }
 }
The preceding code uses the isEnabled() method to determine if the element is displayed on a web page. The preceding code returns true for the Google Search button.
The
isSelected action verifies if an element is selected right now on the web page and can be executed only on a radio button, options in select, and checkbox WebElements. When executed on other elements, it will return false.
The API syntax for the isSelected() method is as follows:
boolean isSelected()
The preceding method returns a Boolean value specifying whether the target element is selected or not selected on the web page.
The following is the code to verify if the Google Search box is selected or not on a search page:
 public class IsSelected{
  public static void main(String[] args){
    WebDriver driver = new FirefoxDriver();
    driver.get("http://www.google.com");
    WebElement searchBox = driver.findElement(By.name("q"));
    System.out.println(searchBox.isSelected());
  }
 }
The preceding code uses the isSelected() method. It returns false for the Google Search box, because this is not a radio button, options in select, or a checkbox.