
With the database setup out of the way, let's start creating our application. If you remember, the first thing on our list of features is to allow users to register accounts on our site. As I've mentioned before, we'll be using the auth package from the Django contrib packages to provide user account features.
In order to use the auth package, we'll need to add it our INSTALLED_APPS list in the settings file (found at $PROJECT_ROOT/src/blueblog/settings.py). In the settings file, find the line defining INSTALLED_APPS and make sure that the string django.contrib.auth is part of the list. It should be by default, but for some reason if it's not there, add it manually.
You'll see that Django has included the auth package and couple of other contrib applications to the list by default. A new Django project includes these applications by default because almost all Django projects end up using these.
Note
If you need to add the auth application to the list, remember to use quotes to surround the application name.
We also need to make sure that the MIDDLEWARE_CLASSES list contains django.contrib.sessions.middleware.SessionMiddleware, django.contrib.auth.middleware.AuthenticationMiddleware, and django.contrib.auth.middleware.SessionAuthenticationMiddleware. These middleware classes give us access to the logged in user in our views, and also make sure that if I change the password for my account, I'm logged out from all other devices that I previously logged on to.
As you learn more about the various contrib applications and their purpose, you can start removing any that you know you won't need in your project. Now, let's add the URLs, views and templates that allow the users to register with our application.
In order to create the various views, URLs, and templates related to user accounts, we'll start a new application. To do so, type the following in your command line:
> python manage.py startapp accounts
This should create a new accounts folder inside the src folder. We'll add code that deals with user accounts in files found inside this folder. To let Django know that we want to use this application in our project, add the application name (accounts) to the INSTALLED_APPS setting variable; making sure to surround it in quotes.
The first feature we will work on is user registration. Let's start by writing the code for the registration view inside accounts/views.py. Make sure that the contents of views.py match what is shown here:
from django.contrib.auth.forms import UserCreationForm
from django.core.urlresolvers import reverse
from django.views.generic import CreateView


class UserRegistrationView(CreateView):
    form_class = UserCreationForm
    template_name = 'user_registration.html'

    def get_success_url(self):
        return reverse('home')
I'll explain what each line of this code is doing in a bit. But first, I'd like you to get to a state where you can register a new user and see for yourself how the flow works. Next, we'll create the template for this view. In order to create the template, you first need to create a new folder called templates inside the accounts folder. The name of the folder is important, since Django automatically searches for templates in folders of that name. To create this folder, just type the following command:
> mkdir accounts/templates
Next, create a new file called user_registration.html inside the templates folder and type in the code shown below:
{% extends "base.html" %}

{% block content %}
<h1>Create New User</h1>
<form action="" method="post">{% csrf_token %}
    {{ form.as_p }}
    <input type="submit" value="Create Account" />
</form>
{% endblock %}
Finally, remove the existing code in blueblog/urls.py and replace it with this:
from django.conf.urls import include
from django.conf.urls import url
from django.contrib import admin
from django.views.generic import TemplateView
from accounts.views import UserRegistrationView

urlpatterns = [
    url(r'^admin/', include(admin.site.urls)),
    url(r'^$', TemplateView.as_view(template_name='base.html'), name='home'),
    url(r'^new-user/$', UserRegistrationView.as_view(), name='user_registration'),
]
That's all the code we need to get user registration in our project! Let's do a quick demonstration. Run the development server by typing the following command:
> python manage.py runser
ver
In your browser, visit http://127.0.0.1:8000/new-user/ and you'll see a user registration form. Fill that in, and click submit. You'll be taken to a blank page on successful registration. If there are some errors the form will be shown again with the appropriate error messages. Let's verify that our new account was indeed created in our database.
For the next step, we will need to have an administrator account. The Django auth contrib application can assign permissions to user accounts. The user with the highest level of permission is called the super user. The super user account has free reign over the application and can perform any administrator actions. To create a super user account, run this command:
> python manage.py createsuperuser
Note
Since you already have the runserver command running in your terminal, you will need to quit it first by pressing Ctrl + C in the terminal. You can then run the createsuperuser command in the same terminal. After running the createsuperuser command, you'll need to start the runserver command again to browse the site.
If you want to keep the runserver command running and run the createsuperuser command in a new terminal window, you will need to make sure you activate the virtual environment for this application by running the same source blueblogEnv/bin/activate command that we ran earlier when we created our new project.
After you have created the account visit http://127.0.0.1:8000/admin/ and log in with the admin account. You will see a link titled Users. Click that and you should see a list of users registered in our app. It will include the user you just created.
Congrats! In most other frameworks, getting to this point with a working user registration feature would take a lot more effort. Django, with it's batteries included approach, allows us to do the same with a minimum of effort.
Next, I'll explain what each line of code that you wrote does.
Here's the code for the user registration view again:
class UserRegistrationView(CreateView):
    form_class = UserCreationForm
    template_name = 'user_registration.html'

    def get_success_url(self):
        return reverse('home')
Our view is pretty short for something that does such a lot of work. That's because instead of writing code from scratch to handle all the work, we use one of the most useful features of Django, generic views. Generic views are base classes included with Django that provide functionality commonly required by a lot of web apps. The power of generic views comes from the ability to customize them to a great degree with ease.
Note
You can read more about Django generic views in the documentation available at https://docs.djangoproject.com/en/stable/topics/class-based-views/.
Here, we're using the CreateView generic view. This generic view can display a ModelForm using a template and on submission can either redisplay the page with errors if the form data was invalid or call the save method on the form and redirect the user to a configurable URL. The CreateView can be configured in a number of ways.
If you want a ModelForm to be created automatically from some Django model, just set the model attribute to the model class, and the form will be generated automatically from the fields of the model. If you want the form only show certain fields from the model, use the fields attribute to list the fields you want, exactly like you'd do when using a ModelForm.
In our case, instead of having a ModelForm generated automatically, we're providing one of our own; UserCreationForm. We do this by setting the form_class attribute on the view. This form, which is part of the auth contrib app, provides the fields and a save method that can be used to create a new user. As we start developing more complicated applications in later chapter, you'll see that this theme of composing solutions from small reusable parts provided by Django is a common practice in Django web app development, and in my opinion is one of the best features of the framework.
Finally, we define a get_success_url function that does a simple reverse URL and returns the generated URL. The CreateView calls this function to get URL to redirect the user to when a valid form is submitted and saved successfully. To get something up and running quickly, we left out a real success page and just redirected the user to a blank page. We'll fix this later.
The template, which extends the base template we created earlier simply displays the form passed to it by the CreateView using the form.as_p method, which you might have seen in the simple Django projects you may have worked on before.
The urls.py file is a bit more interesting. You should be familiar with most of it, the parts where we include the admin site URLs and the part where we assign our view a URL. It's the usage of TemplateView that I want to explain here.
Like the CreateView, the TemplateView is another generic view provided to us by Django. As the name suggests, this view can render and display a template to the user. It has a number of customization options. The most important one is template_name, which tells it which template to render and display to the user.
We could have created another view class that subclassed the TemplateView, and customized it by setting attributes and overriding functions like we did for our registration view. But I wanted to show you another method of using a generic view in Django. If you only need to customize some basic parameters of a generic view; in this case we only wanted to set the template_name parameter of the view, you can just pass the values as key=value pairs as function keyword arguments to the as_view method of the class when including it in the urls.py file. Here, we pass the template name which the view renders when the user access it's URL. Since we just needed a placeholder URL to redirect the user to, we simply use the blank base.html template.
Tip
This technique of customizing generic views by passing key/value pairs only makes sense when you're interested in customizing very basic attributes, like we do here. In case you want more complicated customizations, I advice you subclass the view, otherwise you will quickly get messy code that is difficult to maintain.
With registration out of the way, let's write code to provide users with the ability to log in and log out. To start, the user needs some way to go to the login and registration pages from any page on the site. To do this, we'll need to add header links to our template. This is the perfect opportunity to demonstrate how template inheritance can lead to much cleaner and less code in our templates.
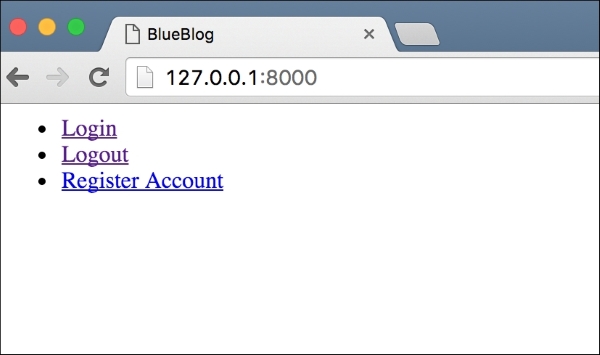
Add the following lines right after the body tag in our base.html file:
{% block header %}
<ul>
    <li><a href="">Login</a></li>
    <li><a href="">Logout</a></li>
    <li><a href="{% url "user_registration"%}">Register Account</a></li>
</ul>
{% endblock %}
If you open the home page for our site now (at http://127.0.0.1:8000/), you should see that we now have three links on what was previously a blank page. It should look similar to the following screenshot:
Click on the Register Account link. You'll see the registration form we had before, and the same three links again. Note how we only added those links to the base.html template. But since the user registration template extends the base template, it got those links without any effort on our part. This is where template inheritance really shines.
You might have noticed that the href for the login/logout links is empty. Let's start with the login part.
Let's define the URL first. In blueblog/urls.py import the login view from the auth app:
from django.contrib.auth.views import login
Next, add this to the urlpatterns list:
url(r'^login/$', login, {'template_name': 'login.html'}, name='login'),Then create a new file inside accounts/templates called login.html. Put in the following content:
{% extends "base.html" %}

{% block content %}
<h1>Login</h1>
<form action="{% url "login" %}" method="post">{% csrf_token %}
    {{ form.as_p }}

    <input type="hidden" name="next" value="{{ next }}" />
    <input type="submit" value="Submit" />
</form>
{% endblock %}
Finally, open up blueblog/settings.py and add the following line to the end of the file:
LOGIN_REDIRECT_URL = '/'
Let's go over what we've done here. First, notice that instead of creating our own code to handle the login feature, we used the view provided by the auth app. We import it using from django.contrib.auth.views import login. Next, we associate it with the login/URL. If you remember the user registration part, we passed the template name to the home page view as a keyword parameter in the as_view() function. That approach is used for class-based views. For old-style view functions, we can pass a dictionary to the url function that is passed as keyword arguments to the view. Here, we use the template we created in login.html.
If you look at the documentation for the login view (https://docs.djangoproject.com/en/stable/topics/auth/default/#django.contrib.auth.views.login), you'll see that on successfully logging in, it redirects the user to settings.LOGIN_REDIRECT_URL. By default, this setting has a value of /accounts/profile/. Since we don't have such a URL defined, we change the setting to point to our home page URL instead.
Next, let's define the logout view.
In blueblog/urls.py import the logout view using from django.contrib.auth.views import logout and add the following to the urlpatterns list:
url(r'^logout/$', logout, {'next_page': '/login/'}, name='logout'),And that's it. The logout view doesn't need a template; it just needs to be configured with a URL to redirect the user to after login them out. We just redirect the user back to the login page.
Having added the login/logout view, we need to make the links we added in our navigation menu earlier take the user to those views. Change the list of links we had in templates/base.html to the following:
<ul>
    {% if request.user.is_authenticated %}
    <li><a href="{% url "logout" %}">Logout</a></li>
    {% else %}
    <li><a href="{% url "login" %}">Login</a></li>
    <li><a href="{% url "user_registration"%}">Register Account</a></li>
    {% endif %}
</ul>
This will show the Login and Register Account links to the user if they aren't already logged in. If they are logged in, which we check using the request.user.is_authenticated function, they are only shown the Logout link. You can test all of these links yourself and see how little code was needed to make such a major feature of our site work. This is all possible because of the contrib applications that Django provides.
With the user registration out of the way, let's get started with the blogging side of the application. We'll create a new application for the blog, so in the console, type in the following:
> python manage.py startapp blog
> mkdir blog/templates
Add the blog application to the list of INSTALLED_APPS in our settings.py file. With the app created and installed, let's start with the models we'll be using.
In blog/models.py, type the code shown below:
from django.contrib.auth.models import User
from django.db import models


class Blog(models.Model):
    owner = models.ForeignKey(User, editable=False)
    title = models.CharField(max_length=500)

    slug = models.CharField(max_length=500, editable=False)


class BlogPost(models.Model):
    blog = models.ForeignKey(Blog)
    title = models.CharField(max_length=500)
    body = models.TextField()

    is_published = models.BooleanField(default=False)

    slug = models.SlugField(max_length=500, editable=False)
After typing in this code, run the following commands to create the database tables for these models:
> python manage.py makemigrations blog
> python manage.py migrate blog
This will create the database tables necessary to support our new models. The models are pretty basic. One field type that you might not have used before is the SlugField. A slug is a piece of text that is used to uniquely identify something. In our case, we use two slug fields to identify both our blog and our blog post. Since the fields are non-editable, we'll have to write the code to give them some values ourselves. We'll look into that later.
Let's create a view where the user can setup his blog. Let's make the form that the user will use to create a new blog. Create a new file blog/forms.py and enter the following:
from django import forms

from blog.models import Blog


class BlogForm(forms.ModelForm):
    class Meta:
        model = Blog

        fields = [
                 'title'
                 ]
This creates a model form that allows edits to only the title field of our Blog model. Let's create a template and view to go along with this form.
Create a file called blog/templates/blog_settings.html and type in the following HTML code:
{% extends "base.html" %}

{% block content %}
<h1>Blog Settings</h1>
<form action="{% url "new-blog" %}" method="post">{% csrf_token %}
    {{ form.as_p }}

    <input type="submit" value="Submit" />
</form>
{% endblock %}
As you may have noticed, I've used the url tag on the blog-settings named URL, but haven't created that URL pattern yet. We'll do that after we create the view, but just remember the name for later and make sure our URL gets the same name.
Note
There is no right order in which to create your view, template and URLs. It's up to you to decide whichever you are more comfortable with.
In your blog/views.py file, add the following code to create the view:
from django.core.urlresolvers import reverse
from django.http.response import HttpResponseRedirect
from django.utils.text import slugify
from django.views.generic import CreateView

from blog.forms import BlogForm


class NewBlogView(CreateView):
    form_class = BlogForm
    template_name = 'blog_settings.html'

    def form_valid(self, form):
        blog_obj = form.save(commit=False)
        blog_obj.owner = self.request.user
        blog_obj.slug = slugify(blog_obj.title)

        blog_obj.save()
        return HttpResponseRedirect(reverse('home'))
Modify blueblog/urls.py. Add this to the top of the file from blog.views import NewBlogView and add this to the urlpatterns list:
url(r'^blog/new/$', NewBlogView.as_view(), name='new-blog'),
As a final step, we need some way for the user to access our new view. Change the header block in base.html to look like this:
{% block header %}
<ul>
{% if request.user.is_authenticated %}
<li><a href="{% url "new-blog" %}">Create New Blog</a></li>
<li><a href="{% url "logout" %}">Logout</a></li>
{% else %}
<li><a href="{% url "login" %}">Login</a></li>
<li><a href="{% url "user_registration"%}">Register Account</a></li>
{% endif %}
</ul>
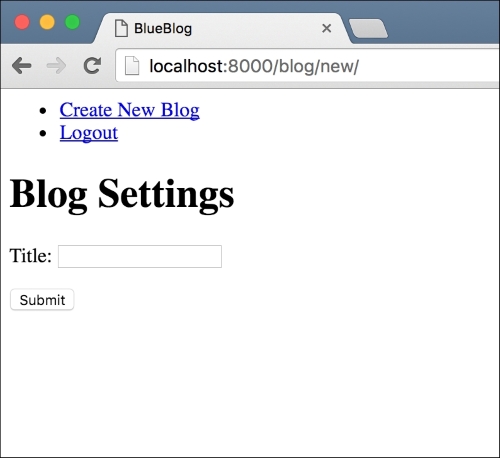
{% endblock %}To test our latest feature, open up the home page at http://127.0.0.1:8000 and click the Create New Blog link. It will present a form where you can enter the blog title and save your new blog. The page should look similar to the following screenshot:
Most of the code we have added is pretty basic. The interesting part is the NewBlogView. Let's look at how it works. First of all, notice that we subclass it from the CreateView generic view. The create view allows us to easily display and process a form that will create a new object of the given model. To configure it, we can either set the model and fields attribute of the view, which the create view will then use to generate a model form, or we can manually create a model form and assign it to the view, like we've done here.
We also configure the template that will be used to display the form. We then define the form_valid function, which the create view calls when the form is submitted with valid data. In our implementation, we call the model forms save method with the commit keyword parameter set to False. This tells the form to create a new object of our model with the data it was passed, but not to save the created object to the database. Then we set the owner of the new blog object to the logged in user and set its slug to a slugified version of the title entered by the user. slugify is one of the many utility functions that Django provides. Once we've modified the blog object per our requirement, we save it and return an HttpResponseRedirect from the form_valid function. This response is returned to the browser which then takes the user to the home page.
Until now, we've made do with a blank page with just a navigation bar as our home page. But it has a serious problem. Start by creating a new blog by following the link in the navigation bar. On successfully creating a new blog, we are redirected back to the home page, where we are again greeted with a link to create another blog. But this isn't the behavior we want. Ideally, our users should be limited to one blog per account.
Let's fix this. First, we'll restrict the blog creation view to only allow users to create a blog if they don't already have one. Import HttpResponseForbidden and the Blog model in blog/views.py:
from django.http.response import HttpResponseForbidden
from blog.models import Blog
Add a dispatch method to the NewBlogView class with the following code:
def dispatch(self, request, *args, **kwargs):
    user = request.user
    if Blog.objects.filter(owner=user).exists():
        return HttpResponseForbidden ('You can not create more than one blogs per account')
    else:
        return super(NewBlogView, self).dispatch(request, *args, **kwargs)
The dispatch method is one of the most useful methods to override on generic views. It is the first method that is called when the view URL is hit, and decides based on the request type whether to call the get or post methods on the view class to process the request. Thus, if you ever want to have some code that is run on all request types (GET, POST, HEAD, PUT, and so on), dispatch is the best method to override.
In this case, we make sure that the user doesn't already have a blog object associated with their account. If they do, we return the Not Allowed response by using the HttpResponseForbidden response class. Try it out. You shouldn't even be able to access the new blog page now if you have already created a blog before and should see an error instead.
One last thing. Try accessing the URL http://127.0.0.1:8000/blog/new/ after logging out. Notice how you'll get an AnonymousUser object is not iterable error. This is because even though you're not logged in as a registered user, the code for the view still assumes that you are. Also, you should not be able to access the new blog page without logging in first. To fix this, first put these two import lines at the top of blog/views.py:
from django.utils.decorators import method_decorator
from django.contrib.auth.decorators import login_required
Then change the definition line of the dispatch method to match the following:
@method_decorator(login_required)
def dispatch(self, request, *args, **kwargs):
If you try to access the page now without logging in first, you should see a Page not found (404) Django error page. If you look at the URL for that page, you'll see that Django is trying to serve the /accounts/login/ URL. That's the default behavior for the login_required decorator. To fix this we need to change the value of the LOGIN_URL variable in our settings file. Put this in blueblog/settings.py:
LOGIN_URL = '/login/'
Try accessing http://localhost:8000/blog/new/ now and you will be redirected to the login page. If you put in the correct username/password combination, you will be logged in and taken to the page you were trying to access before, the Create New Blog page. This functionality is provided to us for free because we use the built-in login view of Django.
We'll discuss the method_decorator and the login_required decorator in later chapters. If you want more info on these now, look at their documentation in the Django docs. It does an excellent job of explaining both.
You will find the documentation for login_required at https://docs.djangoproject.com/en/stable/topics/auth/default/#the-login-required-decorator. For the method_decorator, you can look at https://docs.djangoproject.com/en/stable/topics/class-based-views/intro/#decorating-the-class.
It's high time that we created a proper home page for our users instead of showing a blank page with some navigation links. Also, it seems very unprofessional to show users the Create New Blog link when it leads to an error page. Let's fix all these issues by creating a home page view that contains a bit of intelligence. We'll put the code for our home page view in the blog application. Technically it can go anywhere, but I personally like to put such views in either the main application of the project (the blog in this case) or create a new application for such common views. In your blog/views.py file, import the TemplateView generic view from django.views.generic import TemplateView and put the following code for the view:
class HomeView(TemplateView):
    template_name = 'home.html'

    def get_context_data(self, **kwargs):
        ctx = super(HomeView, self).get_context_data(**kwargs)

        if self.request.user.is_authenticated():
            ctx['has_blog'] = Blog.objects.filter(owner=self.request.user).exists()

        return ctx
Tie this new view to the home page URL by importing it in blueblog/urls.py using from blog.views import HomeView and changing the existing root URL config from url(r'^$', TemplateView.as_view(template_name='base.html'), name='home'), to url(r'^$', HomeView.as_view(), name='home'),.
Since the TemplateView class is no longer required, you can remove it from the imports. You should already have a good idea of what we're doing here. The only new thing is the TemplateView and it's get_context_data method. The TemplateView is another one of Djangos built-in generic views. We configure it by providing a template file name and the view renders that template by passing it the dictionary returned by our get_context_data function as the context. Here, we are setting the has_blog context variable to True if the user has an existing blog associated with his account.
With our view done, we'll need to make a few changes to our base.html template and add a new home.html template. For the base.html template, change the code in the header block to match:
{% block header %}
<ul>
    {% if request.user.is_authenticated %}
    {% block logged_in_nav %}{% endblock %}
    <li><a href="{% url "logout" %}">Logout</a></li>
    {% else %}
    <li><a href="{% url "login" %}">Login</a></li>
    <li><a href="{% url "user_registration"%}">Register Account</a></li>
    {% endif %}
</ul>
{% endblock %}
We've removed the Create New Blog link and replaced it with another block called logged_in_nav. The idea is that each page that inherits from the base template can add navigation links here to be shown to a logged in user. Finally, create a new file called blog/templates/home.html and add the following code:
{% extends "base.html" %}

{% block logged_in_nav %}
{% if not has_blog %}
<li><a href="{% url "new-blog" %}">Create New Blog</a></li>
{% else %}
<li><a href="">Edit Blog Settings</a></li>
{% endif %}
{% endblock %}
Just like we discussed, the home page template overrides the logged_in_nav block to add a link to create a new blog if the user doesn't have an existing blog, or to edit the settings for the existing blog. You can test that all of our changes work by visiting the home page with a user that has a blog already created, and a new user without a blog. You'll see that link to create a new blog only shows up if the user hasn't already created one.
Next, let's work on the settings view.
Put the code for the view in blog/views.py:
class UpdateBlogView(UpdateView):
    form_class = BlogForm
    template_name = 'blog_settings.html'
    success_url = '/'
    model = Blog

    @method_decorator(login_required)
    def dispatch(self, request, *args, **kwargs):
        return super(UpdateBlogView, self).dispatch(request, *args, **kwargs)
You'll need to import UpdateView from django.views.generic. Also, update the get_context_data method of the HomeView in the same file to match this one:
def get_context_data(self, **kwargs):
    ctx = super(HomeView, self).get_context_data(**kwargs)

    if self.request.user.is_authenticated():
        if Blog.objects.filter(owner=self.request.user).exists():
            ctx['has_blog'] = True
            ctx['blog'] = Blog.objects.get(owner=self.request.user)
    return ctx
Change the blog/templates/blog_settings.html to look like the following:
{% extends "base.html" %}

{% block content %}
<h1>Blog Settings</h1>
<form action="" method="post">{% csrf_token %}
    {{ form.as_p }}

    <input type="submit" value="Submit" />
</form>
{% endblock %}
The only change we've done is to remove the URL we defined explicitly in the form action before. This way, the form will always submit to whatever URL it is served from. This is important as we'll see later.
Update blog/templates/home.html as shown in the following code:
{% extends "base.html" %}

{% block logged_in_nav %}
{% if not has_blog %}
<li><a href="{% url "new-blog" %}">Create New Blog</a></li>
{% else %}
<li><a href="{% url "update-blog" pk=blog.pk %}">Edit Blog Settings</a></li>
{% endif %}
{% endblock %}
Finally, import the UpdateBlogView in blueblog/urls.py and add the following to the urlpatterns.
url(r'^blog/(?P<pk>\d+)/update/$', UpdateBlogView.as_view(), name='update-blog'),
That's it. Visit the home page with the user you used to create the blog in the last section and this time you'll see a link to edit your blog instead of creating a new one. The interesting thing to look at here in the UpdateView subclass; UpdateBlogView. We only defined the form class, the template name, the success URL and the model to get a complete working update view. With these things configured, and our URLs set up so that the primary key of the object we want to edit is passed to our view as the keyword argument named pk, the UpdateView displays a form tied to the instance of the model we want to edit. In the home view, we add the users blog to the context and use it in the home template to generate a URL for the update view.
In the form, we needed to change the action attribute of the form so that on submit, it posted to the current page. Since we use the same template in both the create and update views, we need the form to submit to whatever URL it is rendered from. As you'll see in the upcoming projects as well, it is a common practice in Django to use the same template with similar views. And the way Django generic views are structured makes it easier to do.
Let's create the views that users can use to create and edit blog posts. Let's start with creating a new blog post. We already created the model earlier, so let's start with the form and template we'll use. In blog/forms.py, create this form:
class BlogPostForm(forms.ModelForm):
    class Meta:
        model = BlogPost

        fields = [
                 'title',
                 'body'
                 ]
You'll need to import the BlogPost model as well. For the template, create a new file blog/templates/blog_post.html, and add the following content:
{% extends "base.html" %}

{% block content %}
<h1>Create New Blog Post</h1>
<form action="" method="post">{% csrf_token %}
    {{ form.as_p }}

    <input type="submit" value="Submit" />
</form>
{% endblock %}
In blog/views.py, import the BlogPostForm and BlogPost model and then create the NewBlogPostView:
class NewBlogPostView(CreateView):
    form_class = BlogPostForm
    template_name = 'blog_post.html'

    @method_decorator(login_required)
    def dispatch(self, request, *args, **kwargs):
        return super(NewBlogPostView, self).dispatch(request, *args, **kwargs)

    def form_valid(self, form):
        blog_post_obj = form.save(commit=False)
        blog_post_obj.blog = Blog.objects.get(owner=self.request.user)
        blog_post_obj.slug = slugify(blog_post_obj.title)
        blog_post_obj.is_published = True

        blog_post_obj.save()

        return HttpResponseRedirect(reverse('home'))
In blueblog/urls.py, import the preceding view and add the following URL pattern:
url(r'blog/post/new/$', NewBlogPostView.as_view(), name='new-blog-post'),
And finally, change the homepage template blog/template/home.html to link to our new page:
{% extends "base.html" %}

{% block logged_in_nav %}
    {% if not has_blog %}
    <li><a href="{% url "new-blog" %}">Create New Blog</a></li>
    {% else %}
    <li><a href="{% url "update-blog" pk=blog.pk %}">Edit Blog Settings</a></li>
    <li><a href="{% url "new-blog-post" %}">Create New Blog Post</a></li>
    {% endif %}
{% endblock %}
All of this code should be pretty familiar to you by now. We've used model forms and generic views to get the functionality we need, and all we needed to do was configure some stuff. We haven't written one line of code to create the relevant form fields, validate the user input, and to handle the various error and success scenarios.
You can test out our new view by using the Create New Blog Post link in the navigation on the home page.
As we did before with the Blog model, we'll create an edit view for the blog post using the same template as the create view. But first, we need to add a way for the user to see his blog posts with links to the edit page. To keep things simple, let's add this list to our home page view. In the HomeView, edit the get_context_data method to match the following:
def get_context_data(self, **kwargs):
    ctx = super(HomeView, self).get_context_data(**kwargs)

    if self.request.user.is_authenticated():
        if Blog.objects.filter(owner=self.request.user).exists():
            ctx['has_blog'] = True
            blog = Blog.objects.get(owner=self.request.user)

            ctx['blog'] = blog
            ctx['blog_posts'] = BlogPost.objects.filter(blog=blog)

    return ctx
At the end of blog/templates/home.html; after the logged_in_nav block ends, add the following code to override the content block and show the blog posts:
{% block content %}
<h1>Blog Posts</h1>
<ul>
    {% for post in blog_posts %}
    <li>{{ post.title }} | <a href="">Edit Post</a></li>
    {% endfor %}
</ul>
{% endblock %}
If you visit the home page now, you'll see a list of posts that the user has made. Let's create the functionality to edit the posts. Create the following view in blog/views.py:
class UpdateBlogPostView(UpdateView):
    form_class = BlogPostForm
    template_name = 'blog_post.html'
    success_url = '/'
    model = BlogPost

    @method_decorator(login_required)
    def dispatch(self, request, *args, **kwargs):
        return super(UpdateBlogPostView, self).dispatch(request, *args, **kwargs)
Import this view into your blueblog/urls.py file and add the following pattern:
url(r'blog/post/(?P<pk>\d+)/update/$', UpdateBlogPostView.as_view(), name='update-blog-post'),
Edit the list of blog posts we created earlier in the home page template to add the URL for editing a post:
{% for post in blog_posts %}
    <li>{{ post.title }} | <a href="{% url "update-blog-post" pk=post.pk %}">Edit Post</a></li>
{% endfor %}
If you open the home page now, you'll see that you can click on the Edit Post link and that it takes you to the editing page for the blog post. One last thing we need to fix is the title of the edit blog post page. You may have noticed that even when editing, the title said Create New Blog Post. In order to fix this, replace the h1 tag inside blog/templates/blog_post.html with the following:
<h1>{% if object %}Edit{% else %}Create{% endif %} Blog Post</h1>The context passed to the template by the UpdateView includes a variable called object. This is the instance that the user is currently editing. We check for the existence of this variable in the template. If we find it, we know that we're editing an existing blog post. If not, we know it's a new blog post being created. We detect this and set the title accordingly.
To add a view to show blog posts, add the following view class to blog/views.py:
class BlogPostDetailsView(DetailView):
    model = BlogPost
    template_name = 'blog_post_details.html'
Remember to import DetailView generic view from django.views.generic. Next, create the blog/templates/blog_post_details.html template with the following code:
{% extends "base.html" %}

{% block content %}
<h1>{{ object.title }}</h1>
<p>{{ object.body }}</p>
{% endblock %}
Import the details view and add the following URL pattern to the urls.py file:
url(r'blog/post/(?P<pk>\d+)/$', BlogPostDetailsView.as_view(), name='blog-post-details'),
Finally, change the list of blog posts in the home page template to link to the post details page from the post title:
{% for post in blog_posts %}
    <li><a href="{% url "blog-post-details" pk=post.pk %}">{{ post.title }}</a> | <a href="{% url "update-blog-post" pk=post.pk %}">Edit Post</a></li>
{% endfor %}
On the home page, the blog post titles should now link to the details page.