
Until now, we've only been playing with a single user account and making our site work for that one user. Let's get to the exciting part and add sharing posts to other users blogs. However, once multiple users get added to the mix, there is one thing we should look at before moving forward.
To demonstrate the complete lack of security in our application, let's create a new user account. Log out using the header link and register a new account. Next, log in with that user. You should end up on the home page and should not see any blog posts in the list.
Now, type in the URL http://127.0.0.1:8000/blog/post/1/update/. You should see the blog post we created from our first user in the edit view. Change either the title or the body of the blog post and click save. You are redirected back to the home page and it appears that the save has succeeded. Log in back to the first account and you'll see that the title of the blog post has been updated. This is a serious security breach and must be fixed, otherwise, any user can edit the blog posts for any other user without any restrictions.
The simple way in which we are able to solve this problem again demonstrates the power and simplicity of the Django framework. Add the following method to the UpdateBlogPostView class:
def get_queryset(self):
    queryset = super(UpdateBlogPostView, self).get_queryset()
    return queryset.filter(blog__owner=self.request.user)
That's it! Try opening http://127.0.0.1:8000/blog/post/1/update/ again. This time instead of allowing you to edit the blog post of another user, you see a 404 page.
What this small piece of code does can be understood after looking at how the UpdateView generic view works. The generic view calls a number of small methods, each of which does a specific job. Here's a list of some of the methods that are defined by the UpdateView class:
get_objectget_querysetget_context_object_nameget_context_dataget_slug_field
The thing about having small methods like these is that in order to change the functionality of subclasses, we can override only one of these and fulfill our purpose, like we've done here. Read the Django documentation to figure out what these and many of the other methods used by the generic views do.
For our case, the get_queryset method, as the name suggests, gets the queryset within which the object to edit is searched for. We get the default queryset from the super method (which just returns a self.model.objects.all()) and return a version further filtered to only include blog posts owned by the currently logged in user. You should be familiar with relationship filters. If these are new to you, read the Django tutorial to familiarize yourself with the basics of filtering model querysets.
The reason you now see a 404 if you try to access someone else's blog post is that when the CreateView tries to get the object to edit, it receives a queryset that only includes blog posts owned by the currently logged in user. Since we're trying to edit someone else's blog post, it's not included in that queryset. Not finding the object to edit, the CreateView returns a 404.
The blog post sharing feature allows users to select the blog of another user they would like to share their blog posts with. This would allow users to gain more readers by sharing their content on the blogs of more popular writers, and readers would get to read more relevant content in one place instead of needing to discover more blogs.
The first step in making sharing possible is to add a field on the BlogPost model to indicate which blogs the post is shared with. Add this field to the BlogPost model in blog/models.py:
shared_to = models.ManyToManyField(Blog, related_name='shared_posts')
We are simply adding a basic Django many to many relationship field. If you'd like to review your knowledge of the features a many to many field provides, I advice you take a look at the Django tutorial again, specifically, the part that deals with M2M relationships.
One thing to note about the new field is that we had to specify related_name explicitly. As you might know, whenever you associate a model with another using any relationship field (ForeignKey, OneToMany, ManyToMany) Django automatically adds an attribute to the other model that allows easy access to the linked model.
Before we added the shared_to field, the BlogPost model already had a ForeignKey pointed at the Blog model. If you looked at the attributes available on the Blog model (using the shell), you would have found a blogpost_set attribute, which was a manager object that allowed access to BlogPost models that referenced that Blog. If we try to add the ManyToMany field without a related_name, Django would complain because the new relationship would also try to add a reverse relationship, also called blogpost_set. Because of this we need to give the reverse relationship another name.
After defining the M2M relationship, you can now access blog posts shared with a blog model by using the shared_posts attributes all() method on the Blog model. We'll see an example of that later.
After defining the new field, run the following commands to migrate your DB to create the new relationship:
> python manage.py makemigrations blog
> python manage.py migrate blog
Next, let's create the view that allows the user to select a blog to share their post with. Add this to blog/views.py:
class ShareBlogPostView(TemplateView):
    template_name = 'share_blog_post.html'

    @method_decorator(login_required)
    def dispatch(self, request, *args, **kwargs):
        return super(ShareBlogPostView, self).dispatch(request, *args, **kwargs)

    def get_context_data(self, pk, **kwargs):
        blog_post = BlogPost.objects.get(pk=pk)
        currently_shared_with = blog_post.shared_to.all()
        currently_shared_with_ids = map(lambda x: x.pk, currently_shared_with)
        exclude_from_can_share_list = [blog_post.blog.pk] + list(currently_shared_with_ids)

        can_be_shared_with = Blog.objects.exclude(pk__in=exclude_from_can_share_list)

        return {
            'post': blog_post,
            'is_shared_with': currently_shared_with,
            'can_be_shared_with': can_be_shared_with
        }
This view is a subclass of the template view. You should have a pretty good idea of how it works by now. The important bit to look at here is the code inside the get_context_data method. First, we get the blog post object using the id passed in the keyword arguments gathered from the parsed URL pattern. Next, we get a list of all blog objects this post has been shared with. We do this because we don't want to confuse the user by allowing sharing to a blog that the post is already shared with.
The next line of code uses the Python built-in map method on the queryset of the blogs the post is shared with. map is one of the most useful methods when working with any kind of lists (or list-like objects) in Python. It takes as it's first argument a function that takes a single argument and returns one argument, and a list as it's second argument. map then calls the given function on each element in the input list and gathers the results in a final list that is returned. Here, we use a lambda to extract the ID of the blog objects that this post is already shared with.
Finally, we can get the list of blog objects that this post can be shared with. We use the exclude method to not include the blog objects the post is already shared with. We pass this to the template in the context. Next, let's take a look at the template that you need to create in blog/templates/share_blog_post.html:
{% extends "base.html" %}

{% block content %}
{% if can_be_shared_with %}
<h2>Share {{ post.title }}</h2>
<ul>
    {% for blog in can_be_shared_with %}
    <li><a href="{% url "share-post-with-blog" post_pk=post.pk blog_pk=blog.pk %}">{{ blog.title }}</a></li>
    {% endfor %}
</ul>
{% endif %}

{% if is_shared_with %}
<h2>Stop sharing with:</h2>
<ul>
    {% for blog in is_shared_with %}
    <li><a href="{% url "stop-sharing-post-with-blog" post_pk=post.pk blog_pk=blog.pk %}">{{ blog.title }}</a></li>
    {% endfor %}
</ul>
{% endif %}
{% endblock %}
There's nothing special in this template. Let's move on to the two URLs and views that this refers to, since without those we can't render this template. First, let's look at SharepostWithBlog, which you need to create in blog/views.py. You will need to add this import line to the top of the file as well:
from django.views.generic import View
The code for the view is this:
class SharePostWithBlog(View):
    @method_decorator(login_required)
    def dispatch(self, request, *args, **kwargs):
        return super(SharePostWithBlog, self).dispatch(request, *args, **kwargs)

    def get(self, request, post_pk, blog_pk):
        blog_post = BlogPost.objects.get(pk=post_pk)
        if blog_post.blog.owner != request.user:
            return HttpResponseForbidden('You can only share posts that you created')

        blog = Blog.objects.get(pk=blog_pk)
        blog_post.shared_to.add(blog)

        return HttpResponseRedirect(reverse('home'))
Import this into blueblog/urls.py and add it with the following URL pattern:
url(r'blog/post/(?P<pk>\d+)/share/$', SharePostWithBlog.as_view(), name='share-blog-post-with-blog'),
Unlike all our previous views, this view doesn't fit nicely into any of the generic views that Django provides. But Django has a base generic view that makes our life easier than creating a function that handles the request.
The View generic view is used whenever you need something completely custom to handle a request. Like all generic views, it has a dispatch method that you can override to intercept a request before any further processing is done. Here, we make sure that the user is logged in before allowing them to proceed.
In a View subclass, you create methods with the same name as the request types you want to handle. Here, we create a get method as we only care about handling GET requests. The View class takes care of calling our method when the correct request method is used by the client. In our get method, we're doing a basic check to see if the user owns the blog post. If they do, we add the blog to the shared_to ManyToMany relationship of the BlogPost model.
The last view we need to create is one to allow the user to remove a blog post they have already shared. The code for that is shown here:
class StopSharingPostWithBlog(View):
    @method_decorator(login_required)
    def dispatch(self, request, *args, **kwargs):
        return super(StopSharingPostWithBlog, self).dispatch(request, *args, **kwargs)

    def get(self, request, post_pk, blog_pk):
        blog_post = BlogPost.objects.get(pk=post_pk)
        if blog_post.blog.owner != request.user:
            return HttpResponseForbidden('You can only stop sharing posts that you created')

        blog = Blog.objects.get(pk=blog_pk)
        blog_post.shared_to.remove(blog)

        return HttpResponseRedirect(reverse('home'))
Like the SharePostWithBlog view, this one subclasses the View generic view. The code is almost exactly the same as the previous view. The only difference is that in the previous view we used blog_post.shared_to.add, whereas in this view we use the blog_post.shared_to.remove method.
Finally, import these two views into blueblog/urls.py and add the following patterns:
url(r'blog/post/(?P<post_pk>\d+)/share/to/(?P<blog_pk>\d+)/$', SharePostWithBlog.as_view(), name='share-post-with-blog'),
    url(r'blog/post/(?P<post_pk>\d+)/stop/share/to/(?P<blog_pk>\d+)/$', StopSharingPostWithBlog.as_view(), name='stop-sharing-post-with-blog'),
In order to show a link to the share this post page, edit the home.html template to change the entire code inside the content block to this:
{% if blog_posts %}
<h2>Blog Posts</h2>
<ul>
    {% for post in blog_posts %}
    <li>
        <a href="{% url "blog-post-details" pk=post.pk %}">{{ post.title }}</a> |
        <a href="{% url "update-blog-post" pk=post.pk %}">Edit Post</a> |
        <a href="{% url "share-blog-post" pk=post.pk %}">Share Post</a>
    </li>
    {% endfor %}
</ul>
{% endif %}
And that's it. Now when you visit the home page, each blog post should have a Share Post link next to it. When you click it, you'll see a second page with links to share the blog post on other user blogs. Clicking the link should share your post and also show a corresponding remove link on the same page. Of course, in order to test this, you should create a second user account and add a blog using that account.
One last thing we should do is modify the get_context_data method of the HomeView to also include shared posts in the blog post list:
def get_context_data(self, **kwargs):
    ctx = super(HomeView, self).get_context_data(**kwargs)

    if self.request.user.is_authenticated():
            if Blog.objects.filter(owner=self.request.user).exists():
            ctx['has_blog'] = True
            blog = Blog.objects.get(owner=self.request.user)

            ctx['blog'] = blog
            ctx['blog_posts'] = BlogPost.objects.filter(blog=blog)
            ctx['shared_posts'] = blog.shared_posts.all()

    return ctx
Add this to the bottom of the content block inside the blog/templates/home.html template:
{% if shared_posts %}
<h2>Shared Blog Posts</h2>
<ul>
    {% for post in shared_posts %}
    <li>
        <a href="{% url "blog-post-details" pk=post.pk %}">{{ post.title }}</a>
    </li>
    {% endfor %}
</ul>
{% endif %}
{% endblock %}
And that's it, our first application is complete! If you open the home page now, you should see a Share Post link next to each blog post. Clicking this should open up another page where you can select which blog to share this post with. To test it you should create another blog with the other account we created earlier when we were looking at the security of our application. Once you have another blog configured, your share blog post page should look similar to this:
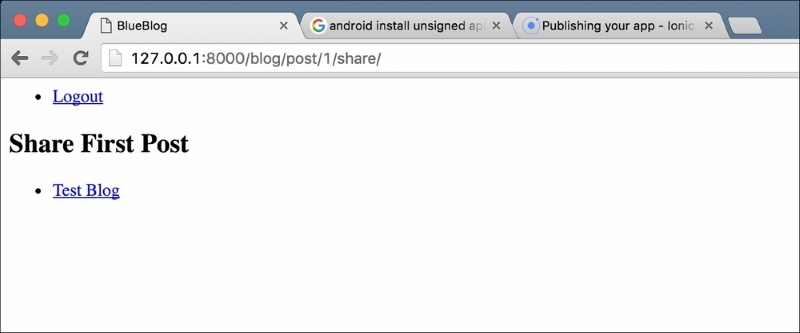
Clicking the title of the other blog should share the post and take you back to the home page. If you click the Share Post link again on the same post, you should now see a heading saying Stop sharing with, and the name of the blog you shared this post with.
If you log in to the other account now, you should see that the post is now shared there, and is listed under the Shared Blog Posts section.