
I don't know how but I can feel that your weekend is close and that you are starting to think about going shopping to buy the needed groceries for the next week. Unless you are a genius who is able to maintain the whole list in your head or you are a modest person who does not need so much, you probably make a shopping list before going shopping. Maybe you even use some app for that. Now, I ask you: why not use your own app? How do you feel about creating and designing it? Let's do that! Let's create our own shopping list application. Let's start by creating a rapid prototype for it. It's a really easy task—build an interactive prototype for the shopping list.
It should show the list and allow us to add and remove the items. Actually, it's very similar to a ToDo list. Let's start doing it using classic HTML + CSS + JS + jQuery approach. We will also use the Bootstrap framework ( http://getbootstrap.com/ ) to make things a little bit more beautiful without having to write extensive CSS code. (Yes, because our book is not about CSS and because making things with Bootstrap is so crazily easy!)
Probably, your code will end up looking as something like the following:
Here is the HTML code:
<div class="container">
  <h2>My Shopping List</h2>
  <div class="input-group">
    <input placeholder="add shopping list item"
      type="text" class="js-new-item form-control">
    <span class="input-group-btn">
      <button @click="addItem" class="js-add btn btn-default"
        type="button">Add!</button>
    </span>
  </div>
  <ul>
    <li>
      <div class="checkbox">
        <label>
          <input class="js-item" name="list"
            type="checkbox"> Carrot
        </label>
      </div>
    </li>
    <li>
      <div class="checkbox">
        <label>
          <input class="js-item" name="list" type="checkbox"> Book
        </label>
      </div>
    </li>
    <li class="removed">
      <div class="checkbox">
        <label>
          <input class="js-item" name="list" type="checkbox"
            checked> Gift for aunt's birthday
        </label>
      </div>
    </li>
  </ul>
</div>
Here is the CSS code:
.container {
  width: 40%;
  margin: 20px auto 0px auto;
}

.removed {
  color: gray;
}

.removed label {
  text-decoration: line-through;
}

ul li {
  list-style-type: none;
}
Here is the JavaScript/jQuery code:
$(document).ready(function () {
  /**
   * Add button click handler
   */
  function onAdd() {
    var $ul, li, $li, $label, $div, value;

    value = $('.js-new-item').val();
    //validate against empty values
    if (value === '') {
      return;
    }
    $ul = $('ul');
    $li = $('<li>').appendTo($ul);
    $div = $('<div>')
        .addClass('checkbox')
        .appendTo($li);
    $label = $('<label>').appendTo($div);
    $('<input>')
        .attr('type', 'checkbox')
        .addClass('item')
        .attr('name', 'list')
        .click(toggleRemoved)
        .appendTo($label);
    $label
        .append(value);
    $('.js-new-item').val('');
  }

  /**
   * Checkbox click handler -
   * toggles class removed on li parent element
   * @param ev
   */
  function toggleRemoved(ev) {
    var $el;

    $el = $(ev.currentTarget);
    $el.closest('li').toggleClass('removed');
  }

  $('.js-add').click(onAdd);
  $('.js-item').click(toggleRemoved);
});
Tip
Downloading the example code
Detailed steps to download the code bundle are mentioned in the
Preface of this book.
The code bundle for the book is also hosted on GitHub at https://github.com/PacktPublishing/Learning-Vue.js-2.
We also have other code bundles from our rich catalog of books and videos available at https://github.com/PacktPublishing/. Check them out!
If you open the page in a browser, you will probably see something like the following:
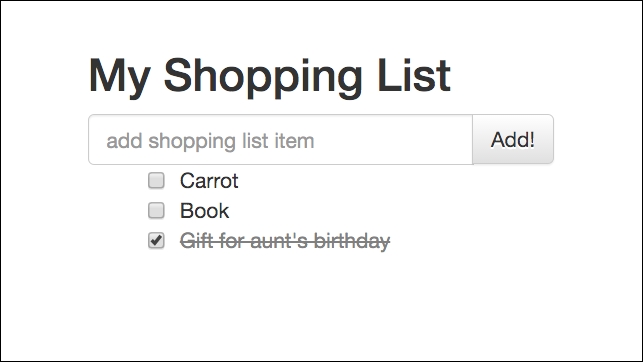
Shopping list implementation using the HTML + CSS + jQuery approach
Please have a look at JSFiddle at https://jsfiddle.net/chudaol/u5pcnLw9/2/ .
As you can see, it is a very basic piece of HTML code that contains an unordered list of elements, where each element is presented with a checkbox and a text—an input for the user text and the Add! button. Each time the Add! button is clicked, the content of the text input is transformed into a list entry and appended to the list. When the checkbox of any item is clicked, the state of an entry is toggled from to to buy (unchecked) to bought (checked).
Let's also add a feature that allows us to change the title of the list (it might become useful if we end up implementing multiple shopping lists in the application).
So, we will end up with some extra markup and some more jQuery event listeners and handlers:
<div class="container">
  <h2>My Shopping List</h2>
  <!-- ... -->
  <div class="footer">
    <hr/>
    <em>Change the title of your shopping list here</em>
    <input class="js-change-title" type="text"
      value="My Shopping List"/>
  </div>
</div>

//And javascript code:
function onChangeTitle() {
  $('h2').text($('.js-change-title').val());
}
$('.js-change-title').keyup(onChangeTitle);
Check JSFiddle at https://jsfiddle.net/chudaol/47u38fvh/3/ .
This was a very simple example. Let's try to implement it step-by-step using Vue.js. There are plenty of ways of including vue.js into your project, but in this chapter, we will include it just by adding the JavaScript Vue file from the CDN:
<script src="https://cdnjs.cloudflare.com/ajax/libs/vue/2.0.3/vue.js"> </script>
So, let's start by rendering a list of elements.
Create the HTML file and add the following markup:
<div id="app" class="container">
  <h2>{{ title }}</h2>
  <ul>
    <li>{{ items[0] }}</li>
    <li>{{ items[1] }}</li>
  </ul>
</div>
Now add the following JavaScript code:
var data = {
  items: ['Bananas', 'Apples'],
  title: 'My Shopping List'
};

new Vue({
  el: '#app',
  data: data
});
Open it in the browser. You will see that the list is rendered:
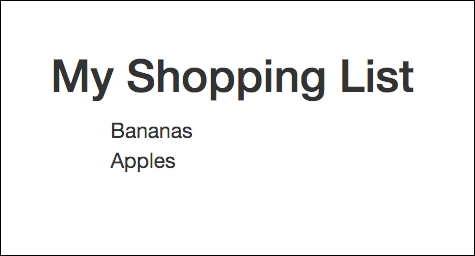
Shopping list implemented using Vue.js
Let's analyze this example. The Vue application code starts with the new Vue keyword. How do we bind the piece of markup to the application data? We pass to the Vue instance the DOM element that must be bound to it. Any other markup in the page will not be affected and will not recognize Vue's magic.
As you can see, our markup is wrapped into the #app element and is passed as a first argument in the map of Vue options. The data argument contains the objects that are being used inside the markup using double curly brackets ({{}}) . You will probably find this annotation very easy to understand if you are familiar with templating preprocessors (for example, handlebars; for more information, visit
http://handlebarsjs.com/
).
So what?—you're probably exclaiming. What are you going to teach me? How to use templating preprocessors? Thank you very much, but I would be better off having some beers and watching football.
Stop, dear reader, don't go, just grab your beer and let's continue our example. You'll see that it'll be lots of fun!
Let's see data binding in action. Open your browser's developer tools, find your JavaScript code, and add a breakpoint at the start of the script. Now analyze how the data objects look before and after the Vue application is initialized. You see, it changed a lot. Now the data object is prepared to the reactive data binding:
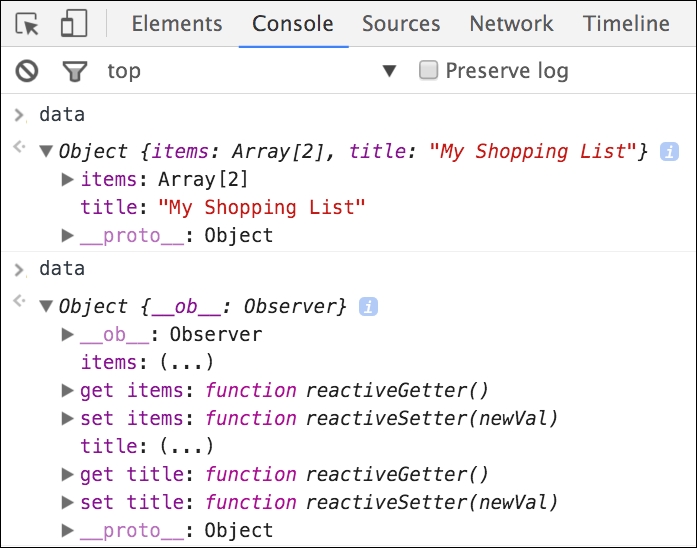
The data object before and after the Vue object initialization
Now if we change the title property of the data object from the developer tools console (we can do it because our data is a global object), it will be reflected automatically in the title on the page:
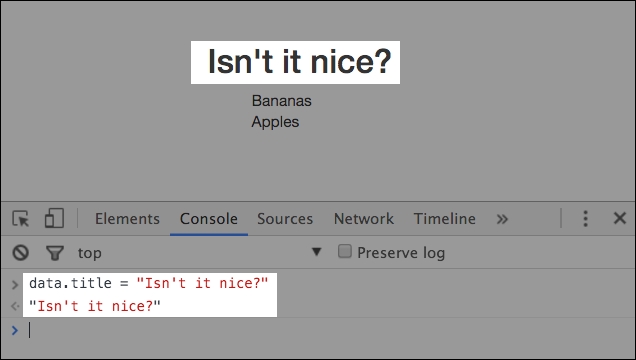
Data binding: changing object properties affects the View immediately
So, in our example, we were able to bring the data from the plain JavaScript data model to the page. We provided it a sort of a flight from the application code to the page. Don't you think that it would be nice if we could offer a two-way flight to our data?
Let's see now how we can achieve two-way data binding and how we can change the value of a data property from the page.
Copy the HTML markup for the title, change the input from the first jQuery example, and add the attribute v-model="title" to the input element.
Tip
Have you already heard about directives in Vue.js? Congratulations, you've just used one! Actually, the v-model attribute is a directive of Vue.js that provides two-way data binding. You can read more about it at the official Vue page:
http://vuejs.org/api/#v-model
.
Now, the HTML code for our shopping list application code looks like the following:
<div id="app" class="container">
  <h2>{{ title }}</h2>
  <ul>
    <li>{{ items[0] }}</li>
    <li>{{ items[1] }}</li>
  </ul>
  <div class="footer">
    <hr/>
    <em>Change the title of your shopping list here</em>
    <input v-model="title"/>
  </div>
</div>
And that's it!
Refresh the page now and modify the input. You'll see the title automatically being updated as you type:
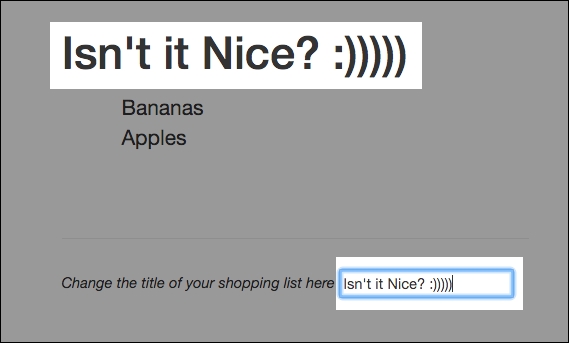
Data binding: changing the text bound to the model's property affects the text bound to the same property immediately
So, everything is nice; however, this example just grabs the two item elements and renders them as list items. We want it to render the list of items independently of the list size.
So, we need some mechanism to iterate through the items array and to render each item in our <ul> element.
Fortunately, Vue.js provides us with a nice directive for iterating through iterative JavaScript data structures. It is called v-for. We will use it in the list item <li> element. Modify the markup of the list so that it looks like the following:
  <ul>
    <li v-for="item in items">{{ item }}</li>
  </ul>
Note
You will learn other nice directives such as v-if, v-else, v-show, v-on, v-bind, and so on in this book, so keep reading.
Refresh the page and have a look. The page remains the same. Now, try to push an item into the array of items from the developer tools console. Try to pop them as well. You will not be surprised to see that the items array manipulations are immediately reflected on the page:

Data binding: changing an array affects lists based on it immediately
So, now we have a list of items that is rendered on a page with just one line of the markup. However, we still need these items to have a checkbox that allows us to check the already bought items or uncheck them when needed.
To achieve this behavior, let's slightly modify our items array by changing our string items and transforming them into the objects with two properties, text and checked (to reflect the state), and let's modify the markup to add a checkbox to each item.
So our JavaScript code for the data declaration will look like the following:
var data = {
  items: [{ text: 'Bananas', checked: true },
          { text: 'Apples',  checked: false }],
  title: 'My Shopping List',
  newItem: ''
};
And our list markup will look like this:
<ul>
  <li v-for="item in items" v-bind:class="{ 'removed':
    item.checked }">
    <div class="checkbox">
      <label>
        <input type="checkbox" v-model="item.checked"> {{
          item.text }}
      </label>
    </div>
  </li>
</ul>
Refresh the page and check that the checked property of the items checkbox, and the removed class of each list item, <li>, is bound to the checked Boolean state of the items. Play around and try to click checkboxes to see what happens. Isn't it nice that just with two directives we are able to propagate the state of the items and change the class of the corresponding <li> HTML element?
So now we just need a small addition to our code to be able to actually add shopping list items. To achieve that, we will add one more object to our data and call it newItem. We'll also add a small method that pushes new item to the items array. And we'll call this method from the markup page using the v:on directive used on the HTML input element that will be used for the new item and on the button used to click to add a new item.
So our JavaScript code will look like the following:
var data = {
  items: [{ text: 'Bananas', checked: true },
          { text: 'Apples', checked: false }],
  title: 'My Shopping List',
  newItem: ''
};
new Vue({
  el: '#app',
  data: data,
  methods: {
    addItem: function () {
      var text;

      text = this.newItem.trim();
      if (text) {
        this.items.push({
          text: text,
          checked: false
        });
        this.newItem = '';
      }
    }
  }
});
We added a new property to the data object called newItem. Then we added a new section called methods to our Vue initialization options object and added the addItem method to this section. All the data properties are accessible in the methods section via the this keyword. Thus, in this method, we just get this.newItem and push it into the this.items array. Now we must bind the call to this method to some user action. As it has already been mentioned, we will use the v-on directive and apply it to the enter keyup on the new item input and to the Add! button click.
So add the following markup before our list of items:
<div class="input-group">
  <input v-model="newItem" v-on:keyup.enter="addItem"
    placeholder="add shopping list item" type="text" class="form-
    control">
  <span class="input-group-btn">
    <button v-on:click="addItem" class="btn btn-default"
      type="button">Add!</button>
  </span>
</div>
Note
The v-on directive attaches an event listener to the elements. The shortcut is the @ sign. So, instead of writing v-on:keyup="addItem", you can write @keyup="addItem". You can read more about the v-on directive on the official documentation site at
http://vuejs.org/api/#v-on
.
Let's finalize. The whole code now looks like the following:
Here is the HTML code:
<div id="app" class="container">
  <h2>{{ title }}</h2>
  <div class="input-group">
    <input v-model="newItem" @keyup.enter="addItem"
      placeholder="add shopping list item" type="text"
      class="form-control">
  <span class="input-group-btn">
    <button @click="addItem" class="btn btn-default"
      type="button">Add!</button>
  </span>
  </div>
  <ul>
    <li v-for="item in items" :class="{ 'removed': item.checked
      }">
      <div class="checkbox">
        <label>
          <input type="checkbox" v-model="item.checked"> {{
            item.text }}
        </label>
      </div>
    </li>
  </ul>
  <div class="footer hidden">
    <hr/>
    <em>Change the title of your shopping list here</em>
    <input v-model="title"/>
  </div>
</div>
Here is the JavaScript code:
var data = {
  items: [{ text: 'Bananas', checked: true },
          { text: 'Apples', checked: false }],
  title: 'My Shopping List',
  newItem: ''
};

new Vue({
  el: '#app',
  data: data,
  methods: {
    addItem: function () {
      var text;

      text = this.newItem.trim();
      if (text) {
        this.items.push({
          text: text,
          checked: false
        });
        this.newItem = '';
      }
    }
  }
});
Here's a link to JSFiddle: https://jsfiddle.net/chudaol/vxfkxjzk/3/ .