Book Image

Full-Stack Web Development with Vue.js and Node

By : Aneeta Sharma
Book Image

Full-Stack Web Development with Vue.js and Node

By: Aneeta Sharma

Overview of this book

Isomorphic JavaScript was the buzzword of the year 2017, allowing developers to utilize a single language throughout their web development stack and build cost-effective and scalable applications. MEVN is a one such modern web development stack consisting of web applications such as MongoDB, Express.js, Vue.js, and Node.js. Hands-On Full-Stack Web Development with Vue.js 2 and Node.js leverages the harmony of these technologies to help you create full-stack web applications. Starting with the core frameworks, this example-based guide explains all the key concepts of frameworks, how to set them up properly, and how to use popular modules to connect them together and make them work cohesively. You will learn all this with the help of real-world examples. In addition to this, you will be able to scaffold web application architecture, add an authentication layer, and develop the MVC structure to support the development of your application. You'll explore how to create data models for your applications and then write REST APIs by exposing your data model to your application. Solely orientated towards building a full, end-to-end application using the MEVN stack, this book will help you understand how your application development grows.
Table of Contents (12 chapters)

Installing MongoDB

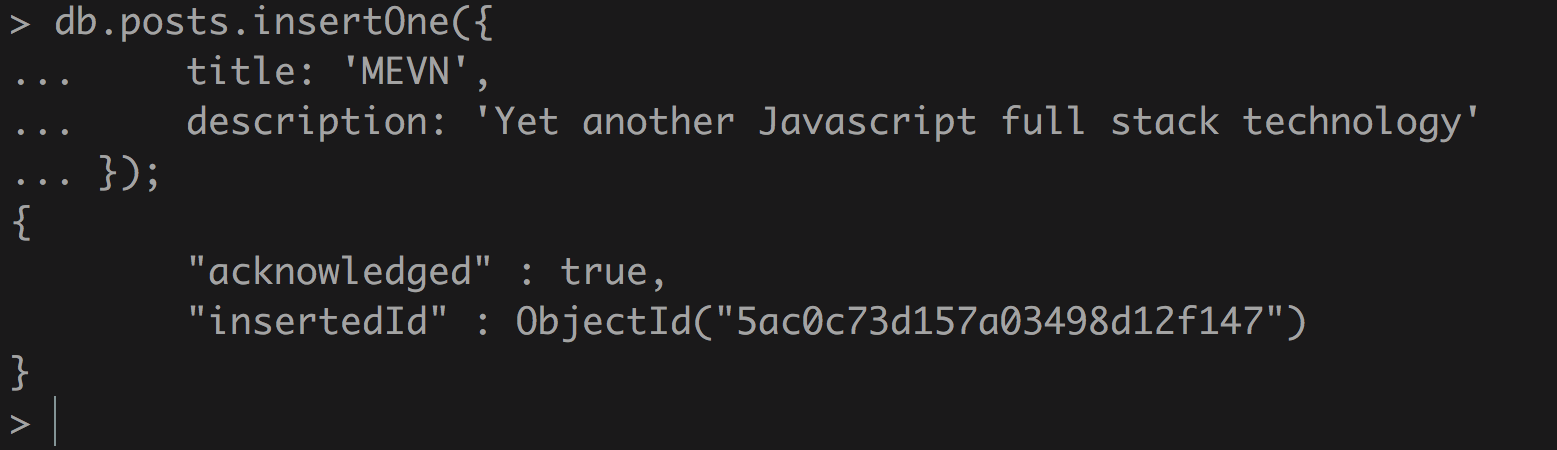
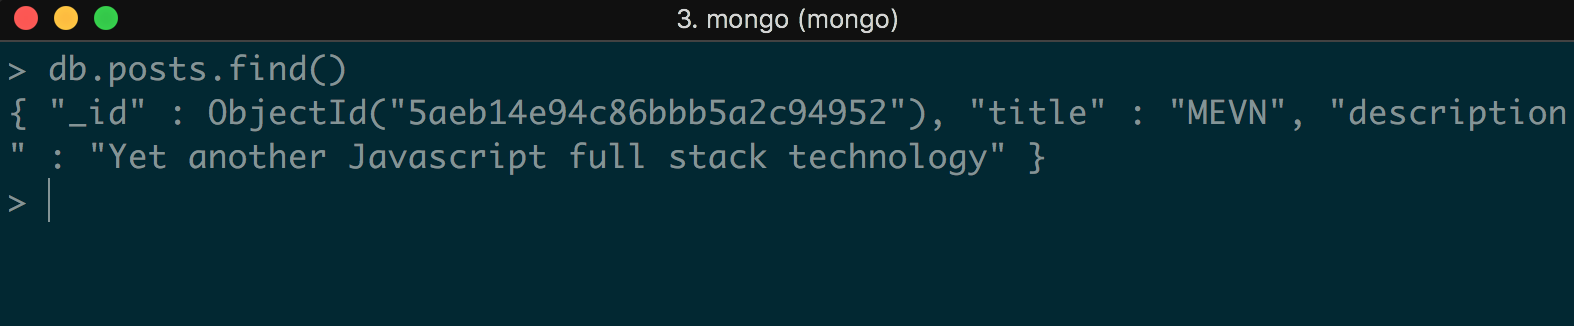
MongoDB is the first part of the technology in the MEVN stack. MongoDB is a free and open source document-based database published under a GNU license. It is a NoSQL database, meaning it is a non-relational database. Unlike relational databases, which use tables and rows to represent data, MongoDB uses collections and documents. MongoDB represents the data as a collection of JSON documents. It provides us with the flexibility to add fields in whatever way we want. Each document in a single collection can have a totally different structure. Aside from adding fields, it also provides the flexibility to change the fields from document to document in whatever way we want, something that is a cumbersome task in relational databases.

The benefits of MongoDB compared to Relational Database Management Systems (RDBMS)

MongoDB offers a lot of benefits compared to Relational Database Management Systems:

  • Schema-less architecture: MongoDB does not require us to design a specific schema for its collections. A schema for one document can vary, with another document being totally different.
  • Each document is stored in a JSON-structured format.
  • Querying and Indexing the MongoDB is very easy.
  • MongoDB is a free and open source program.

Installing MongoDB on macOS

Installing MongoDB by downloading

  1. Download the version of MongoDB you want from https://www.mongodb.com/download-center#production.
  2. Copy the downloaded gzipped to the root folder. Adding it to the root folder will allow us to use it globally:
 $ cd Downloads
$ mv mongodb-osx-x86_64-3.0.7.tgz ~/
  1. Unzip the gzipped file:
 $ tar -zxvf mongodb-osx-x86_64-3.0.7.tgz
  1. Create a directory that will be used by Mongo to save data:
 $ mkdir -p /data/db
  1. Now, to check if the installation was done successfully, start the Mongo server:
 $ ~/mongodb/bin/mongod

Here, we have successfully installed and started the mongo server.

Installing MongoDB via Homebrew

To install MongoDB in macOS from Homebrew, follow these steps:

  1. With Homebrew, we just need a single command to install MongoDB:
$ brew install mongodb
  1. Create a directory that will be used by Mongo to save data:
 $ sudo mkdir -p /data/db
  1. Start the Mongo server:
 $ ~/mongodb/bin/mongod

Hence, MongoDB is finally installed.

Installing MongoDB on Linux

There are two ways to install MongoDB on Linux as well: we can either use the apt-get command or we can download the tarball and extract it.

Installing MongoDB using apt-get

To install MongoDB using apt-get, perform the following steps:

  1. Run the following command to install the latest version of MongoDB:
 $ sudo apt-get install -y mongodb-org
  1. Verify if mongod has been successfully installed by running the command:
 $ cd /var/log/mongodb/mongod.log
  1. To start the mongod process, execute the following command in the Terminal:
 $ sudo service mongod start
  1. See if the log file has a line that denotes that the MongoDB connection was made successfully:
 $ [initandlisten] waiting for connections on port            <port>
  1. To stop the mongod process:
 $ sudo service mongod stop
  1. To restart the mongod process:
 $ sudo service mongod restart

Installing MongoDB using tarball

  1. Download the binary file from https://www.mongodb.com/download-center?_ga=2.230171226.752000573.1511359743-2029118384.1508567417. Use this command:
 $ curl -O https://fastdl.mongodb.org/linux/mongodb-linux-x86_64-
3.4.10.tgz
  1. Extract the downloaded files:
 $ tar -zxvf mongodb-linux-x86_64-3.4.10.tgz
  1. Copy and extract to the target directory:
 $ mkdir -p mongodb
$ cp -R -n mongodb-linux-x86_64-3.4.10/ mongodb
  1. Set the location of the binary in the PATH variable:
 $ export PATH=<mongodb-install-directory>/bin:$PATH
  1. Create a directory to be used by Mongo to store all database-related data:
 $ mkdir -p /data/db
  1. To start the mongod process:
 $ mongod

Installing MongoDB on Windows

Installing MongoDB from the installer is as easy as installing any other software on Windows. Just like we did for Node.js, we can download the MongoDB installer for Windows from the official website (https://www.mongodb.com/download-center#atlas). This will download an executable file.

Once the executable file is downloaded, run the installer and follow the instructions. Just go through the dialog box, reading the instructions carefully. When the installation is complete, just click on the Close button and you are done.

Using MongoDB

Let's dive a little deeper into MongoDB. As mentioned earlier as well, Mongo consists of a database with collections (tables/groups of data) and documents (rows/entries/records). We will use a few commands provided by MongoDB to create, update, and delete the documents:

First, start the Mongo server with this command:

$ mongod

Then, open the Mongo shell with this command:

$ mongo

Creating or using a MongoDB database

This is the place where we can see all of our databases, collections, and documents.
To display the list of databases that we have, we can use the following:

> show dbs

Now, this command should list all the existing databases. To use the database that we want, we can simply run this command:

> use <database_name>

But if there is no database listed, don't worry. MongoDB provides us with a functionality where, when we run the preceding command, even if that database does not exist, it will automatically create a database with the given name for us.

So, if we already have a database that we want to use, we simply run that command and, if there are no databases yet, we create one using this command:

> use posts

When we run this command, a database named posts will be created.

Creating documents

Now, let's quickly review the commands used in MongoDB. The insert command is used to create new documents in a collection in MongoDB. Let's add a new record to the database that we just created called posts.

Here as well, in order to add a document to a collection, we first need a collection, which we don't have yet. But MongoDB allows us to create a collection easily by running the insert command. Again, if the collection exists, it will add the document to the given collection and, if the collection does not exist, it will simply create a new collection.

Now, in the Mongo shell, run the following command:

> db.posts.insertOne({
title: 'MEVN',
description: 'Yet another Javascript full stack technology'
});

The command will create a new collection called posts in the posts database. The output of this command is:

It will return a JSON object that has the ID of the document that we just created in the insertedId key and a flag that the event was received as acknowledged.

Fetching documents

This command is used when we want to fetch the records from a collection. We can either fetch all the records or a specific document by passing parameters as well. We can add a few more documents to the posts database to better learn the command

Fetching all documents

To fetch all the records from the posts collection, run the following command:

> db.posts.find()

This will return all the documents that we have in the posts collection:

Fetching a specific document

Let's find a post where the title is MEVN. To do that, we can run:

> db.posts.find({ 'title': 'MEVN' })

This command will return only those documents whose title is MEVN:

Updating documents

This command is used when we want to update a certain part of a collection. Let's say we want to update the description of a post whose title is Vue.js; we can run the following command:

> db.posts.updateOne(
{ "title" : "MEVN" },
{ $set: { "description" : "A frontend framework for Javascript programming language" } }
)

The output for this command will be:

We can see here that the matchedCount is 1, which means that as regards the parameter that we sent to update the record with the title MEVN, there was one document in the posts collection that matched the query.

The other key called modifiedCount gives us the count of the documents that got updated.

Deleting documents

The delete command is used to remove documents from a collection. There are several ways to delete a document from MongoDB.

Deleting documents that match a given criteria

To remove all the documents with certain conditions, we can run:

> db.posts.remove({ title: 'MEVN' })

This command will remove all the documents from the posts collection whose titles are MEVN.

Deleting a single document that matches the given criteria

To delete only the first record that satisfies the given criteria, we can just use:

> db.posts.deleteOne({ title: 'Expressjs' })

Deleting all records

To delete all the records from a collection, we can use:

> db.posts.remove({})