-
Book Overview & Buying
-
Table Of Contents
Frontend Development Projects with Vue.js 3 - Second Edition
By :
Vue achieves two-way data binding by creating a dedicated directive that watches a data property within your Vue component. The v-model directive triggers data updates when the target data property is modified on the UI. This directive is usually useful for HTML form elements that need to both display the data and modify it reactively – for example, input, textarea, radio buttons, and so on.
We can enable two-way binding by adding the v-model directive to the target element and binding it to our desired data props:
<template>
<input v-model="name" />
</template>
<script>
export default {
data() {
return {
name: ''
}
}
}
</script>
In Figure 1.16, the output generated by running the preceding code will be as follows:
Figure 1.16 – Output for the v-model example
Note
Binding a huge amount of data using v-model can affect the performance of your application. Consider your UI and split the data into different Vue components or views. Vue data in the local state is not immutable and can be redefined anywhere in the template.
In the next exercise, we are going to build a component using Vue’s two-way data binding and experiment with what it means to bind data in two ways.
The context for this type of data model is usually forms or wherever you expect both input and output data. By the end of the exercise, we should be able to utilize the v-model attribute in the context of a form.
To access the code file for this exercise, refer to https://github.com/PacktPublishing/Frontend-Development-Projects-with-Vue.js-3/tree/v2-edition/Chapter01/Exercise1.04.
Let’s start the exercise by performing the following steps:
npm init vue@3 as a starting point, or within the root folder of the code repository, navigate into the Chapter01/Exercise 1.04 folder by using the following commands in order:> cd Chapter01/Exercise 1.04/ > yarn
yarn dev
code . command within the project directory) or your preferred IDE.Exercise1-04.vue in the src/components directory.Exercise1-04.vue, start by composing an HTML label and bind an input element to the name data prop using v-model inside the template area:<div class="form"> <label> Name <input type="text" v-model="name" /> </label> </div>
text input by returning a reactive data prop called name in the <script> tag:<script>
export default {
data() {
return {
name: '',
}
},
}
</script>label and selectable HTML select tied to the language data prop using v-model inside of the template area:<div class="form"> <label> Name <input type="text" v-model="name" /> </label> <label> Preferred JavaScript style <select name="language" v-model="language"> <option value="Javascript">JavaScript </option> <option value="TypeScript">TypeScript </option> <option value="CoffeeScript">CoffeeScript </option> <option value="Dart">Dart</option> </select> </label> </div>
select input by returning a reactive data prop called language in the <script> tag:<script>
export default {
data() {
return {
name: '',
language: '',
}
},
}
</script>form fields, output the name and language inside of an unordered list structure (<ul> and <li>) by using curly braces such as {{ name }}:Your code should look as follows:
<template>
<section>
<div class="form">
<label>
Name
<input type="text" v-model="name" />
</label>
<label>
Preferred JavaScript style
<select name="language" v-model="language">
<option value="JavaScript">JavaScript
</option>
<option value="TypeScript">TypeScript
</option>
<option value="CoffeeScript">CoffeeScript
</option>
<option value="Dart">Dart</option>
</select>
</label>
</div>
<ul class="overview">
<li><strong>Overview</strong></li>
<li>Name: {{ name }}</li>
<li>Preference: {{ language }}</li>
</ul>
</section>
</template>
<style> tag at the bottom of the component:<style>
.form {
display: flex;
justify-content: space-evenly;
max-width: 800px;
padding: 40px 20px;
border-radius: 10px;
margin: 0 auto;
background: #ececec;
}
.overview {
display: flex;
flex-direction: column;
justify-content: space-evenly;
max-width: 300px;
margin: 40px auto;
padding: 40px 20px;
border-radius: 10px;
border: 1px solid #ececec;
}
.overview > li {
list-style: none;
}
.overview > li + li {
margin-top: 20px;
}
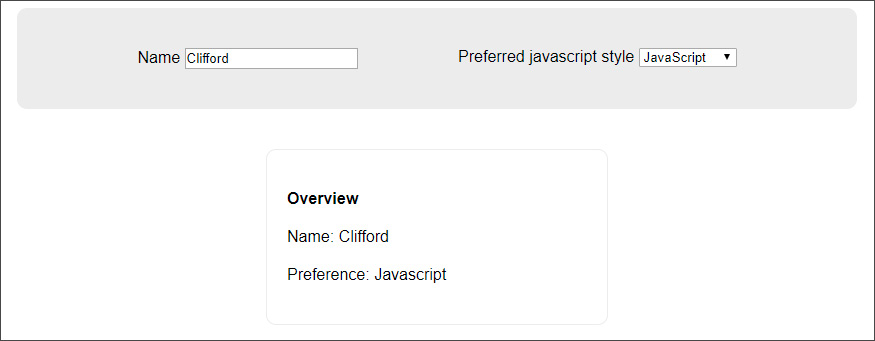
</style>https://localhost:3000. Your output should look as follows:
Figure 1.17 – Displaying the final form after the data is updated
When you update the data in the form, it should also update the overview area synchronously.
In this exercise, we used the v-model directive to bind the name and JavaScript-style drop-down selection to our local state’s data. When you modify the data, it will reactively update the DOM elements to which we output its value.
Next, we will discuss our v-for directive further and different approaches to handling iterative data collection in Vue.