

First thing's first—are you completely happy with the site as it is? While it is not a huge problem to make modifications after deployment, there is no point in making things difficult by having to recode some pages or make design changes later, when you can get them done now.
Here is a checklist to use in order to ensure that, from a user's point of view, the site works nicely:
|
Use at least two different browsers. |
One browser may implement some features that others do not—you might find that something you rely on heavily works on your browser of choice but not on others. |
[ ] |
|
Resize your browsers for a variety of pages. |
This helps to determine whether you have HTML elements that have not been set correctly. For example, some section may use the full page width, while others expand only to a certain limit. |
[ ] |
|
Access pages from slow as well as fast connections. |
You might find that certain pages load very slowly over a dial-up connection. This might mean you need to rethink image and page sizes. |
[ ] |
|
Check all links—text and image. |
Often, links break during deployment because of differing file paths and so forth. You should: Check all links and buttons on each page. Check all links in blocks. Check that large as well as small images display appropriately. Check that any ads link correctly. |
[ ] |
|
Check each page's look. |
Important, because not all browsers can render certain style sheet settings. |
[ ] |
|
Use each page. |
This is vital for ensuring that users can: Register accounts Manage their accounts Add content depending on permissions Correctly access content depending on their roles Make use of all the site's facilities Ensure that: The search engine works correctly Contact emails can be sent properly Privacy and conditions of use are shown along with any important copyright information. |
[ ] |
|
Try to break the site (as a restricted user, of course). |
Just as important as ensuring everything works properly (if not more important), is ensuring that nothing can be broken at will. |
[ ] |
If you can perform everything listed in this checklist with several browsers, with no problems, then you can be reasonably certain that the site will hold up when it goes live. If everything is in order, then we can begin with the preparation process. Preparation comes in three stages. In no particular order, we need to ensure that we have a nice, clean, working version of the site, a nice, clean working copy of the database, and finally, a nice, clean file system ready for the files on the host site. Let's take a look at how this is done.
Intuitively enough, you have to make sure you have an adequate host. By this, I mean you have a host on which you can create a MySQL database, and that allows access to a file system, and whatever other goodies you think are needed. To make life easy, it is important to have an FTP account available to transfer files across to the host file system. More often than not, you should be able to log onto the FTP account with your administrator's username and password automatically.
To test this out, try and navigate to the following URL:
ftp://ftp.your_domain_name.com
If you are prompted for a password or are shown the contents of the home directory, then congratulations, there is an FTP account available. If you don't have one, then consider getting one from your ISP, or finding out from them how they upload files. Incidentally, instead of being prompted for a username and password every time, you might want to send them in the URL, like so:
ftp://username:password@hostname/
If you're worried about security (by this, I mean: you are worried about security), then it's best to leave out the password and simply pass the username, because otherwise this can cause security problems if URLs are logged in a non-secure place. Remember that this information is already being passed in an unencrypted format. If you wish to do everything securely, speak to your host about how to secure file transfers.
If you don't have access to an FTP account, then don't panic. Read the section entitled Transfer the Files a little later on in this Appendix—it will still be easy to move your files to the host site. However, no FTP account may be an indication of a poor service, so be careful to ensure that everything else required is available.
Now that there is somewhere to upload the Drupal files to, and something to do it with, you need to create a database. The process for creating a new database and user account varies widely from host to host, so we won't discuss every possibility here.
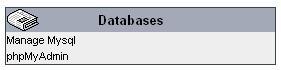
Take a look at the administrative interface and see if there is a section for creating and controlling MySQL databases (hopefully, phpMyAdmin is available). For example, the demo site's host has the following Manage Mysql link in the Databases section that provides an interface used to create databases. It also provides phpMyAdmin in order to administer those databases:
Clicking on the Manage MySQL link brings up the following page. Once the database is created, make note of its name—often hosts will append something to the name you choose, as shown here in the demo site's database creation interface:
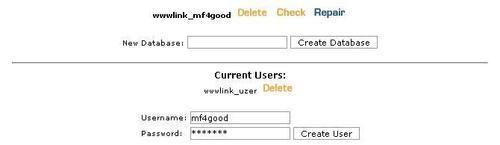
This database has been called wwwlink_mf4good, where mf4good is the name I chose for the live database, and wwwlink_ is the part that was added. Before we continue, it is important to note that this database needs a valid user, so ensure that it has one as shown here:
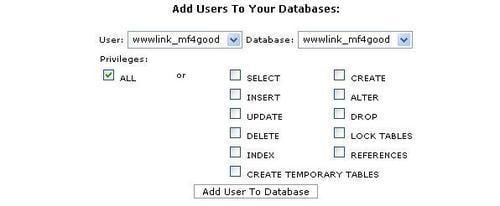
In this case, the wwwlink_mf4good database now has the user wwwlink_mf4good (it's not necessary to specify the same name, any one will do), and with that, the host site is pretty much ready to receive the new Drupal website. Take note:
Note
Drupal needs almost all privileges available to a database user. Ensure that you grant ALL privileges here, otherwise there may be problems down the line.
Remember, these usernames, passwords, and database names are all important for the configuration of the site, so don't forget any of them.
If you get stuck, get help from the host's support team; that's what they are there for.
Before transferring anything, make a master copy of the site. ZIP up and store the exact version of the drupal directory that you send across.
Note
At the moment, the target URL for the Drupal index page will be something like: http://www.domain_name.com/drupal/. If you want it to be http://www.domain_name.com/, then ZIP the files without the parent directory so that files are extracted directly to the public_html folder on the live site.
While we are on the subject, you may as well clean up the Drupal file system properly, so that you don't end up saving erroneous files.
Access your site from a browser and perform the following four important tasks:
1. Disable all caching and clear all caches—hopefully, these haven't been enabled during development anyway.
2. Disable clean URLs—in case the new server isn't set up correctly. You can enable it later.
3. Set any logging options (such as database logging) to small values and run cron—to clear out old log files that are no longer needed and cut down on transfer size.
4. Remove redundant posts—try not to transfer over a whole lot of stuff that will be deleted anyway.
Next, focus on the actual file system. If you're like me, then you probably create backups of all the modified files as you work. As far as Windows machines go, these are denoted by .bak, and placed in the same folder as the original file. Make a backup of your drupal folder before deleting anything, just to be safe. Then, remove all backup files from the drupal folders.
While it might seem a bit excessive to do this at the moment, there are a couple of good reasons for it. First, having any sort of unused files lying around on your host file system is poor security practice. Second, why clutter up a brand-new installation with files you don't need? Working on a lot of files over the course of the development phase, adding and removing functionality, and so on, adds a lot of unnecessary size to the upload if you don't trim away what isn't needed.
Now, open up the configuration file, settings.php, and remove the username and password. The current database name and password will change to the ones set when you created a new database on the host, but there is no point in transferring any type of sensitive information like this—especially because people often prefer to use the same username and password for a variety of things.
Once this is done, you have to wait until the next section to add one more file, and you can then make a master, zipped copy of your Drupal site—call it RTP (Release to Public) or something similar to distinguish it from other versions.
If you are working on a Linux box, you can tar and gzip your files instead—doing so will help with the upload time. If you are developing on Windows, then you might want to make sure that your host can unzip .zip files because they will more than likely be using a Linux server—there shouldn't be a problem, however. In the unlikely event that there is, the best thing to do is download and install a gzip utility for Windows at http://www.gzip.org/, which you can then use to ZIP up files in the .gz format.
In order to deploy the database, there must be a backup of it. It is this backup file that is transferred across to the host site and used to create a new database there. As you already have all the information you need regarding backups (from Chapter 10), we need look at them no further here.
With the backup file of the entire Drupal added somewhere to the drupal folder (anywhere will do, so long as you can find it again), you are now ready to begin transferring files across to the host. Remove the .sql file from the site as soon as it has been used—hold it somewhere out of the document root in case you need to use it again.