Sign In Start Free Trial
Account

Add to playlist

Create a Playlist

Modal Close icon
You need to login to use this feature.
  • Book Overview & Buying Alfresco Developer Guide
  • Table Of Contents Toc
Alfresco Developer Guide

Alfresco Developer Guide

By : Jeff Potts
4 (7)
close
close
Alfresco Developer Guide

Alfresco Developer Guide

4 (7)
By: Jeff Potts

Overview of this book

This book will guide you through the steps necessary to add image, video, and audio elements into your Drupal sites. For each topic, you start with simple techniques and move on to more advanced techniques. By the time you've completed this book, you should have a firm ground from which to tackle most multimedia needs, and enough of an understanding to creatively solve more complex problems. This book will provide information for administrators and professional site developers who are required to embed multimedia into a Drupal site. The reader needs basic knowledge of Drupal operation, but no experience of how Drupal handles multimedia items is expected.
Table of Contents (17 chapters)
close
close
Alfresco Developer Guide
Credits
About the Author
About the Reviewers
Preface
3
Index

Packaging and Deploying Customizations

Now you know how to extend Alfresco without getting your files tangled up with the core distribution. But what is the best way to package them up and deploy them to the server? Most people choose Ant to build and package their customizations. Once they are packaged, you have three options for deploying them as part of the Alfresco web application:

  • Copy your files on top of an exploded Alfresco web application.
  • Integrate your files with the Alfresco WAR, which you then deploy.
  • Package your changes as an Alfresco Module Package (AMP) file. The AMP is then installed in—merged into—an Alfresco WAR, which is then deployed to the application server.

The first two approaches are self-explanatory. Copying custom files into an exploded Alfresco web application is the least trouble of the three. It is fast, and makes for a very efficient development cycle. A common approach is to use an Ant build file to zip everything into an archive, and then unzip the archive on top of the exploded Alfresco web application. This is the approach you'll use as you work through the examples in this book.

Some application servers, such as JBoss, have a deployment process that deploys WAR files automatically. In this case, it might be useful to integrate the custom files with the Alfresco WAR and then copy the WAR to the deployment directory. Again, using one or more Ant tasks is a common approach in this situation.

The third approach is to use an AMP. Conceptually, the AMP approach is no different than the "integrate with the Alfresco WAR" option: An AMP file is really just a ZIP of your customizations, which are then merged with an Alfresco WAR. The difference is that when you "install" an AMP into the Alfresco WAR, the AMP tools can do things such as check for specific versions of Alfresco, make a backup of the Alfresco WAR, and notify you if the AMP has already been installed to the WAR. More details on working with AMPs can be found in the Appendix.

The following table summarizes the three approaches:

Deployment Approach

Considerations

Copy customizations over the top of an expanded Alfresco web application.

Fastest development cycle.

Easy to point to a definitive set of changes.

Some Change Management organizations like to deal only with WAR files.

Merge customizations with the Alfresco WAR.

Change Management likes it—Leverages standard "I deploy the WAR you give me" procedures.

When developing locally, merging with the WAR seems unnecessary.

Package customizations as an AMP, which is then "installed" into the Alfresco WAR and deployed.

Facilitates version and dependency checking.

Easier to share with others, particularly when the set of customizations may need to coexist with customizations provided by others.

Same development overhead as "merge with WAR" option.

Uses nonstandard, Alfresco-only tool.

Separating Server-Specific Customizations

In every implementation, there is usually a set of customizations that is server-specific and a set that is not server-specific. A good practice is to keep server or environment-specific customizations separate from customizations that do not depend on a specific server or environment. For example, suppose in your shop you have three environments—one each for Development, Test, and Production. Let's assume that you want to configure Alfresco to authenticate against an LDAP directory. You ought to be able to take your Alfresco WAR and deploy it, unchanged, to Development, Test, and Production. If each environment has its own LDAP server, and you include the LDAP configuration as a part of the WAR, you won't be able to do that.

The way to address this is to make sure that only customizations that are independent of server or environment get packaged together. Server-specific customizations should be packaged separately. You might even want to use two different Eclipse projects. One might be called server extensions and the other client extensions, for example. In this case, the LDAP configuration is a server extension.

Using this approach, when you package your client customizations, you should be able to deploy the same package to Development, Test, or Production without modification.

Step-by-Step: Packaging and Deploying a Simple Customization

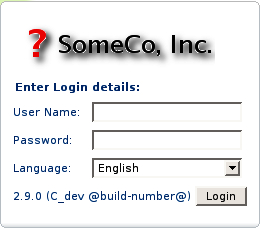
Let's run through an end-to-end example for a simple customization to validate what you've learned so far. In this example you're going to do two things. First, you're going to modify the login page to display the proud SomeCo logo and the Alfresco version. Second, you're going to extend the content model with a few simple types. To do this, follow these steps:

  1. If you haven't already, create a new Java project in Eclipse called client-extensions and update its build path to be dependent on SDK AlfrescoEmbedded, which is one of the projects included with the Alfresco SDK that references all of the dependent JARs.
  2. How you set up the directory structure in your Java project is mostly a personal preference. The source code that accompanies the book will follow Alfresco's project structure fairly close, thus making it easier to follow.
  3. Given that, create the following directory structure in the client-extensions project:
        |config|alfresco|extension|model
        |src|java
        |src|web|jsp|extension
        |src|web|META-INF
        |src|web|someco|images
  4. The examples in this book use Apache Ant to package and deploy the customizations to your local Alfresco web application. The build.xml file refers to a build.properties file. The build.properties file should be used to specify variables specific to your setup. If you set up your Eclipse project folder structure as described earlier, you shouldn't have to edit the build.xml file; the build.properties file should be all you need to touch. The source code that accompanies this chapter includes a build.properties.sample file. Rename it to build.properties, and then edit it to point to the expanded Alfresco SDK and the exploded Alfresco webapp directory in Tomcat. Here is an example:
        alfresco.sdk.remote.dir=|usr|local|bin|alfresco-labs-3.0-sdk|lib|remote
        alfresco.sdk.server.dir=|usr|local|bin|alfresco-labs-3.0-sdk|lib|server
        alfresco.web.dir=|usr|local|bin|apache|apache-tomcat-5.5.17|webapps|alfresco

    Now you are ready to populate the project with Alfresco customizations. The exact details aren't important right now: The point of the exercise is to learn what goes where. So rather than building each file from scratch, use the following table to figure out what files need to be copied from the source code included with the chapter into your Eclipse project. The "Where it came from" column shows where I got the file, in case you are curious. You'll learn how to build these files in the subsequent chapters:

    File (Path relative to the root of the Eclipse project)

    File description

    Where it came from

    |src|web|jsp|extension|login.jsp

    |src|web|jsp|extension|relogin.jsp

    Modified login.jsp and relogin.jsp

    Copied from Alfresco's web application and modified

    |src|web|someco|images|someco-logo.png

    SomeCo corporate logo

    High-dollar branding consultants, focus groups, hours of graphics design work

    |src|web|META-INF|faces-config.xml

    Custom faces-config.xml file to override Alfresco's navigation rules related to login

    Copied from Alfresco's web application and modified

    |config|alfresco|extension|web-client-config-custom.xml

    Custom web client configuration to override login page path with the path to the custom page

    Copied from Alfresco's web application and modified

  5. That's all that is required to customize the login page. To make the example slightly more interesting, let's make a very small extension to Alfresco's content model. A full chapter is devoted to extending the content model, so, again, don't sweat the details at this point. For now, just copy each of the files shown in the following table from the source code that accompanies this chapter into your Eclipse project:

    File (Path relative to the root of the Eclipse project)

    File description

    Where it came from

    |config|alfresco|extension|someco-model-context.xml

    Model context file (Spring bean configuration)

    Copied from custom-model-context.xml.sample in [distribution]|extensions|extension and modified

    |config|alfresco|extension|model|scModel.xml

    Model XML file

    Copied from customModel.xml.sample in [distribution]|extensions|extension and modified

    |config|alfresco|extension|web-client-config-custom.xml

    Custom web client configuration to expose custom types to the web client user interface

    Modified the same web-client-config-custom.xml file as the one used for the custom login page

  6. Now deploy the customizations. If it is running, shut down Tomcat. Then use Ant to package and deploy the files. You can use Eclipse to invoke the deploy target or use the command line as follows:
    ant deploy


After successfully running the Ant target, your changes will be sitting in the Alfresco web application directory you specified in build.properties. To test this out, start Tomcat back up and see if the customizations made it.

The login page should look like this:

Step-by-Step: Packaging and Deploying a Simple Customization

Log in, navigate to a folder, and create some content. You should see Someco Document and Someco Whitepaper as available content types.

Taking a Look at the Build File

The sample code in this book uses Ant to package and deploy the customizations. The initial build.xml file is very straightforward. The list of Ant targets and what they do is probably more important than the actual contents of the build.xml file. The Ant targets are shown in the following table:

Ant Target

What it does

clean

Removes all generated files

compile

Compiles src to ${bin.dir}

deploy

Unzips the ${package.file.zip} into ${alfresco.web.dir}

package-extension

Creates a ZIP called ${package.file.zip} that can be unzipped on top of an exploded Alfresco web application

package-jar

Jars up the compiled classes and ${web.dir}/META-INF into ${package.file.jar}

setup

Creates the ${build.dir} and ${bin.dir} directories

zip-project

Zips the entire Eclipse project as is into ${project.file.zip}

You can recreate the table output by asking Ant for project help on the command line:

ant -p
CONTINUE READING
83
Tech Concepts
36
Programming languages
73
Tech Tools
Icon Unlimited access to the largest independent learning library in tech of over 8,000 expert-authored tech books and videos.
Icon Innovative learning tools, including AI book assistants, code context explainers, and text-to-speech.
Icon 50+ new titles added per month and exclusive early access to books as they are being written.
Alfresco Developer Guide
notes
bookmark Notes and Bookmarks search Search in title playlist Add to playlist font-size Font size

Change the font size

margin-width Margin width

Change margin width

day-mode Day/Sepia/Night Modes

Change background colour

Close icon Search
Country selected

Close icon Your notes and bookmarks

Confirmation

Modal Close icon
claim successful

Buy this book with your credits?

Modal Close icon
Are you sure you want to buy this book with one of your credits?
Close
YES, BUY

Submit Your Feedback

Modal Close icon
Modal Close icon
Modal Close icon