

We will take an example of a Loan Processing Application. For simplicity our Loan process system carries out three steps for approving or rejecting the loan. These steps include Customer Address verification, Credit verification, and Loan assessment.
We start by designing our application, and identifying the entity model of the system that would interact with the system. All of the entity can be modelled as POJO. We will define the following entity model for the Loan processing system:
Address POJO—this contains address information
Customer POJO—this contains customer information. The customer object holds a reference to the address object instance.
Loan POJO—this contains Loan information and holds a reference to the address Customer object.
Each POJO provides a set of properties and corresponding get/set method to set the information. For instance Customer object provides the setFirstname and getFirstName methods to set and get the firstName property.
Note
The source code and build file of is available in the ApacheCXFBook/springapp folder of the source code distribution. Refer to the Appendix Getting Ready with the Code examples for detailed instructions on how to download the source code from the Packt web site.
We will now create the entity models. Let's start off by creating the Address model.We will name this implementation class as Address. The following is the code listing for Address.java:
package demo.spring;


public class Address {

   private String addressLine1;
   private String addressLine2;
   private String city;
   private String state;
   private String country;

   public String getAddressLine1() {
      return addressLine1;
   }
   public void setAddressLine1(String addressLine1) {
      this.addressLine1 = addressLine1;
   }
   public String getAddressLine2() {
      return addressLine2;
   }
   public void setAddressLine2(String addressLine2) {
      this.addressLine2 = addressLine2;
   }
   public String getCity() {
      return city;
   }
   public void setCity(String city) {
      this.city = city;
   }
   public String getState() {
      return state;
   }
   public void setState(String state) {
      this.state = state;
   }
   public String getCountry() {
      return country;
   }
   public void setCountry(String country) {
      this.country = country;
   }


}
As you see above the Address class is pretty straightforward and provides properties and methods to store address information, such as address line, city, state, and country.
Next we will create the Customer entity model. We will name this implementation class as Customer. The following is the code listing for Customer.java:
package demo.spring;

public class Customer {

   private String firstname;
   private String lastname;
   private String SSN;
   private String DOB;
   private Address address;
   public String getFirst name() {
      return firstname;
   }
   public void setFirstname(String firstname) {
      this.firstname = firstname;
   }
   public String getLastname() {
      return lastname;
   }
   public void setLastname(String lastname) {
      this.lastname = lastname;
   }
   public String getDOB() {
      return DOB;
   }
   public void setDOB(String dob) {
      DOB = dob;
   }
   public Address getAddress() {
      return address;
   }
   public void setAddress(Address address) {
      this.address = address;
   }
   public String getSSN() {
      return SSN;
   }
   public void setSSN(String ssn) {
      SSN = ssn;
   }

}
The Customer object contains a reference to Address information, which stores the address information for the customer.
Finally we create the Loan entity. We will name this implementation class as Loan. The Following is the code listing for Loan.java:
package demo.spring;

import java.util.Date;

public class Loan {

   private Customer customer;
   private String loanApplicationId;
   private Date loanApplyDate;
   private String loanStatus;
   public String getLoanStatus() {
      return loanStatus;
   }
   public void setLoanStatus(String loanStatus) {
      this.loanStatus = loanStatus;
   }
   public Customer getCustomer() {
      return customer;
   }
   public void setCustomer(Customer customer) {
      this.customer = customer;
   }
   public String getLoanApplicationId() {
      return loanApplicationId;
   }
   public void setLoanApplicationId(String loanApplicationId) {
      this.loanApplicationId = loanApplicationId;
   }
   public Date getLoanApplyDate() {
      return loanApplyDate;
   }
   public void setLoanApplyDate(Date loanApplyDate) {
      this.loanApplyDate = loanApplyDate;
   }

}
The Loan object contains a reference to Customer information, which stores the customer information. Clients interact with the Loan system by creating an instance of Loan object.
With the entity modelled, we now create the various services for the Loan processing application that will carry out the required Loan functions.
As part of the Loan processing application, we will create three services—verify Address, verify Credit and Loan assessment. These services are also designed as POJO. We start off by creating the Address verification service which validates an address.
We create an interface and implementation for the Address verification service. We will name the interface as VerifyAddress and the implementation class as VerifyAddressImpl. The Following provides the code listing for VerifyAddress.java:
package demo.spring;

public interface VerifyAddress {

   public boolean verifyAddress(Address address);

}
VerifyAddress interface provides the method verifyAddress which takes Address object as input and returns true or false to denote a valid or an invalid address. The following provides the code listing for VerifyAddressImpl.java. As part of the implementation, we provide a dummy implementation, which returns false if address city is null.
package demo.spring;

public class VerifyAddressImpl implements VerifyAddress {

   public boolean verifyAddress(Address address) {
      System.out.println("verifyAddress called");
      if(address.getCity() == null){
         return false;
      }
      return true;

   }

}
Next we will create the Credit Verification service which provides credit verification about the customer. We create an interface and implementation for the Credit verification service. We will name the interface as VerifyCredit and the implementation class as VerifyCreditImpl. The following provides the code listing for VerifyCredit.java:
package demo.spring;

public interface VerifyCredit {

   public String GOOD_CREDIT ="GOOD";
   public String BAD_CREDIT ="BAD";
   public String verifyCredit(Customer customer);

}
VerifyCredit provides one method, verifyCredit which takes Customer object as input and returns String with value either GOOD_CREDIT or BAD_CREDIT. The following provides the code listing for VerifyCreditImpl.java. As part of the implementation, we provide a dummy implementation, which returns GOOD_CREDIT if customer SSN starts with A. In a real world implementation, you would probably use one of the various external credit rating services offered over the web.
package demo.spring;

public class VerifyCreditImpl implements VerifyCredit {

   public String verifyCredit(Customer customer) {
      System.out.println("verifyCredit called with SSN " + customer.getSSN());
      if(customer.getSSN().startsWith("A")){
         return GOOD_CREDIT;
      }else{
         return BAD_CREDIT;
      }

   }

}
Next we will create the LoanAssessment service which provides loan assessment, taking into account the loan and customer details. We create an interface and implementation for the Loan Assessment service. We will name the interface as LoanAssessment and implementation class as LoanAssessmentImpl. The following provides the code listing for LoanAssessment.java:
package demo.spring;

public interface LoanAssessment {

   public String LOAN_APPROVED ="APPROVED";
   public String LOAN_REJECTED ="REJECTED";
   public Loan assessLoan(Loan loan);

}
LoanAssessment provides one method, assessLoan which takes the Loan object as input and returns the Loan object as output with the loan status as APPROVED or REJECTED. The following provides the code listing for LoanAssessmentImpl.java. As part of the implementation, we provide a dummy implementation, which sets the loan as approved if Customer SSN starts with "A".
package demo.spring;

import java.util.Date;

public class LoanAssessmentImpl implements LoanAssessment {

   public Loan assessLoan(Loan loan) {
      //Assign a unique id.
      loan.setLoanApplicationId(loan.getCustomer().getSSN() + System.currentTimeMillis());
      System.out.println("assessLoan loan id generated is "+ loan.getLoanApplicationId());
      //Dummy implementation
      if(loan.getCustomer().getSSN().startsWith("A")){
         loan.setLoanStatus(LOAN_APPROVED);
      }else{
         loan.setLoanStatus(LOAN_REJECTED);
      }

      return loan;
   }

}So far we have created the loosely coupled POJO components as part of the Loan Processing application. From the implementation of the service and entity models, you can see the simplicity associated with POJO implementation and these POJO can be tested without the need for any external container dependency. The other feature is that these objects can be reused across the system and not just with Loan processing applications. For instance, address verification service and credit rating can be used wherever there is need for address and credit verification. Next we will assemble the services to realize the Loan Processing application. We will create an interface and implementation for the LoanProcess application. We name the interface as LoanProcess and implementation class as LoanProcessImpl. The following provides the code listing for LoanProcess.java:
package demo.spring;

public interface LoanProcess {

   public Loan applyLoan(Loan loan);

   public VerifyAddress getVerifyAddress();

   public void setVerifyAddress(VerifyAddress verifyAddress);

   public VerifyCredit getVerifyCredit();

   public void setVerifyCredit(VerifyCredit verifyCredit);

   public LoanAssessment getLoanAssessment();

   public void setLoanAssessment(LoanAssessment loanAssessment);

}
LoanProcess provides the get/set method to access the services, VerifyAddresss, VerifyCredit, and LoanAssessment, along with a method applyLoan(), which the client would call for applying the loan. The following shows the implementation for LoanProcessImpl.java:
package demo.spring;

public class LoanProcessImpl implements LoanProcess {

   private VerifyAddress verifyAddress;
   private VerifyCredit verifyCredit;
   private LoanAssessment loanAssessment;

   public VerifyAddress getVerifyAddress() {
      return verifyAddress;
   }

   public void setVerifyAddress(VerifyAddress verifyAddress) {
      this.verifyAddress = verifyAddress;
   }

   public VerifyCredit getVerifyCredit() {
      return verifyCredit;
   }

   public void setVerifyCredit(VerifyCredit verifyCredit) {
      this.verifyCredit = verifyCredit;
   }

   public LoanAssessment getLoanAssessment() {
      return loanAssessment;
   }

   public void setLoanAssessment(LoanAssessment loanAssessment) {
      this.loanAssessment = loanAssessment;
   }


   public Loan applyLoan(Loan loan) {

      //Step one - verify address
      boolean validAddress = getVerifyAddress().verifyAddress(loan.getCustomer().getAddress());
      if(!validAddress){
         throw new RuntimeException("Address for Customer SSN "+ loan.getCustomer().getSSN() + " is not valid");
      }
      //Step two -verify credit
      String status = getVerifyCredit().verifyCredit(loan.getCustomer());
      if(status.equalsIgnoreCase(VerifyCredit.BAD_CREDIT)){
         //If bad credit, disapprove Loan
         loan.setLoanStatus(LoanAssessment.LOAN_REJECTED);
         return loan;
      }else {
         return getLoanAssessment().assessLoan(loan);
      }

 }


}
As you see above, LoanProcessImpl provides get/set method implementations for various services, getVerifyCredit(), setVerifyCredit(),
and so on , along with a dummy implementation for the applyLoan() method.
applyLoan() calls the various services as part of load processing. First it calls getVerifyAddress().verifyAddress() to verify the address, next it calls the getVerifyCredit().verifyCredit() method to verify the credit and finally getLoanAssessment().assessLoan(), which approves or rejects the loan.
As you see, nowhere in the code have we created an instance of a service object that is VerifyAddress, VerifyCredit or LoanAssessment. So how does LoanProcessImpl get the services instance at runtime? All these dependencies are injected by the Spring IoC container using a configuration file. The configuration file tells the Spring ICO container how to instantiate, configure and wire the dependency in your application. In the Loan processing application, the setter methods for the services are called by Spring IoC framework reading the configuration file. The applyLoan() method will then use the service references to carry out the implementation.
The following is the listing of the Spring configuration file for the Loan processing application. We name the configuration file as loanprocess.xml.
<?xml version="1.0" encoding="UTF-8"?>

<beans xmlns="http://www.springframework.org/schema/beans"
      xmlns:xsi="http://www.w3.org/2001/XMLSchema-instance"
      xsi:schemaLocation="http://www.springframework.org/schema/beans
      http://www.springframework.org/schema/beans/spring-beans-2.0.xsd">

   <bean id="loanProcess" class="demo.spring.LoanProcessImpl">
      <property name="verifyAddress">
         <ref bean="verifyAddress" />
      </property>
      <property name="verifyCredit">
         <ref bean="verifyCredit" />
      </property>
      <property name="loanAssessment">
         <ref bean="loanAssessment" />
      </property>
   </bean>


   <bean id="verifyAddress" class="demo.spring.VerifyAddressImpl">
       <!--  wire dependency-->
    </bean>


    <bean id="verifyCredit" class="demo.spring.VerifyCreditImpl">
       <!--  wire dependency-->
    </bean>

    <bean id="loanAssessment" class="demo.spring.LoanAssessmentImpl">
       <!--  wire dependency-->
    </bean>

</beans>
Let's analyze the loanprocess.xml code listing. We start off with the <beans> tag which defines the XML Schema for Spring beans framework. These are standard definitions for Spring , which you would find in any Spring configuration file. Next we define the beans used in our Loan Process application using the <bean> tag. The bean tag defines information on how to create the bean and defines a unique id, class definition, property, references, and various other properties. For a list of properties associated with bean definition, refer to Spring documentation. For instance, the demo.spring.LoanAssessmentImpl bean definition looks like the following:
<bean id="loanAssessment" class="demo.spring.LoanAssessmentImpl">
       <!--  wire dependency-->
</bean>
To wire the loanAssessment dependency to the LoanProcessImpl bean definition, you use the setter-based dependency injection and use the ref bean definition to wire the loanAssessment bean with the loanAssessment property.
Note
Note that the LoanProcessImpl object provides getter and setter methods for the loanAssesment property and the following definition provides the wiring.
<bean id="loanProcess" class="demo.spring.LoanProcessImpl">
      <property name="loanAssessment">
         <ref bean="loanAssessment" />
      </property>
   </bean>
Similarly the verifyAddress and verifyCredit bean is defined and injected to the loanProcess bean. We have thus assembled our Loan processing application.
The same concepts of dependency injection have been applied throughout the book where we have used Spring configuration. CXF also provides its own schema and bean definition that you can use to configure CXF components, like the <jaxws:client> definition which lets you create JAXWS clients, rather than writing code to create the clients. All of the CXF components can be wired through Spring configurations and can leverage various features offered by Spring framework.
We will now create the standalone client which will invoke the Loan processing application. We will name this implementation class as LoanProcessClient. The following provides the code listing for LoanProcessClient.java:
package demo.spring.client;

import java.util.Date;

import org.springframework.context.support.ClassPathXmlApplicationContext;

import demo.spring.Address;
import demo.spring.Customer;
import demo.spring.Loan;
import demo.spring.LoanProcess;

public class LoanProcessClient {

   public static void main(String[] args){
      try
       {
      System.out.println("LoanProcessClient started");


       ClassPathXmlApplicationContext appContext = new ClassPathXmlApplicationContext(new String[] {
           "/demo/spring/loanprocess.xml"
       });

      System.out.println("Spring configuration file loaded");

      Customer customer = new Customer();
      customer.setFirstname("Naveen");
      customer.setLastname("Balani");
      customer.setSSN("A0989999999");

      //Address
      Address address = new Address();
      address.setAddressLine1("Stree one");
      address.setCity("Mumbai");
      address.setCountry("India");

      customer.setAddress(address);

      Loan loan = new Loan();
      loan.setCustomer(customer);
      loan.setLoanApplyDate(new Date());


      LoanProcess loanProcess = (LoanProcess)
      appContext.getBean("loanProcess");

      Loan loanResponse =loanProcess.applyLoan(loan);

      System.out.println("Loan status for customer with SSN " + loan.getCustomer().getSSN() + " is " + loanResponse.getLoanStatus());

       }
      catch(Exception e){
         e.printStackTrace();
      }
      }

}
LoanProcessClient creates the Customer, Address, and Loan object, and populates it with some data. LoanProcessClient also loads the Spring configuration files through ClassPathXmlApplicationContext as shown below:
    ClassPathXmlApplicationContext appContext = new ClassPathXmlApplicationContext(new String[] {
           "/demo/spring/loanprocess.xml"
       });
After the Spring configuration file is loaded, all the beans defined will be instantiated and the references will be wired. You can then access the bean, for instance LoanProcess POJO, through the getBean() method as shown below:
LoanProcess loanProcess = (LoanProcess)
      appContext.getBean("loanProcess");
Once the client gets a reference to LoanProcess object, it then executes the applyLoan() process on it and get backs the LoanResponse object and prints the status of loan on the console.
Before running the program, we will organize the code so far developed in the appropriate folder structure. You can create the folder structure as shown below and put the components in the respective sub folders.
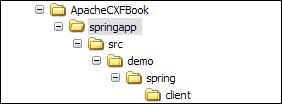
As you see in the figure above,
springappis the project folder for this appendix chapter.springapp/srcis the location of our source code. Place the Java code into the respective package folders in thespringapp/srcfolder. Placeloanprocess.xmlin thesrc/demo/springfolder.Once the code is organized, we will go about building and executing the code.
To build the code we will use the Maven tool. To set up the Maven environment, refer to Appendix A Getting Ready with the Code examples. The pom.xml file for this example is provided in springapp folder. The code below illustrates the pom.xml file:
<project xmlns="http://maven.apache.org/POM/4.0.0" xmlns:xsi="http://www.w3.org/2001/XMLSchema-instance"
  xsi:schemaLocation="http://maven.apache.org/POM/4.0.0 http://maven.apache.org/maven-v4_0_0.xsd">
<modelVersion>4.0.0</modelVersion>
<groupId>packt</groupId>
<artifactId>springloanapp</artifactId>
<packaging>jar</packaging>
<version>1.0-SNAPSHOT</version>
<name>springloanapp</name>
<url>http://maven.apache.org</url>
<build>
      <!--Source Directory -->
      <sourceDirectory>src</sourceDirectory>
      <resources>
         <resource>
            <directory>src</directory>
            <includes>
               <include>**/*.properties</include>
               <include>**/*.xml</include>
            </includes>
         </resource>
      </resources>
      <plugins>
         <plugin>
            <artifactId>maven-compiler-plugin</artifactId>
            <configuration>
               <source>1.5</source>
               <target>1.5</target>
            </configuration>
         </plugin>
         </plugins>
</build>
<properties>
   <!-- Set the latest Spring version here -->
   <spring-version>2.5</spring-version>
   </properties>
<dependencies>
   <dependency>
   <groupId>org.springframework</groupId>
   <artifactId>spring</artifactId>
   <version>${spring-version}</version>
   </dependency>
</dependencies>
</project>
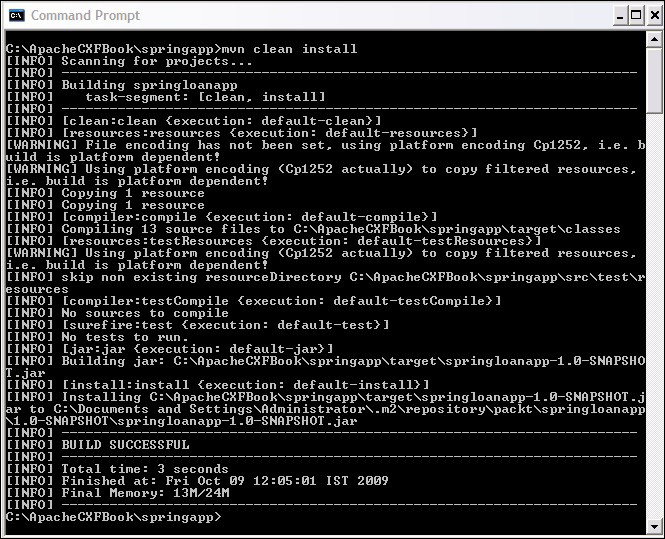
Open the command prompt window, go to the springapp folder and run the command mvn clean install. It will build the source code and put the class files under the target folder. The following screenshot shows the output generated on running the mvn clean install command:
You execute the Java client program LoanProcessClient by giving the following command on the command prompt window:
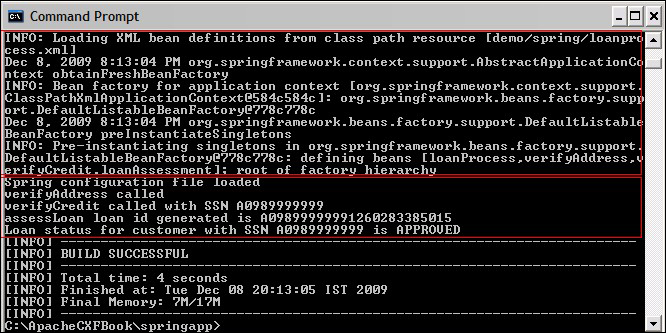
mvn exec:java -Dexec.mainClass=demo.spring.client.LoanProcessClientUpon executing this command, the following output as shown in the screenshot below will be displayed. If you look at the INFO: log event highlighted in the output below, you see the beans—loanProcess, verifyAddress, verifyCredit, and loanAssessment being loaded by the Spring container based on the loanprocess.xml file.
You will then see that the output of the POJO methods being printed at the console, "verifyAddress called", "verifyCredit called with SSN A0989999999", "assessLoan loan id generated is A09899999991255071849921", and "Loan status for customer with SSN A0989999999 is APPROVED"
We have thus successfully assembled and executed our Loan Processing application using Spring IoC container features.