
Today it's generally expected that an organization, company, or even an individual (for example, think of creative professionals such as photographers or musicians) have a website which will serve as a tool for promotional purposes or to generate an income. It may simply be a one page portfolio, or possibly a blog that allows you to share your opinions, or a comprehensive e-commerce operation such as eBay or Amazon. As a content management system, Joomla! has the capacity to accommodate all of these applications. Also, whatever you or your website developer's reasons for choosing Joomla! to power your site, one of the great things about it is the ease with which you can manage and update your content, keeping your users interested in you and your activities or products. Learning how to keep your content fresh and engaging becomes easy once you know how, and that's what this book aims to achieve.
In this first chapter towards understanding how to manage your Joomla! website, we'll refer to a mock up of a website called The Party People to cover:
Accessing and navigating the "backend" or administration interface of your new website
The overall structure of the site and the hierarchy of content
What the overall configuration settings mean to the presentation and delivery of your site
What you see in the web browser is referred to as the frontend of your site and presents the online face and personality of your organization. Managing this pleasant face is easily achieved when you access the backend of the site. The kind folks at Joomla! have made this as fuss free as possible by providing a graphical and easy to navigate administration interface.
It is also important to mention here that editing your website can be done through the frontend of the site as well, depending upon the level of access the user has been granted. There are also certain extensions to Joomla! that allows access to particular areas. Chapter 5, User Management looks at the level of access in detail.
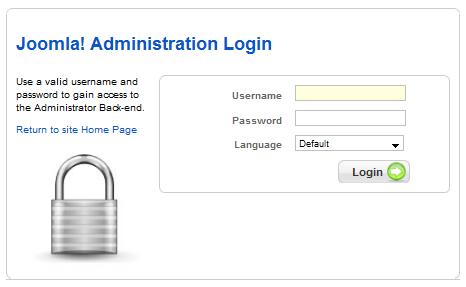
However, access to the administration requires logging in and your website developer will have provided you with the appropriate level of authority to do so. The administration interface called the Control Panel, is a "members only" area.
Note
If your developer has not given you the level of authority as a user to do this, you will need to approach them and ask them to change your user profile. The developer should allocate access to you as a manager at least for administrative rights. Chapter 5, User Management covers user management in a detailed manner.
Access to the Control Panel is through a link relative to the website address. Using the Party People example, the content editor will type in http://partypeople.com/administrator/ and be presented with the login panel to enter a Username and Password before proceeding to the Control Panel.
Having logged in successfully, you are presented with the Control Panel screen (the central hub for managing your content). This is where you begin creating and managing articles, uploading images, as well as a host of other functional activities. Clicking one of the icons (as seen in the following screenshot) gives you access to various sections of the administration interface. We'll address these progressively throughout the chapter.
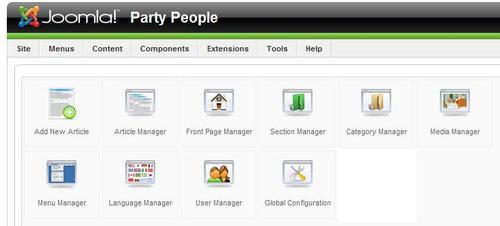
The icons presented are quick links to the most frequently accessed content editing and management activities and are supplementary to the main menu structure located at the top of the administration interface. Use either the icon or the menu to take you to the section.
The icons on display are determined by the level of authority the website developer has created for your role.
As the Control Panel is the central hub of the administration interface, it can also be accessed from other areas of the site through the top menu.
Click the Site | Control Panel link from anywhere within the administration interface to return to this screen. You will need to close or save your current updates in order to enable the link.