
Our first order of business is deciding where to store courses. Instructors using Plone on their own sometimes create an entire Plone site for each course. While this lets them choose add-on products on a per-course basis and offers some isolation should a catastrophe occur, it carries two important disadvantages:
A maintenance burden. Unless you are adept at writing scripts to automate it, upgrading and editing redundant settings on several Plone sites takes time and invites error.
An integration challenge. Sharing information among Plone sites is tricky. By using a single site, you get integrated navigation and search without having to cobble together bridging solutions using XML—RPC or RSS.
Thus, we recommend keeping all your courses (and whatever else you can get away with politically) in a single Plone site. We will keep the courses in a special kind of folder called a large folder.
Note
Folders versus Large Folders
In Plone 3, there are two main types of folders— folders and large folders— each with its own advantages.
Folders are best for holding less than about fifty items. Their contents can be manually ordered through drag-and-drop and appear beneath their enclosing folder in Navigation portlets. However, whenever a folder is loaded into memory (unpickled, in Python parlance), all its contents are loaded as well. This takes up a lot of RAM and causes slowdowns if folders are overpopulated. In addition, since folders store all their contents in a single Python "tuple", they are a prime source of conflict errors in Zope's database: temporary errors which happen whenever two transactions try to write to the same object at once. In addition to adding noise to your error logs, these hurt performance, since they require the entire transaction — everything done in response to the HTTP request — to be redone.
Large folders, on the other hand, are optimized to hold thousands of items, storing their contents in a B-tree, a data structure that supports incremental loading and therefore needs less RAM and disk access. B-trees also provide finer-grained locking, making for fewer conflict errors. The downside is that their contents cannot be manually ordered. Also, for cosmetic reasons, their contents aren't listed in Navigation portlets (though this can be changed in the portal_types tool in the ZMI).
A note about the future
In Plone 4, both folder types will be subsumed by a hybrid that combines the best attributes of each. Called plone.folder, this package is, as of October 2009, available separately for Plone 3 at beta quality. If you choose to use it now, migration to the Plone 4 version will likely be smooth.
Large folders are not available from the Add new menu (addable) out of the box. To enable them...
1. Go to Site Setup → Zope Management Interface, colloquially known as "the ZMI." This is an under-the-hood view for tweaking infrequently used settings and performing advanced tasks.
2. Go to portal_types → Large Plone Folder, where you can control the behavior of the Large Folder type within the Plone site.
3. Turn on Implicitly addable, and save. Large folders are can now be added throughout the site.
Once you are finished adding large folders, it's a good idea to revoke their addability to prevent user confusion. Otherwise, users will see them in their Add menus.
Next, create a top-level large folder for holding courses:
1. Navigate back to the top level of your Plone site (no longer in the ZMI), and choose Add new → Large Folder. Title it "Courses," and save. (Now is a great time to return to
portal_typesand turn off large folder addability.)Although large folders are supposedly designed to hold thousands of items,their views are unpaginated: they are happy to display all those thousands of items on one gigantic page. Improving this behavior is on the docket for a future version of Plone: http://dev.plone.org/plone/ticket/9544. In the meantime, we can take advantage of a little trick using collections to add pagination to the folder:
2. Inside the Courses folder, choose Add new → Collection. Title it "Courses" like its surrounding folder, so the name of the folder and the title on its default page are consistent. Save it.
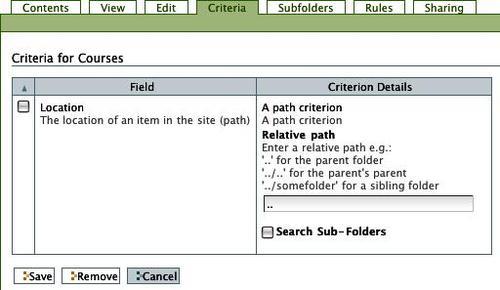
3. On the collection's Criteria tab, add a relative Location criterion, and leave.. (the default) as its Relative path. Search Sub-Folders should remain unchecked; we want to pull in only the direct contents of the Courses folder.
4. Under Set Sort Order, select Title to make courses appear in alphabetical order.
5. Go back to the collection's View tab, and choose Display → Summary view. This keeps users from seeing distracting author information and modification dates.
6. On the collection's Edit → Dates tab, set the Publishing Date far in the future. This ugly but effective trick keeps the collection from showing up in the folder listing for students. You will still see it, however, since you created it.
7. Finally, navigate back to the Courses folder, and set the collection as its default view: choose Display → Select a content item as default view, and choose the Courses collection.
Congratulations! Perhaps that seemed a lot of work for an empty folder, but pagination and efficient storage are insurance against being woken in the middle of the night when your server chokes trying to render too many 1,000-course pages. (It also means fewer servers to buy, a significant monetary saving for your institution.)
Incidentally, you can feel free to add additional levels of organization within your Courses folder at this point: for example, grouping courses by subject or level. Just remember to revoke large folder addability when you're done.