

Akismet certainly does a great job of dealing with spam that has already been submitted, but that function is only one part of the overall spam-preventative measures that you should have in place to protect your sites. The second plugin that you need to use in order to win your battle against spam is WP-reCAPTCHA.
This plugin, which is available at http://wordpress.org/extend/plugins/wp-recaptcha/, works by displaying an image that includes distorted words that your visitors must type in correctly. Using the settings provided by this plugin, this image can be configured to display on the comment form as well as the registration page.
Because of the methods that WP-reCAPTCHA uses to generate their CAPTCHA images, it's much less likely that spammers will be able to use OCR reading spam bots to bypass the protection offered by this plugin.
WP-reCAPTCHA is used by some very well-known sites, such as Facebook, Twitter, and StumbleUpon. Its spam-prevention capabilities are even being employed by a few U.S. government websites. If these sites are confident enough in the protection offered by WP-reCAPTCHA, then there really isn't any reason why you shouldn't entrust your site to it too.
After installing and activating WP-reCAPTCHA, a message will appear at the top of the plugins screen to inform you that this plugin won't function until you provide reCAPTCHA API keys.

If you already have reCAPTCHA API keys associated with this site, then click on Settings | reCAPTCHA and, then enter them into the textboxes found in the reCAPTCHA Keys settings area. If you don't have reCAPTCHA API keys for this site, then you will need to create them before you can begin using this plugin.
To create these keys, you need to visit the reCAPTCHA site at http://recaptcha.net. ReCAPCTHA is now a part of Google, so, if you already have a Google account, you can use that user name and password combination to create the API keys for this domain. If you don't have a Google account, then you will need to create one before proceeding.
Either way, click on My Account. If you already have a Google account, log in now. If you don't have an account with Google, click on Create an account now and then complete the sign up process.
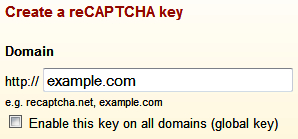
Once you've logged into the reCAPTCHA website, navigate to the reCAPTCHA key creation screen by clicking on My Account | Add a New Site. Next, type the URL of your site into the Domain textbox. The Enable this key on all domains (global key) setting should remain disabled, so just click Create Key.
After your information has been submitted, you will be taken to a page that contains both the public and private keys that have been associated with your domain. Copy both of these keys to your text editor, so that you can enter them into the appropriate textboxes on your website.
Return to the admin area of your website and then click on Settings | reCAPTCHA. At the top of the screen, you will see the reCAPTCHA Keys area. In the Public Key textbox, enter the public key for this domain. Then, in the Private Key textbox, enter the private key.
With those two keys entered, you can now concentrate on configuring the remaining settings found on the reCAPTCHA Options screen. The Comment Options settings section is next. The first setting found here is Enable reCAPTCHA for comments which is enabled. This should be left as is, so take a look at the next setting.
If you enable the Hide reCAPTCHA for registered users who can option, a reCAPTCHA won't be shown to the type of users that you choose from the drop-down menu. There doesn't seem to be much point in requiring users of a certain level to type in a reCAPTCHA since you will, mostly likely, trust that they won't spam your site. So, enable this setting by ticking the checkbox. The drop-down menu that accompanies this setting is currently set to All registered users, but that's a bit too lenient. Instead, it would probably be best to choose Publish Posts.
The Theme setting is next and it's here that you can choose the color used for the background of the reCAPTCHA image that will be shown on your website. So, choose your preferred color from the drop-down menu.
The last setting found in this area is Tab Index, which is currently set to 5. This setting allows you to specify the location of the reCAPTCHA image in the tabbing order of the submission form. While this should be fine at its default, you may need to return to this screen later and make adjustments to that number until you find the appropriate setting for your site.

The Registration Options area is next. Since you hardly want your site to be inundated with spam registrations, you should activate the Enable reCAPTCHA on registration form setting. A Theme setting is, once again, found in this area, so select your preferred reCAPTCHA color from the drop-down menu before moving on to the next set of configurations.

No changes need to be made to the settings found in the Error Messages and General Settings areas, so move on to the MailHide section of your screen. In this area you can enable settings that will protect the email addresses displayed on your blog from being harvested by spammers.
Before you begin to configure these settings, you will need to first generate another set of public and private keys for usage with MailHide. To do this, right-click on key generation service and then open that link in a new browser window to be taken to http://mailhide.recaptcha.net/apikey. The screen that you arrive at will contain your public and private MailHide keys.
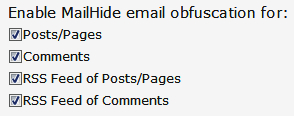
Copy both of these keys to a text document and then return to the reCAPTCHA settings screen. Once there, enable each of the settings found in the Enable MailHide email obfuscation for section of your screen. Then, enter the public key that you just generated into the Public Key textbox. Next, the private key that you just created should be entered into the Private Key textbox.
In the Visibility Options area, enable the Show full email addresses to registered users who can setting. Then, choose your preferred setting from the drop-down menu. Once again, Publish Posts is probably ideal. The default method of hiding email addresses is fine, so skip the remaining configurations found in this area and, instead, click Update Options.

Since some of the sites found in this book already have reCAPTCHA built-in, or use a CAPTCHA method of their own, there's no need to install this plugin on those sites. Also, a CAPCHTA feature doesn't have any place on some of the other sites that you've created throughout the course of this book. The WP-reCAPTCHA plugin is, however, well-suited for usage on all of the following sites:
Project 1: Migrating a Static Website to WordPress
Project 4: Building a Local Classified Ads Website
Project 5: Building a Consumer Review Website
Project 9: Building a Membership Website