
Previous plugins have been about manipulating existing content. For more advanced readers, we will now look at how we can use AJAX to retrieve a list of books that the site owner has been reading.
It will pull this list of books into the plugin and build a pull-out sidebar on the website that will list all the books and provide different ways in which they can be sorted.
For this recipe, we will use a copy of the template we created in the previous recipe.
Using our base template from the previous recipe, we will start out by creating a new file called data.json in the root of the project; this will house the list of our books as JSON. For each book we will store the ISBN, Name, Author, Publisher, and an image.
[
  {
    "isbn": "1849516529",
    "name": "jQuery UI 1.8: The User Interface Library for jQuery",
    "author": "Dan Wellman",
    "publisher": "PACKT Publishing",
    "cover": "images/6525OS_jQuery UI 1.8_Front cover_0.jpg"
  },
  {
    "isbn": "9781849510042",
    "name": "jQuery 1.4 Reference Guide",
    "author": "Jonathan Chaffer, Karl Swedberg",
    "publisher": "PACKT Publishing",
    "cover": "images/0042_MockupCover_0.jpg"
  },
  {
    "isbn": "1849516545",
    "name": "Learning jQuery, Third Edition",
    "author": "Jonathan Chaffer, Karl Swedberg",
    "publisher": "PACKT Publishing",
    "cover": "images/6549OS_Learning jQuery Third Edition_FrontCover.jpg"
  }
]To ensure that your JSON does not contain any errors, I recommend you lint the JSON using JSON Lint (http://jsonlint.com/). This will enable you to ensure you have not made any mistakes with the syntax of your JSON.
The next step after you have got your JSON is for us to start writing our plugin; as we are using our template, we can simply open
plugin.jsto get started. As with our other plugins, the first step when writing our plugin is to name it; in this case we will name itbookshelf.var pluginName = "bookshelf",
Following on from this, we need to set our defaults. We want our user to be able to configure both the URL of the book's data file, and the name of the bookshelf they are adding to their site. We will name these options
urlwith a default value ofnullandbookshelfNamewith a default value ofMy Bookshelf.var pluginName = "bookshelf", defaults = { url : null, bookshelfName: "My Bookshelf" };We also have an extra variable to add to the top of our plugin called
templates, which will store an object literal of templates that will be used by the plugin for generating the HTML for the bookshelf. Thetemplatesobject will contain two templates, the first being the main bookshelf container, and the second the template used for each book added to the bookshelf. To allow our templates to be flexible for us to add content to, we will use placeholder text, starting and ending with the%symbols so that we can replace these with the actual text when we are generating our HTML.var templates = { container : "<div id='bookshelf'><h1>%BookshelfName%</h1><a class='pull' href='#'>Pull</a><div id='bookshelf_books'></div></div>", book: "<div class='book'><h2>%Title%</h2><img src='%Cover%'/><p>%Author%</p><p>%Publisher%</p></div>" };As our plugin is only ever going to have one instance and it needs to exist on the body of the page, we will now make some tweaks to the plugin wrapper. The key change is that, rather than looping through items passed to the plugin, we are simply checking for a current instance of the plugin on the body. If none is found, we create a new instance of the plugin on the body and then simply return
this.$.fn[pluginName] = function ( options ) { if (!$.data(document.body, "plugin_" + pluginName)) { $.data(document.body, "plugin_" + pluginName, new Plugin(document.body, options )); } return this; };This change also has implications on how we call our plugin from our
main.jsfile; regardless of whether a selector is passed to jQuery or not, the plugin will always apply itself to the body. The benefit of this is that now we can simply use$().bookshelf({url: "data.json"})to set up our plugin. We should now update this in themain.jsfile.Our next step is to make a start on our
initmethod. Begin by checking that the developer using our plugin has provided a URL for the book feed to the plugin. To do this we will simply check to seethis.options.urldoes not equalnull. In the event that the URL has not been provided, we will then determine whether the browser console is available and if so, we will output an error to notify the developer they haven't passed a URL to the plugin. Finally we will usereturn falseto exit out of theinitmethod without executing the rest of the method.init: function() { if(this.options.url === null){ //cannot do anything without a URL return false; } },If we want to test whether this works, we can simply change our call to the plugin in the
main.jsfile to not pass any parameters so the code will look like$().bookshelf(). We can then open the page in our browser and, upon opening the browser console, we will see that our plugin has an output similar to the error message shown in the following screenshot: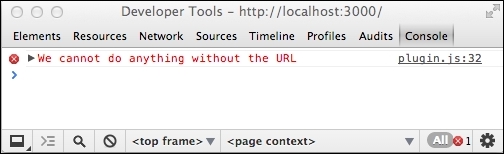
Having tested that our check for the URL works correctly, we can change the call to the plugin in the
main.jsfile back to$().bookshelf({url: "data.json"}).Now that we are sure that the developer using our plugin has provided the URL to the data feed, we are able to continue to initialize our plugin. We will need to add the
bookshelfcontainer to the page, which can be achieved by using simple JavaScript to add to theinnerHTMLof the body element. At the point of adding the bookshelf container to the page, we also need to update the bookshelf name. This can be achieved by using.replace()to replace%BookshelfName%withthis.options.bookshelfName. To keep this simple, we can perform the replace action on the template and append it directly to the body HTML. The init function can be written as follows for this purpose:init: function() { //make sure the user defines a URL for the plugin or else //log an error to the console if(this.options.url === null){ if(typeof console !== "undefined") { console.error('We cannot do anything without the URL'); } return false; } //setup empty bookshelf this.element.innerHTML += templates.container.replace('%BookshelfName%', this.options.bookshelfName); },It is at this point that we can do our book lookup; as the page already has the bookshelf loaded, it is ready for us to get our JSON feed using AJAX. We will do this by using the
jQuery.getJSON()method combined with thejQuery.proxy()method, which we are using to allow us to maintain the correct scope of this in ourthis.outputBooksmethod:init: function() { if(this.options.url === null){ //cannot do anything without a URL if(typeof console !== "undefined") { console.error('We cannot do anything without the URL'); } return false; } //setup empty bookshelf this.element.innerHTML += templates.container.replace('%BookshelfName%', this.options.bookshelfName); //Get books $.getJSON(this.options.url, $.proxy(this.outputBooks, this)); },Our final step in our
initmethod is for us to add the click functionality to our toggle button that shows and hides our bookshelf. We will add this as an event delegated from thebodyelement and clicking on the button will call thethis.toggleVisiblemethod that we will be creating shortly:init: function() { $(this.element).on('click', '#bookshelf .pull', this.toggleVisible); },As you have seen in our
initmethod, we will need to add a couple of extra methods to ourPluginprototype. The first of these isoutputBooks, the secondtoggleVisible, so we will now take a moment to add these methods as follows:Plugin.prototype = { init: function() { if(this.options.url === null){ //cannot do anything without a URL if(typeof console !== "undefined") { console.error('We cannot do anything without the URL'); } return false; } //setup empty bookshelf this.element.innerHTML += templates.container.replace('%BookshelfName%', this.options.bookshelfName); //Get books $.getJSON(this.options.url, $.proxy(this.outputBooks, this)); $(this.element).on('click', '#bookshelf .pull', this.toggleVisible); }, outputBooks: function(data){ }, toggleVisible: function(){ } };With these in place we are ready to start handling the output of our books to our bookshelf. This is handled by our
outputBooksmethod. The first step for ouroutputBooksmethod is for us to set up our variables. We need to append to the bookshelf container so we will retrieve the element usingdocument.getElementById. The reason to use native JavaScript rather than jQuery to select the element is that we will not be requiring any jQuery functionality; thus, for slightly better performance, we will choose to use native JavaScript. We also need two variables to cache generated HTML before it is added to the book container; these arebooksHTMLandbookHTML:outputBooks: function(data){ var bookshelfBooks = document.getElementById('bookshelf_books'), booksHTML = "", bookHTML = ""; },Now that our variables are set up, we can start looking at the data that was returned by the
jQuery.getJSON()method. The method has passed the data as the first parameter of our method that we have nameddata. The data is made up of an array of books so we will use aforloop to loop through the books stored in thedataarray so that we can process them one by one.outputBooks: function(data){ var bookshelfBooks = document.getElementById('bookshelf_books'), booksHTML = "", bookHTML = ""; for (var i = 0; i < data.length; i++) { } },As part of our loop we need to first retrieve the template for a book from the template object this will be stored in the
bookHTMLvariable. We will then use.replace()to start updating the templated HTML with the correct values from the current data item. This will need to be done for the title, author, publisher, and cover.outputBooks: function(data){ var bookshelfBooks = document.getElementById('bookshelf_books'), booksHTML = "", bookHTML = ""; for (var i = 0; i < data.length; i++) { //Setup book with default template bookHTML = templates.book; //Fill in the template bookHTML = bookHTML.replace("%Title%",data[i].name); bookHTML = bookHTML.replace("%Author%",data[i].author); bookHTML = bookHTML.replace("%Publisher%",data[i].publisher); bookHTML = bookHTML.replace("%Cover%",data[i].cover); } },After we have built up the HTML for our individual books, we now need to add it to our
booksHTMLvariable that is used to contain the details of all the books we have just retrieved:outputBooks: function(data){ var bookshelfBooks = document.getElementById('bookshelf_books'), booksHTML = "", bookHTML = ""; for (var i = 0; i < data.length; i++) { //Setup book with default template bookHTML = templates.book; //Fill in the template bookHTML = bookHTML.replace("%Title%",data[i].name); bookHTML = bookHTML.replace("%Author%",data[i].author); bookHTML = bookHTML.replace("%Publisher%",data[i].publisher); bookHTML = bookHTML.replace("%Cover%",data[i].cover); booksHTML += bookHTML; } },After our loop has built up the HTML for all our books, we now need to append it to the
bookshelfcontainer. We will append it by simply adding to theinnerHTMLvariable of the container. The code snippet for this purpose is as follows:outputBooks: function(data){ var bookshelfBooks = document.getElementById('bookshelf_books'), booksHTML = "", bookHTML = ""; for (var i = 0; i < data.length; i++) { //Setup book with default template bookHTML = templates.book; //Fill in the template bookHTML = bookHTML.replace("%Title%",data[i].name); bookHTML = bookHTML.replace("%Author%",data[i].author); bookHTML = bookHTML.replace("%Publisher%",data[i].publisher); bookHTML = bookHTML.replace("%Cover%",data[i].cover); booksHTML += bookHTML; } bookshelfBooks.innerHTML += booksHTML; },At this point, our plugin should be able to render the information about our books to the page; however, without any proper styling it simply shows as a list of books. Our aim is to style it to be a pull-out bookshelf anchored to the right of the page:

At this point we will take a break from working on the JavaScript for our plugin so that we can add the necessary styling to enable us to add the pull-out functionality. Next we need to position our bookshelf. We want this to be fixed to the side of the browser viewport. This will be achieved simply by using
position: fixed,top: 0pxandright: -200px, the reason we set the right to a negative value is that it appears off the edge of the screen to begin with. We will also set the background color to a wood color and set the height to100%so that it fills the browser's viewport height:#bookshelf{ position: fixed; background : #e9c2a6; top: 0px; right: -200px; width: 200px; height: 100%; }The next step is to allow the wrapper for the books to show a scrollbar if the books overflow outside of the wrapper. This can be done in the following way:
#bookshelf #bookshelf_books{
  overflow: auto;
  position: absolute;
  top: 50px;
  left: 0px;
  bottom: 0px;
  width: 200px;
}
We now want to style our title. The code for this can be written as follows:
#bookshelf h1{
  font-size: 1.6em;
  padding: 10px 20px;
  margin: 0px;
  border-bottom: 3px solid #000;
  line-height: 27px;
  background : #e9c2a6;
  z-index: 99;
  position: relative;
}
We will style the individual book items so that there is spacing around each book and a border at the bottom dividing the books, as shown in the following code snippet:
#bookshelf .book{
  padding: 10px 20px;
  border-bottom: 1px solid #000;
}
We also want to ensure that the image for our book does not extend beyond the width of the book item, so we will set a
widthvariable in our CSS as follows:#bookshelf .book img{ width: 160px; }Finally, we will add the styling for the
pulltab that we will use to toggle in order to know whether our bookshelf is open or closed, as shown:#bookshelf .pull{ position: absolute; left: -50px; top: 50%; line-height: 40px; margin-top: -20px; background : #e9c2a6; width: 50px; text-align: center; text-decoration: none; }With our styling complete, we will now see only a tab when we load the page as shown in the following screenshot. However, without our JavaScript, at the moment it will not do anything; we will be unable to see the bookshelf until we write our
toggleVisiblemethod:
Moving on to the
pulltab functionality, we need to work on ourtoggleVisiblemethod. Our first step is to set up our variables. For this we will simply store the jQuery object forthisas$this.toggleVisible: function(){ var $this = $(this); }We are going to manage the state of the
pulltab by toggling theactiveclass; therefore, our next step is to check whether$thishas theactiveclass or not. We check using theifstatement as follows:toggleVisible: function(){ var $this = $(this); if($this.hasClass('active')){ } else{ } }With our
ifstatement in place we now want to animate the bookshelf so that when it is not active it slides open, and when it is already active it slides closed. To perform the animation we will usejQuery.animate()applied directly to the bookshelf container; we will also use.stop()to stop any existing animation. The code snippet to achieve this is as follows:toggleVisible: function(){ var $this = $(this); if($this.hasClass('active')){ $('#bookshelf').stop().animate({ right: '-200px' }, 250); } else{ $('#bookshelf').stop().animate({ right: '0px' }, 250); } }Our next step is to toggle our
activeclass. The code snippet for toggling it is as follows:toggleVisible: function(){ var $this = $(this); if($this.hasClass('active')){ $('#bookshelf').stop().animate({ right: '-200px' }, 250); } else{ $('#bookshelf').stop().animate({ right: '0px' }, 250); } $this.toggleClass('active'); }Our final step is to add
return falseat the end of the method so that the default action of theanchortag used for thepulltab is not executed.toggleVisible: function(){ var $this = $(this); if($this.hasClass('active')){ $('#bookshelf').stop().animate({ right: '-200px' }, 250); } else{ $('#bookshelf').stop().animate({ right: '0px' }, 250); } $this.toggleClass('active'); return false; }At this point our plugin should work; the pull tab should be clickable and it should toggle the visibility of the bookshelf.
Now that we have completed our base plugin, we can think about ways in which we can extend it.
There are many ways in which we can extend our plugin. A couple of ideas are that we can add support to detect whether we should use normal JSON or JSONP, or allow the site visitors to bookmark their favorite books.
As the second option is quite interesting, because it allows us to explore and use the HTML5 localStorage API to cache user preferences, we will be choosing and following this option.
The first step when extending our plugin is to create a copy of what we have done; this will allow us to go back to the old version if we want. Alternatively, we could use source control to manage this plugin.
Once we are ready, we first need to start making changes to the JavaScript plugin. We need to amend the
booktemplate to add a link to toggle whether the book is a favorite or not. To correctly identify the book, we will use the ISBN as a unique identifier that we will store in thehreftag of the link. The code snippet for this is as follows:var templates = { container : "<div id='bookshelf'><h1>%BookshelfName%</h1><a class='pull' href='#'>Pull</a><div id='bookshelf_books'></div></div>", book: "<div class='book'><h2>%Title%</h2><img src='%Cover%'/><p>%Author%</p><p>%Publisher%</p><p><a class='fav_link' href='#%ISBN%'>%Favourite%</a></p></div>" };We also want to enable the developers who are using our plugin to be able to customize the text that is shown on the Add to/Remove from Favorites button so we will add two new
defaultoptions to thedefaultsobject. The first isfavAddTextand the secondfavRemoveText. The code snippet for this is as follows:var pluginName = "bookshelf", defaults = { url : null, bookshelfName: "My Bookshelf", favAddText: "Add to favourites", favRemoveText: "Remove from favourites" };Once we have updated our template and default values, we need to amend our
outputBooksmethod. To start with, ouroutputBooksmethod should already look like the following:outputBooks: function(data){ var bookshelfBooks = document.getElementById('bookshelf_books'), booksHTML = "", bookHTML = ""; for (var i = 0; i < data.length; i++) { //Setup book with default template bookHTML = templates.book; //Fill in the template bookHTML = bookHTML.replace("%Title%",data[i].name); bookHTML = bookHTML.replace("%Author%",data[i].author); bookHTML = bookHTML.replace("%Publisher%",data[i].publisher); bookHTML = bookHTML.replace("%Cover%",data[i].cover); booksHTML += bookHTML; } bookshelfBooks.innerHTML += booksHTML; },The first thing we need to add to the method is the population of the ISBN number; to do this we will simply add another
replacemethod to thebookHTMLvariable to update the ISBN. The code snippet for this is as follows:outputBooks: function(data){ var bookshelfBooks = document.getElementById('bookshelf_books'), booksHTML = "", bookHTML = ""; for (var i = 0; i < data.length; i++) { //Setup book with default template bookHTML = templates.book; //Fill in the template bookHTML = bookHTML.replace("%Title%",data[i].name); bookHTML = bookHTML.replace("%Author%",data[i].author); bookHTML = bookHTML.replace("%Publisher%",data[i].publisher); bookHTML = bookHTML.replace("%Cover%",data[i].cover); bookHTML = bookHTML.replace("%ISBN%",data[i].isbn); bookHTML = bookHTML.replace("%ISBN%",data[i].isbn); booksHTML += bookHTML; } bookshelfBooks.innerHTML += booksHTML; },We now need to determine whether the current book has been stored as a favorite. To manage favorites, we will be storing the ISBN in local storage with the book's ISBN as the key and the value being
true. When an item is removed from being a favorite, the item in local storage will also be removed. To check if a book is a favorite, we simply need to verify if a local storage item exists for that particular ISBN. If an item does not exist,localStorage.getItemwill simply returnnull. Therefore, we will add anifstatement that checks if it returnsnull. The code snippet for this is as follows:outputBooks: function(data){ var bookshelfBooks = document.getElementById('bookshelf_books'), booksHTML = "", bookHTML = ""; for (var i = 0; i < data.length; i++) { //Setup book with default template bookHTML = templates.book; //Fill in the template bookHTML = bookHTML.replace("%Title%",data[i].name); bookHTML = bookHTML.replace("%Author%",data[i].author); bookHTML = bookHTML.replace("%Publisher%",data[i].publisher); bookHTML = bookHTML.replace("%Cover%",data[i].cover); bookHTML = bookHTML.replace("%ISBN%",data[i].isbn); if(localStorage.getItem(data[i].isbn) !== null){ } else{ } booksHTML += bookHTML; } bookshelfBooks.innerHTML += booksHTML; },With our
ifstatement in place, we can now update thefavoritelink with the correct copy, and if a book is a favorite, we will add an extra class to the book to which we can add our favorite book styles:outputBooks: function(data){ var bookshelfBooks = document.getElementById('bookshelf_books'), booksHTML = "", bookHTML = ""; for (var i = 0; i < data.length; i++) { //Setup book with default template bookHTML = templates.book; //Fill in the template bookHTML = bookHTML.replace("%Title%",data[i].name); bookHTML = bookHTML.replace("%Author%",data[i].author); bookHTML = bookHTML.replace("%Publisher%",data[i].publisher); bookHTML = bookHTML.replace("%Cover%",data[i].cover); bookHTML = bookHTML.replace("%ISBN%",data[i].isbn); if(localStorage.getItem(data[i].isbn) !== null){ bookHTML = bookHTML.replace("class='book'","class='book fav'"); bookHTML = bookHTML.replace("%Favourite%",this.options.favRemoveText); } else{ bookHTML = bookHTML.replace("%Favourite%",this.options.favAddText); } booksHTML += bookHTML; } bookshelfBooks.innerHTML += booksHTML; },At this stage we can test out the plugin in our browser. You should see that each book now has a new link called Add to favorites. At this time we haven't added the functionality to actually add the book to become a favorite, so clicking on the links will not perform any action.
We now need to look at the functionality for our favorite links, the first step of which is to add the
toggleFavouritemethod to ourPlugin.prototypeobject. We will be using the jQuery event object to get the current instance of the plugin so thisis passed to our method ase, as shown:toggleFavourite: function(e){ }We will then define our variables. For this method we will need
$this, the plugin instance asplugin, the selected book as$book, andisbnthat is the ISBN number of the book, which we will retrieve from thehrefof the button clicked:toggleFavourite: function(e){ var $this = $(this), plugin = $(e.delegateTarget).data("plugin_" + pluginName), $book = $this.parents('.book'), isbn = $this.attr('href').replace('#',''); }We now need to determine whether the button that has been clicked needs to add or remove a favorite. We will do this by attempting to get the item from the local storage using the
isbnas the key. If the result isnull, we know that we are adding a favorite; otherwise we want to remove a favorite:toggleFavourite: function(e){ var $this = $(this), plugin = $(e.delegateTarget).data("plugin_" + pluginName), $book = $this.parents('.book'), isbn = $this.attr('href').replace('#',''); if(localStorage.getItem(isbn) === null){ } else{ } return false; }With our
ifstatement in place we can now add the functionality. To add a favorite we want to create a new item in the local storage usinglocalStorage.setItem. We then want to add a class to thebookelement to denote that this particular book is in our favorites and allow us to apply styles to show it is a favorite. We also want to change the text of thefavoritelink so that it readsRemove from favorites, which we will retrieve from our plugin options. This is shown in the following code snippet:toggleFavourite: function(e){ var $this = $(this), plugin = $(e.delegateTarget).data("plugin_" + pluginName), $book = $this.parents('.book'), isbn = $this.attr('href').replace('#',''); if(localStorage.getItem(isbn) === null){ localStorage.setItem(isbn, true); $book.addClass('fav'); $this.html(plugin.options.favRemoveText); } else{ } return false; }In the
elsepart of theifstatement, we want to remove the item from favorites. To do this we will uselocalStorage.removeto remove the item from the local storage. We will remove the class from the book and then change the text of our favorites link so that it readsAdd to favorites, which we will retrieve from our plugin options. The code snippet for this is as follows:toggleFavourite: function(e){ var $this = $(this), plugin = $(e.delegateTarget).data("plugin_" + pluginName), $book = $this.parents('.book'), isbn = $this.attr('href').replace('#',''); if(localStorage.getItem(isbn) === null){ localStorage.setItem(isbn, true); $book.addClass('fav'); $this.html(plugin.options.favRemoveText); } else{ localStorage.removeItem(isbn); $book.removeClass('fav'); $this.html(plugin.options.favAddText); } return false; }With our
toggleFavouritemethod completed, we can now add an event to the Add to favorite link. We will add this to the plugininitmethod. One thing you might notice if you follow through the code is that, when we are in theinitmethod, the links have yet to be added to the page. This would be a problem if we were trying to add the event listeners to the individual links; however, we are going to use event delegation so that, instead of adding an event listener to the individual links, we place one event listener on the bookshelf itself:init: function() { if(this.options.url === null){ //cannot do anything without a URL if(typeof console !== "undefined") { console.error('We cannot do anything without the URL'); } return false; } //setup empty bookshelf this.element.innerHTML += templates.container.replace('%BookshelfName%', this.options.bookshelfName); //Get books $.getJSON(this.options.url, $.proxy(this.outputBooks, this)); $(this.element).on('click', '#bookshelf .pull', this.toggleVisible); $(this.element).on('click', '.book a.fav_link', this.toggleFavourite); },At this point if we go back to our browser, we will see that
favoritesare working. For items in ourfavorites, the link text will read Remove from favorites and all the other links will read Add to favorites. To make it clearer to the user of the site, we will add some simple styles to themain.cssfile to change the background color of the book element to a darker one.#bookshelf .book.fav{ background: #dfa67d; }With the new CSS in place, the fact that an item is favorited it is clearer to the users of the site. We now have a bookshelf plugin that allows users to mark their favorite books, as shown in the following screenshot:
