
Basic form validation can be extremely simple to implement with a plugin, but writing a plugin that serves a large number of use cases can be difficult. As such, this section shall show how to build a robust form validation plugin, which validates required e-mail and phone number input fields.
Our first step is to work on our HTML; for this plugin, we want the JavaScript to require minimal setup once it is pointed to a form, which it needs to validate. To do this, we will need to add data attributes to HTML that define what validation needs to be performed and the error messages that will need to be displayed to the users.
The first data attribute we need to add to each of the
inputelements isdata-validate. This data attribute is used to list all the different validators we want to run against the control. In the following example of anemailfield, we will setdata-validatetorequired email, which tells JavaScript that we need to validate and check whether an e-mail address has been entered in the field:<input type="text" name="email" data-validate="required email"/>
We also want to allow the user of our plugin to customize their error messages; to do this, we will take a similar approach to how we define the validators the element uses. Continuing with the example of an
emailfield, we will need to provide error messages for both when the e-mail address has not been filled in and when the e-mail address provided is invalid. To do this, we will add two data attributes:data-required, which displays an error message if the e-mail ID is not entered, anddata-email, which displays an error message if the e-mail ID is not valid:<input type="text" name="email" data-validate="required email" data-required="Please tell us your email address" data-email="Please enter a valid email address" />
Continuing on, we can now do the same for both a name field and a phone number field. The code snippet for this purpose is as follows:
<input type="text" name="name" data-validate="required" data-required="Please tell us your name" />

<input type="text" name="email" data-validate="required email" data-required="Please tell us your email address" data-email="Please enter a valid email address" />

<input type="text" name="phone" data-validate="required phone" data-required="Please tell us your phone number" data-phone="Please enter a valid phone number" />
Now that we have the HTML markup for our fields, we can create the rest of the form; this is simply the
formelement wrapping the fields and the addition of asubmitbutton. This should be placed in our container in ourindex.htmlfile, as shown in the following code snippet:<form action="#" method="post"> <label for="name">Name</label> <input type="text" name="name" data-validate="required" data-required="Please tell us your name" /> <label for="email">Email</label> <input type="text" name="email" data-validate="required email" data-required="Please tell us your email address" data-email="Please enter a valid email address" /> <label for="phone">Phone number</label> <input type="text" name="phone" data-validate="required phone" data-required="Please tell us your phone number" data-phone="Please enter a valid phone number" /> <input type="submit" value="Submit" /> </form>
Now that we have our HTML, we can move on to writing our plugin. The first step is to set up our plugin name. For simplicity, we will call it
validation.var pluginName = "validation"
The next step is to define our defaults. As we are already defining a lot of our settings inside the HTML, there are not many settings we need to actually configure using JavaScript. The one setting that would be useful for configuring is what HTML should be displayed to show an error message. For this, we will allow the developer using the plugin to provide a template; a default template will be stored in the default settings. To allow the error message to be displayed in the template, we will insert
%E%where the error message should be outputted:var pluginName = "validation", defaults = { errorTemplate: '<p class="error">%E%</p>' };
Before we move on to the
initsection of our plugin, we will spend some time writing some basic validators. These will be private and inaccessible outside of the plugin. To start with, we will set up a new object literal calledvalidatorsthat we will place after thePlugin.prototypeobject.var validators = { }We will add a series of basic validation methods to this object, for those criteria that are required such as
emailandphone. Each validation method will accept an object literal as a parameter, as seen in the following code snippet:var validators = { required: function(validationAttr){ }, email: function(validationAttr){ }, phone: function(validationAttr){ } };Starting with the
requiredmethod, we need to check that its value is notnull, that it is not an empty string, and that the value does not equal the default value. This is accomplished by the following code:required: function(validationAttr){ var valid = true; if (validationAttr.value === null || validationAttr.value === '') { valid = false; } return valid; },Moving on to the e-mail validation, we need to use a regular expression to validate that the value added is in fact an e-mail address. To test the regular expression, we will use
.match, as shown:email: function(validationAttr){ var valid = false; if (validationAttr.value.match(/^((?:(?:(?:\w[\.\-\+]?)*)\w)+)\@((?:(?:(?:\w[\.\-\+]?){0,62})\w)+)\.(\w{2,6})$/)) { valid = true; } return valid; },The final validation method is for phone validation. We will use a regular expression to validate the phone number. To test the regular expression, we will use
.match, as shown:phone: function(validationAttr){ var valid = false; if (validationAttr.value.match(/^(0(\d|\s){8,12}$)|(\+(\d|\s){8,12}$)/)) { valid = true; } return valid; }We can now move on to the
initsection of our plugin. To validate the form, we need to handle two types of events, the submission of the form and the changing of the value of the form element. The prerequisite for our plugin to work is that it should be applied to the form element; we can then use event delegation to add the two types of events directly to the form. We will pass three parameters to thejQuery.on()method, firstly the event, secondly the selector, and finally the event handler method that we will shortly be adding to our prototype object. For thechangeevent, we will use[data-validate]as the selector, which will select any form element that we have added validation to. For the form submission, we will add asubmitevent to the form., as shown:init: function() { $(this.element).on('change','[data-validate]',this.validateField); $(this.element).on('submit',this.validateForm); },The next step is to set up our methods, the first being
validateFormand the second,validateField. ThevalidateFormmethod will accept the jQuery event object as its only parameter and thevalidateFieldmethod will take the jQuery event object and a parameter calledthat. The code snippet for this is as follows:Plugin.prototype = { init: function() { $(this.element).on('change','[data-validate]',this.validateField); $(this.element).on('click',this.validateForm); }, validateForm: function(e){ }, validateField: function(e,that){ } };The first method we will get started with is the
validateFieldmethod that will validate any field. When we added thevalidateFormmethod toPlugin.prototype, you may have noticed that we pass two parameters to the method. The first parameter is the jQuery object that is passed to the method by jQuery. The second parameter is an optional parameter calledthat(a pseudonym forthisused wherevalidateFieldis called in a way that makesthishave an incorrect scope).At the start of the
validateFieldmethod, we will setup several different variables:valid: Thevalidvariable keeps track of whether the field is valid or not.field: Thefieldvariable defaults to equalingthat. Ifthatwere not passed to the method as a parameter, the field becomes equal tothis.$field: Once we have decided whether thefieldattribute is equal tothatorthis, we will get the jQuery object of thefieldattribute and store it as$field.requiredValidators: TherequiredValidatorsvariable stores an array of validators required to be executed on the form field. This is retrieved from thedata-validatedata attribute using.attr('data-validate')and then splitting it into an array using.split(' ').plugin: Thepluginvariable stores the current instance of the plugin retrieved using$(e.delegateTarget).data("plugin_" + pluginName).$error: Any existing error message for a field will have their jQuery object cached usingjQuery.data(). These can then be retrieved and removed.errorHTML: TheerrorHTMLwill be used for building up the error message's HTML page.validateField: function(e,that){ var valid = true, field = that || this, $field = $(field), requiredValidators = $field.attr('data-validate').split(' '), plugin = $(e.delegateTarget).data("plugin_" + pluginName), $error = $field.data('error') || null, errorHTML = null; }
After setting up our variables, we can now remove any existing error messages, as shown in the following code snippet:
validateField: function(e,that){
  var valid = true,
  field = that || this,
  $field = $(field),
  requiredValidators = $field.attr('data-validate').split(' '),
  plugin = $(e.delegateTarget).data("plugin_" + pluginName),
  $error = $field.data('error') || null,
  errorHTML = null;

  if($error !== null){
    $error.remove();
  }
}
Now that we have removed any existing error messages, we can start with validating the field. The first step in validating the field is to set up the
validationAttrobject literal with the value of the element. The code to achieve this is as follows:validateField: function(e,that){ var valid = true, field = that || this, $field = $(field), requiredValidators = $field.attr('data-validate').split(' '), plugin = $(e.delegateTarget).data("plugin_" + pluginName), $error = $field.data('error') || null, errorHTML = null; if($error !== null){ $error.remove(); } var validationAttr = { value: $field.val() }; }We now need to go through each of the items in the
requiredValidatorsarray and run each of the validators. We will use aforloop to go through the array ofrequiredValidatorsas shown:validateField: function(e,that){ var valid = true, field = that || this, $field = $(field), requiredValidators = $field.attr('data-validate').split(' '), plugin = $(e.delegateTarget).data("plugin_" + pluginName), $error = $field.data('error') || null, errorHTML = null; if($error !== null){ $error.remove(); } var validationAttr = { value: $field.val() }; for (var i = 0; i < requiredValidators.length; i++) { } }Inside the
forloop, we now need to run the correct validation. We can do this by runningvalidators[requiredValidators[i]](validationAttr). Breaking down this statement, we find that thevalidators[requiredValidators[i]]part of the code selects the method and the(validationAttr)part executes the method with thevalidationattributes object as the parameter. Thevalidationmethod is executed as a part of anifstatement. If the validation fails, it will execute the code required to set the failed state. This can be understood better by the following code snippet:validateField: function(e,that){ var valid = true, field = that || this, $field = $(field), requiredValidators = $field.attr('data-validate').split(' '), plugin = $(e.delegateTarget).data("plugin_" + pluginName), $error = $field.data('error') || null, errorHTML = null; if($error !== null){ $error.remove(); } var validationAttr = { value: $field.val() }; for (var i = 0; i < requiredValidators.length; i++) { if(validators[requiredValidators[i]](validationAttr) === false){ } } }We now need to handle what happens if the validation fails. Inside our
ifstatement, we need to add the functionality to show an error message. The error message needs to use the error message template that we defined in the template combined with the text for the error message, which is defined on the field as a data attribute. To do this, we need to set theerrorHTMLvariable to the value returned by using JavaScript's.replace()onplugin.options.errorTemplateto replace%E%with the value of the current validators, error message.We then need to append the error message to the page; simultaneously, we also want to cache the error element jQuery object. We can do this all in one line of code by using the
jQuery.datamethod to store an error on the field. As the value of the data we are adding, we can use$(errorHTML).insertAfter($field)that returns the error message of the corresponding jQuery object, which is now cached using .data().Finally, before we close our
ifstatement, we can setvalidequal tofalseand break out of our loop usingbreak. The code snippet for this purpose is as follows:validateField: function(e,that){ var valid = true, field = that || this, $field = $(field), requiredValidators = $field.attr('data-validate').split(' '), plugin = $(e.delegateTarget).data("plugin_" + pluginName), $error = $field.data('error') || null, errorHTML = null; if($error !== null){ $error.remove(); } var validationAttr = { value: $field.val() }; for (var i = 0; i < requiredValidators.length; i++) { if(validators[requiredValidators[i]](validationAttr) === false){ errorHTML = plugin.options.errorTemplate.replace("%E%", $field.attr('data-'+requiredValidators[i])); $field.data('error',$(errorHTML).insertAfter($field)); valid = false; break; } } return valid; }At this point, our elements on change functionality should be working; however, the next step is to add the functionality for when the form is submitted.
We can now get started with adding the functionality to the
validateFormmethod. The first step is to define our variables. For this method, we will need a simple Boolean variable namedvalid, and a plugin variable that we will load the plugin instance into.validateForm: function(e){ var valid = true, plugin = $(this).data("plugin_" + pluginName); },Our next step is to go through the form looking for elements we want to validate. We will do this by finding elements with the
data-validateattribute set and then usejQuery.each()to loop through each of these, as shown in the following code snippet:validateForm: function(e){ var valid = true, plugin = $(this).data("plugin_" + pluginName); $(plugin.element).find('[data-validate]').each(function(){ }); },Now that we are looping through our fields, we can add some validation rather than duplicate the change validation, which we have already written. We will simply use an
ifstatement to check the result of thevalidateFieldmethod on each element. If at any point thevalidateFieldmethod returns the value asfalse, we setvalidequal tofalseas the form has failed validation.validateForm: function(e){ var valid = true, plugin = $(this).data("plugin_" + pluginName); $(plugin.element).find('[data-validate]').each(function(){ if(plugin.validateField(e,this) === false){ valid = false; } }); },Our final step is to return the
validvariable.validateForm: function(e){ var valid = true, plugin = $(this).data("plugin_" + pluginName); $(plugin.element).find('[data-validate]').each(function(){ if(plugin.validateField(e,this) === false){ valid = false; } }); return valid; },
It is important that our validators work as we expect and that, if we go on to improve our plugin by adding extra validators, we should perform a regression test on our code. While we could manually test each of our validation methods, it makes sense to write some unit tests to test the code.
Unfortunately our plugin isn't quite ready for unit testing as our validators are nested within a closure and we are therefore unable to call them directly.
The first step is for us to add a new method to our plugin prototype, which will act as a pass-through for our tests. This method needs to be minimal as we don't want to be testing the pass through; we want to test the actual validator. We will call our new method
validateString, and it will simply take the options passed to the plugin and perform the validation. As the validators expect to receive an object literal, we will setup the object literal with the value. We then simply return the value returned by the validator, as shown in the following code snippet:validateString: function(options){ var validationAttr = { value: options.val }; return validators[options.validator](validationAttr); }With our new method complete, we now need to update the plugin wrapper to add support for calling the
validateStringmethod. We will need to add anifstatement to determine whether the plugin should run as normal or whether it is being used to simply validate a string.$.fn[pluginName] = function ( options, methodOptions) { var localPlugin = null; if (options === undefined || typeof options === 'object') { return this.each(function () { if (!$.data(this, "plugin_" + pluginName)) { $.data(this, "plugin_" + pluginName, new Plugin( this, options )); } }); } else if(options === "validateString"){ localPlugin = new Plugin( null, {} ); return localPlugin.validateString(methodOptions); } };Now that we have updated our plugin, we can test this out in the browser console. Once you have the page open and have opened the console, you can test the new version of the plugin with:
$().validation('validateString',{val: "test", validator: "required"});This should simply return
trueto the console.Now that we are happy that our changes to our plugin are working, we will start setting up QUnit. The first step is to create a new HTML file called
test.html, which will be used for our unit tests. We will use the QUnit CSS and JavaScript both directly from the jQuery site, so the only extra file we need to create is thetest.jsfile that will house our tests.<!DOCTYPE html> <html> <head> <title></title> <link rel="stylesheet" href="http://code.jquery.com/qunit/qunit-1.11.0.css"> </head> <body> <div id="qunit"></div> <div id="qunit-fixture"></div> <script src="js/vendor/jquery-1.9.1.min.js"></script> <script src="js/plugin.js"></script> <script src="http://code.jquery.com/qunit/qunit-1.11.0.js"></script> <script src="js/tests.js"></script> </body> </html>The next step is our
tests.jsfile. There are three main test cases we want to create, the first to test the required validation, the second to test the e-mail validation, and the third to test the phone number validation.Starting with the required validation test case, our first step is to create our test case. This is done by executing the test method with two properties. The first is the name of the test case, and the second is a callback method where we will add all the individual assertions:
test( "Required validation", function() {
});
When adding our assertions, we are going to use the
okmethod to which we will pass two parameters. The first is our condition and the second is the name of the individual assertion. For theconditionparameter, we will simply check that the plugin validation method is returning what we expect; in our case, the values will equaltrueorfalse. For our first assertion, we will set the value to"", and we expect that this will returnfalseas it is an empty string; for our second assertion, we will passRequired value, and we expect that this will returntrueas it is a populated value:test( "Required validation", function() { ok($().validation('validateString',{val: "", validator: "required"}) === false, "Value is not entered"); ok($().validation('validateString',{val: "Required value", validator: "required"}) === true, "Value is entered"); });The next step is to do the same for the e-mail validation: for our first assertion we will set the value to
helloand we expect that this will returnfalseas it is not a valid e-mail address; for our second assertion, we will pass[email protected], and we expect that this will returntrueas it is a valid e-mail address.test( "Email Validation", function() { ok($().validation('validateString',{val: "hello", validator: "email"}) === false, "Value is not email address"); ok($().validation('validateString',{val: "[email protected]", validator: "email"}) === true, "Value is email address"); });Finally we will add our test case for the phone number validation, for our first assertion we will set the value to "hello" and we expect that this will return false as it is not a valid phone number, for our second assertion we will pass "01234789777" and we expect that this will return true as it is a phone number.
test( "Phone Number Validation", function() {
  ok($().validation('validateString',{val: "hello", validator: "phone"}) === false, "Value is not phone number");
  ok($().validation('validateString',{val: "01234789777", validator: "phone"}) === true, "Value is a phone number");
});
Upon opening this in the browser, we will be presented with the tests; if you look at each test case you will notice
(0,2,2).These values indicate there were zero failures, two passes out of a total of two assertions.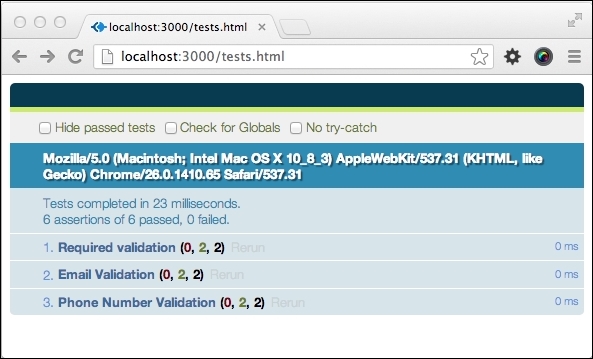
To help you with your own plugin development, you should take advantage of the many resources available on the Web.
The official documentation for information about jQuery Plugins can be found at: http://learn.jquery.com/plugins/
Information about how to use GitHub is available at https://help.github.com/.
My blog that has tutorials, jQuery plugins, and a portfolio of my work: http://www.jonathanfielding.com.