

If you've tried to play your video at any stage during the first two tasks in this section, you will note that it doesn't look that professional, and also requires you to control it using the context menu—this isn't really user-friendly, is it? We're going to change that in this task by adding in some basic styles.
Before we can add any code, you need to avail yourself of some icons—there are some included with the code download for this book, or you can try looking on the Internet. You can try something like the icons created by Kevin Andersson, available from http://www.tabsicons.com/classic/#tabs_free. You will also notice from the CSS style code in this task that I've used sprites, along with CSS to position them—this results in a smoother result as the image is already cached. To create your sprite, you can use the free online service at http://www.csssprite.com; you will need to rename your resulting file accordingly—the site gives you the CSS required once the images have been converted.
We also need to add in images for the volume background as well as the playback seeker handle—again, you will need to look for suitable images on the Internet or you can use the ones included in the code download for this book.
Open up your text editor and load up the result from the previous task—you should have this in your editor:
<!DOCTYPE html>
<html>
  <head>
    <title>HTML5 Video Plugin Test</title>
  </head>
  <body>
    <div class="video_player">
      <video controls="controls" id="mainvideo"
        poster="media/trailer_480p.jpg" >
        <source src="media/trailer_480p.ogv"
        type="video/ogg" />
        <source src="media/trailer_480p.mp4"
        type="video/mp4" />
        <source src="media/trailer_480p.webm"
        type="video/webm" />
      </video>
    </div>
    <div class="custom_controls">
      <a class="play" title="Play"></a>
      <a class="pause" title="Pause"></a>
      <div class="time_slider"></div>
      <div id="time">
      <span class="timer">00:00:00</span> /
      <span class="duration">00:00:00</span>
      </div>
      <div class="volume">
      <div class="volume_slider"></div>
        <a class="mute" title="Mute"></a>
        <a class="unmute" title="Unmute"></a>
      </div>
    </div>
  </body>
</html>
Create a new blank file and save it as
videoplayer.cssinto thecssfolder (from the first task). Add the following into your header area:<link href="css/videoplayer.css" rel="stylesheet" type="text/css" />
We now need to add in the CSS styles to the
videoplayer.cssfile—there are a fair few required, so we will look at each section in turn, beginning with the basic containers:#mainvideo { width: 800px; } .video_player { width: 800px; } .video_player .custom_controls { background-color: #fcfcfc; clear: both; height: 23px; left: 20px; padding: 5px; position: relative; top: -50px; width: 90%; }We now focus on providing the play and pause buttons, so add in the following:
.play, .pause, .volume, .time_slider, .timer {float: left; }
.play, .pause, .mute, .unmute { cursor: pointer; }
.play, .pause { display: block; height: 24px; margin-left: 5px; margin-right: 15px; opacity: 0.8; width: 33px;
  background: url(../images/playpause-icon.png) no-repeat;

  transition: all 0.2s ease-in-out;
  -moz-transition: all 0.2s ease-in-out;
  -webkit-transition: all 0.2s ease-in-out;
  -o-transition: all 0.2s ease-in-out;
}
.play { background-position: 0 0; }
.pause { background-position: 0px -32px; display: none; }
.play:hover, .pause:hover { opacity: 1; }
The next item to add is a slider and handle for controlling our position in the video:
.ui-slider-handle { display: block; margin-left: -9px;
  position: absolute; z-index: 2; }
.ui-slider-range { bottom: 0; display: block; height: 100%;
  left: 0; position: absolute; width: 100%; z-index: 1; }
.time_slider { border: 1px solid #444; height: 10px; width:
  470px; margin-top: 5px; position: relative;
  border-radius: 15px 15px 15px 15px;
  -webkit-border-radius: 15px 15px 15px 15px;
  -moz-border-radius: 15px 15px 15px 15px;
  box-shadow: 0 -3px 3px #333 inset;
  -webkit-box-shadow: 0 -3px 3px #333 inset;
  background: -moz-linear-gradient(center top , #555, #333)
  repeat scroll 0 0 #555;
  background: -webkit-linear-gradient(center top , #555,
#333) repeat scroll 0 0 #555;
  background: -o-linear-gradient(center top , #555, #333)
    repeat scroll 0 0 #555;
  background: -ms-linear-gradient(center top , #555, #333)
  repeat scroll 0 0 #555;
}
.time_slider .ui-slider-handle { cursor: pointer; top: -2px;
  background: url(../images/handler.png) no-repeat;
  height: 16px; opacity: 0.8; width: 16px; }
.time_slider .ui-slider-handle.ui-state-hover { opacity: 1; }
.time_slider .ui-slider-range { border-radius: 5px; -moz-
  border-radius: 5px; -webkit-border-radius: 5px; }
We now need to adjust the styles used for the total playback time and time elapsed, so go ahead and add in this:
#time { color: #999999; font-weight: bold; margin-top: 5px;
  font-size: 0.7em; }
.timer { margin-left: 10px; margin-right: 5px; }
Unless we want to become prematurely deaf, we need some means to control the volume, so let's fix that now:
.volume { bottom: 0; color: #fff; height: 35px; overflow:
  hidden; padding: 5px 10px 0; position: absolute; right: 0;
  width: 33px; }
.volume:hover { background: url(../images/volume.png) no-
  repeat scroll 8px 0 transparent; height: 161px; }
.volume_slider { height: 105px; left: -1px; opacity: 0;
  position: relative; width: 33px; }
.volume:hover .volume_slider { opacity: 1; }
.volume_slider .ui-slider-handle { opacity: 0.8; width: 14px;
  background: url(../images/handler.png) no-repeat;
  height: 15px; left: 9px; margin-bottom: -15px; margin-left:
  0; }
.volume_slider .ui-slider-handle.ui-state-hover { opacity: 1; }
We need some means to automatically mute or un-mute our video, so go ahead and add in the following, which will take care of this:
.mute, .unmute { bottom: 7px; display: block; height: 23px;
   opacity: 0.8; position: absolute; text-indent: -999px;
   width: 33px; background: url(../images/volumefullmute-
   icon.png) no-repeat; }
.mute:hover, .unmute:hover { opacity: 1; }
.mute { background-position: 0px 0px; }
.unmute { background-position: 0px -32px; display: none; }
The last stage is to add a button that allows us to control the stopping and starting of the video by simply clicking on the video itself. We will be adding in jQuery code later to enable this functionality, but for now, add in the following:
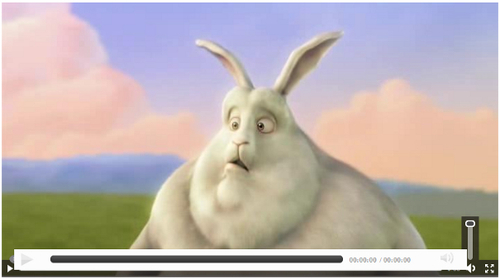
.video-overlay { background: url("../images/button.png")
  no-repeat scroll 50% 50% rgba(0, 0, 0, 0.4); cursor:
  pointer; display: block; height: 100%; left: 0; position:
  absolute; top: 0; width: 100%; }
If all is well, we will end up with something like this, although the functionality won't work until we've added in the jQuery code:
In the previous tasks, we've focused on providing a basic style to the video controls as well as adding the requisite functionality for controlling the video through jQuery. A big drawback with the styles that we've looked at is that they are not terribly attractive; this is something we can easily fix by adding in the final styling code, which we will do now.
Create a blank file called
videoplayerstyles.cssand store this file in a subfolder calledcss, to which we will put a reference in our code using this line:<link href="css/videoplayerstyles.css" rel="stylesheet" type="text/css" />
We begin by adding in a short block of CSS, which will act as a reset on the base styles:
.video_player .custom_controls { background-color: #000;
  left: -5px; top: 0px; clear: both; height: 30px;
  padding-top: 8px; position: relative; width: 100%; }
We can now begin to style the main video container:
.video_player { border: 5px solid #61625D; float: left;
  font-family: Arial,Helvetica,sans-serif; padding: 10px;
  position: relative;
  border-radius: 5px 5px 5px 5px;
  -webkit-border-radius: 5px 5px 5px 5px;
  -moz-border-radius: 5px 5px 5px 5px;
  box-shadow: 0 15px 35px #535353 inset;
  -webkit-box-shadow: 0 15px 35px #535353 inset;
  background: -moz-linear-gradient(center top , #333, #000)
    repeat scroll 0 0 #000;
  background: -webkit-linear-gradient(center top , #333,
    #000) repeat scroll 0 0 #000;
  background: -ms-linear-gradient(center top , #333, #000)
    repeat scroll 0 0 #000;
  background: -o-linear-gradient(center top , #333, #000)
    repeat scroll 0 0 #000;
}
We need to provide a visual means to control the sliders by using a handle icon:
.time_slider .ui-slider-handle { opacity: 0.8; width: 16px;
  background: url("../images/handler.png") no-repeat scroll
  0 0 transparent; cursor: pointer; height: 16px; top: -
2px; }
It's time now to add some color and style to the seeker control that allows you to control where you are in the video playback:
.time_slider .ui-slider-range {
  border-radius: 5px 5px 5px 5px;
  -webkit-border-radius: 5px 5px 5px 5px;
  -moz-border-radius: 5px 5px 5px 5px;
  background: -moz-linear-gradient(center top , #434, #778)
   repeat scroll 0 0 #434;
  background: -moz-linear-gradient(center top , #434, #778)
    repeat scroll 0 0 #434;
  background: -moz-linear-gradient(center top , #434, #778)
    repeat scroll 0 0 #434;
  background: -moz-linear-gradient(center top , #434, #778)
    repeat scroll 0 0 #434;
}
If all is well, we should now have a more stylish player, albeit one that won't fully work (just yet)—here's a screenshot of one I prepared earlier:

Phew! That was a mammoth task! We've looked at a number of different styles in this task, with the key aim of designing something that displays a basic set of controls, and which can be customized at a later date. You will note also from the first screenshot in this recipe that there appears to be two sets of controls—the top one is the set of controls being styled by the code from this section; the bottom one (partially hidden), is the default set of controls shown by the browser.
The first part of this code overrides the original .video_player
.custom_controls CSS style; this is designed on the principle of progressive enhancement, where removing the new theme file will still allow the base style to be used. We've added some additional styles to give some color to the background container as well as the volume slider and volume handle.
We've also delved into the CSS required to set up styles for each element, such as volume control, a playback button, a pause button (not shown yet), and others—while you will find that these are yet to done, we've laid down the groundwork for the next task, which is to add in the jQuery functionality!
Now that we have split the CSS styles into two separate files (one for the base appearance and one for the theme), we can play with the colors used on the seeker controls. You can replace the .time_slider
.ui-slider-range style with any number of different colors—the choice is entirely up to you. A good source of color choices is in the themes offered as part of jQuery UI—try this blue-green color code as an example:
.time_slider .ui-slider-range {
  background: -moz-linear-gradient(center top , #2C4359,
  #E1E463) repeat scroll 0 0 #2C4359;
  background: -webkit-linear-gradient(center top , #2C4359,
  #E1E463) repeat scroll 0 0 #2C4359;
  background: linear-gradient(center top , #2C4359, #E1E463)
  repeat scroll 0 0 #2C4359;
  background: -o-linear-gradient(center top , #2C4359,
  #E1E463) repeat scroll 0 0 #2C4359;
  border-radius: 5px 5px 5px 5px;
  -webkit-border-radius: 5px 5px 5px 5px;
  -moz-border-radius: 5px 5px 5px 5px;
}