
Here we cover installing these software products in your Windows machine:
Apache 2
PHP 5
MySQL 5
You can download the latest MSI Installer version of the Apache HTTP Server from http://httpd.apache.org/download.cgi. Download the latest Win32 Binary (MSI Installer), which should have a name like apache_2.x.y-win32-x86-no_ssl.msi, then execute it.
The default installation location of Apache 2 is C:\Program Files\Apache Group\Apache2\, but the installer allows you to specify a different path. You can choose a more convenient location (such as C:\Apache), which can make your life working with Apache easier.
During installation you’ll be asked to enter your server’s information:
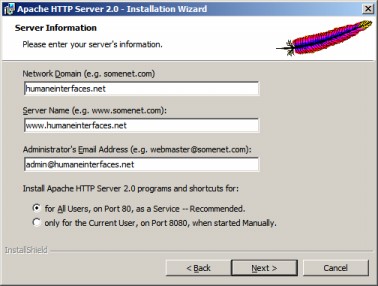
Figure A.1: Installing Apache 2.0
If you’re not sure about how to complete the form, just type localhost for the first two fields, and write your email address for the last. You can change this information later by editing the Apache configuration file. The default location of this file is C:\Program Files\Apache Group\Apache2\conf\httpd.conf.
You can also choose to install Apache on Port 80, or on Port 8080. The default port is 80, but if you already have a web server (such as IIS) on your machine, you’ll need to install Apache on a different port. If you choose to run Apache on Port 8080, you will need to start the Apache service manually by going to the Apache bin folder (by default C:\Program Files\Apache Group\Apache2\bin), and typing
apache -k install
When the web server runs on a port different than 80, you need to specify the port manually when making HTTP requests, such as in http://localhost:8080/ajax/suggest.
In the next setup screens, you can safely use the default options.
Along with the Apache server the installer will also start the Apache Service Monitor program, which is available from the taskbar. The taskbar icon reflects the current state of the web server (stopped, running, etc.), and also allows you to start, stop, or restart the Apache service.
Note
Keep in mind that you’ll need to restart (or stop and then start) the Apache service after making any changes to the httpd.conf configuration file, in order for the changes to become effective.
After installing Apache 2, make sure it works OK. If you installed it on port 80, browse to http://localhost/. If you installed it on 8080, go to http://localhost:8080/. You should see an Apache welcome message similar to this:
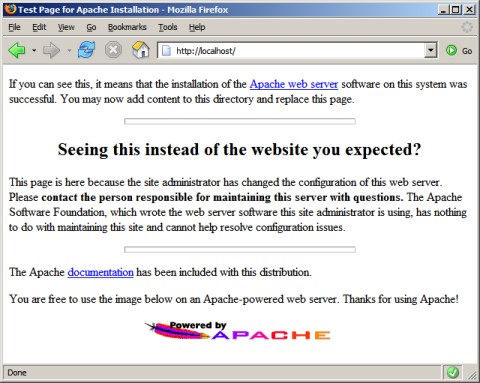
Figure A.2: Apache Installed Successfully
The official website of MySQL is http://www.mysql.com. At the time of this writing the latest stable version is MySQL 5.0, and you can download it from http://dev.mysql.com/downloads/mysql/5.0.html. However, it’s good to know that we made our SQL queries compliant with the SQL 92 standard, so you should be able to reuse them with other database systems with minimum of translation effort.
In the Downloads page, scroll down to the Windows downloads section, and download the Windows Essentials file. You’ll be asked to choose a mirror site, and the file will be named something like mysql-essential-5.0.xx-win32.msi. After downloading the file, simply execute it to install your MySQL Server.
After installation you’ll be given the chance to configure your server. Do so. It’s safe to use the default options all the way through. At some point you’ll need to set the root password, which will correspond to the root@localhost user. Choose a password that’s complicated enough for others not to guess and simple enough for you to remember.
Before going through any case studies in this book, remember to see the Preparing the AJAX Database section at the end of this appendix.
The official website of PHP is http://www.php.net. Start by downloading from the Windows Binaries section the latest PHP 5 zip package (not the installer!) from http://www.php.net/downloads.php. We prefer not to use the installer because it doesn’t include extensions that you may need for your projects, and it doesn’t do much configuration work for you anyway.
After you download the Windows binaries, follow these steps to install PHP:
Unzip the zip package (it should be a file with a name like
php-5.x.y-win32.zip) into a folder namedC:\PHP\. You can choose another name or location for this folder if you want.Copy
php.ini-recommendedfromC:\PHP\to your Windows folder (C:\Windows), renaming it asphp.ini.Open
php.inifor editing with the text editor of your choice (such as Notepad) and uncomment thephp_gd2.dll,php_mysql.dll, andphp_xsl.dllextension lines (by removing the leading semicolons), and add a similar line forphp_mysqli:extension=php_gd2.dll extension=php_mysql.dll extension=php_mysqli.dll extension=php_xsl.dll
We recommend enabling full error reporting for PHP on the development machine, but this is optional (this option is the default). Be warned that this change can alter the functionality of other scripts on your server. Find the
error_reportingline inphp.iniand change it to:error_reporting = E_ALL
Copy
php5ts.dllandlibmysql.dlllocated inC:\PHP\, to the WindowsSystem32folder (by default\Windows\System32).Copy
php_mysql.dll,php_mysqli.dll,php_xsl.dll,andphp_gd2.dllfromC:\PHP\ext, to the WindowsSystem32folder.Open the Apache configuration file for editing. By default, the location of this file is
C:\Program Files\Apache Group\Apache2\conf\httpd.conf.In
httpd.conf, find the portion with manyLoadModuleentries, and add the following lines:LoadModule php5_module c:/php/php5apache2.dll AddType application/x-httpd-php .php
Also in
httpd.conf, find theDirectoryIndexentry, and addindex.phpat the end of the line, like this:DirectoryIndex index.html index.html.var index.phpSave the
httpd.conffile, and then restart the Apache 2 service, using the Apache Service Monitor by clicking its icon in the Notification Area of the taskbar. (If you get any error at this point, make sure that you followed correctly all the previous steps of the exercise.) If Apache restarts without generating any errors, that is a good sign.Create a folder called
ajaxunder thehtdocsfolder (by defaultC:\Program Files\Apache Group\Apache2\htdocs).To make sure that your Apache instance can also correctly parse PHP code, create a file named
test.phpin theajaxfolder, and then add the following code to it:<?php phpinfo(); ?>
Point your web browser to
http://localhost/ajax/test.php(orhttp://localhost:8080/ajax/test.phpif you installed Apache to work on port 8080) to test if everything went OK with the installation. You should get a page like this:
Figure A.3: PHP Installation Working
Congratulations, you just finished installing Apache, MySQL, and PHP!
The configuration set up isn’t yet finished. If you’re running Windows (and you probably are, since you’re reading this), please skip the Preparing Your *nix Playground section, and go through the Installing phpMyAdmin and Preparing the AJAX Database sections at the end of this appendix.