HyperText Markup Language (HTML) is a markup language used to describe the structure of a web page.
Consider a snippet of text with no markup:
HTML HyperText Markup Language (HTML) is a markup language used to describe the structure of a web page. We can use it to differentiate such content as headings lists links images Want to https://www.packtpub.com/web-development Learn more about web development.
The above snippet of text may make some sense to you, but it may also raise some questions. Why does the snippet begin with the word HTML? Why is there a URL in the middle of a sentence? Is this one paragraph?
Using HTML, we can differentiate several bits of content to give them greater meaning. We could mark the word HTML as a heading, <h1>HTML</h1>; we could mark a link to another web page using the URL <a href="https://www.packtpub.com/web-development">Learn more about web development</a>.
Throughout this chapter, we will be looking at the HTML5 version of the HTML language. We will look at the syntax of HTML in the next section.
Syntax
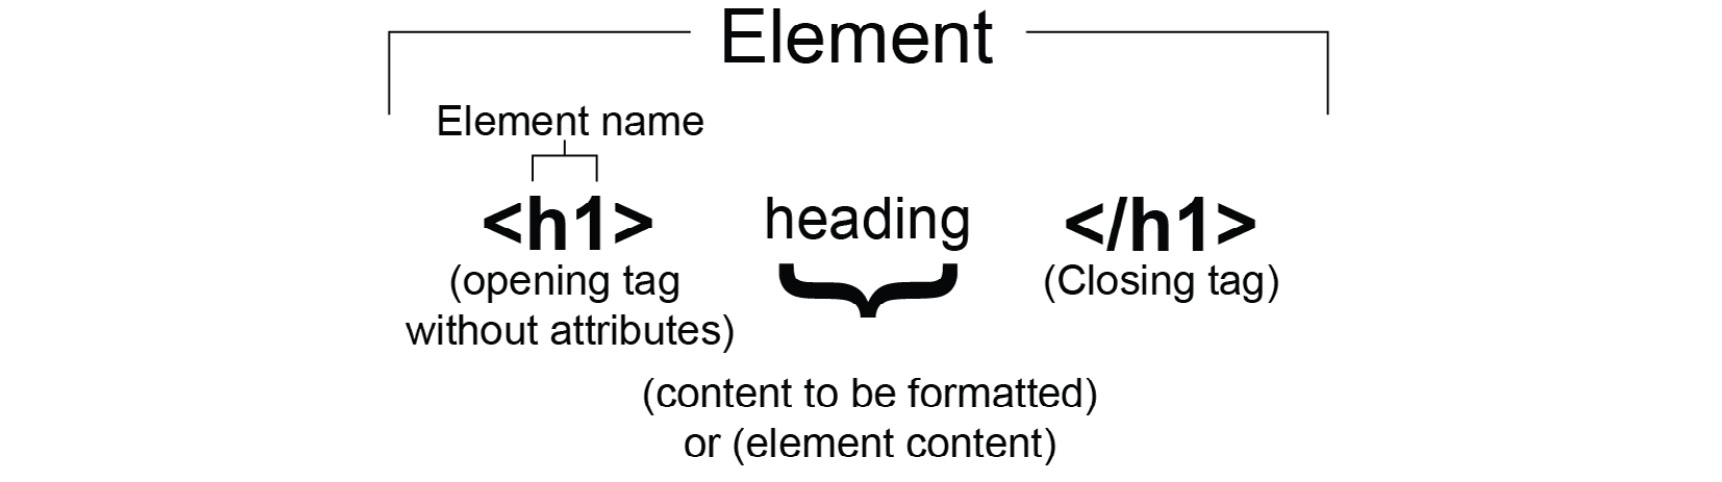
The syntax of HTML is made up of tags (with angle brackets, <>) and attributes. HTML provides a set of tags that can be used to mark the beginning and end of a bit of content. The opening tag, closing tag, and all content within those bounds represent an HTML element. The following figure shows the HTML element representation without attributes:
Figure 1.3: HTML element representation without tag attributes
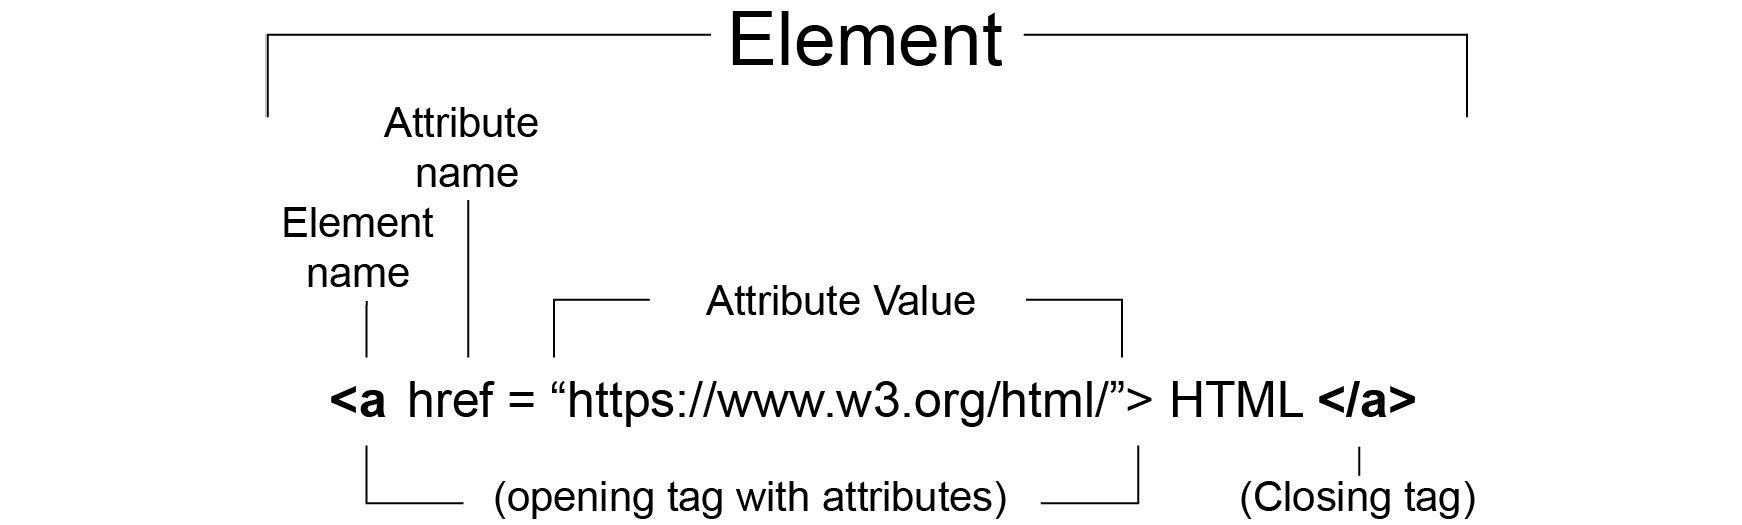
The following figure shows the HTML element representation with tag attributes:
Figure 1.4: HTML element representation with tag attributes
A tag has a name (for instance, p, img, h1, h2, h3, br, or hr) and that name combined with attributes will describe how the browser should handle the content. Many tags have a start and an end tag with some content in between, but there are also tags that don't expect any content, and these can be self-closing.
An opening tag can have any number of attributes associated with it. These are modifiers of the element. An attribute is a name-value pair. For example, href="https://www.packtpub.com/web-development" is an attribute with the name href and the value https://www.packtpub.com/web-development. An href attribute represents a hypertext reference or a URL, and when this attribute is added to an anchor element, <a>, it creates a hyperlink that the user can click in the browser to navigate to that URL.
To provide information within an HTML document to be ignored by the parser and not shown to the end user, you can add comments. These are useful for notes and documentation to aid anyone who might read or amend the source of the HTML document. A comment begins with <!-- and ends with -->. Comments, in HTML, can be single or multiline. The following are some examples:
<!-- Comment on a single line -->
<!--
    This comment is over multiple lines.
    Comments can be used to inform and for detailed documentation.
-->
You can use comments to provide helpful hints to other developers working on the web page but they will be ignored by the browser when parsing the page.
Let's see what the previous snippet of text content looks like when it is given some meaning with HTML:
<h1>HTML</h1>
<p>
HyperText Markup Language (HTML) is a markup language used to describe the structure of a web page.
</p>
<p>
We can use it to differentiate such content as:
</p>
<ul>
    <li>headings</li>
    <li>lists</li>
    <li>links</li>
    <li>images</li>
</ul>
<p>
Want to <a href="https://www.packtpub.com/web-development">learn more about web development?</a>
</p>
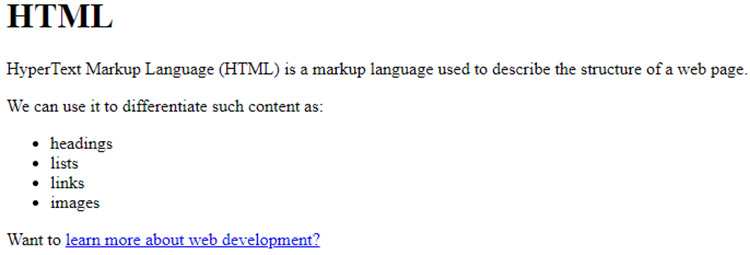
If we were to look at this HTML code rendered in a browser, it would look like the following figure:
Figure 1.5: HTML rendered in the Google Chrome web browser
The first line shows the text content "HTML" with a start tag, <h1>, and an end tag, </h1>. This tells the browser to treat the text content as an h1 heading element.
The next line of our code snippet has a <p> start tag, which means the content until the corresponding end tag, </p> (on the last line), will be treated as a paragraph element. We then have another paragraph and then an unordered list element that starts with the <ul> start tag and ends with the </ul> end tag. The unordered list has four child elements, which are all list item elements (from the <li> start tag to the </li> end tag).
The last element in the example is another paragraph element, which combines text content and an anchor element. The anchor element, starting from the <a> start tag and ending at the </a> end tag, has the text content learn more about web development? and an href attribute. The href attribute turns the anchor element into a hyperlink, which a user can click to navigate to the URL given as the value of the href attribute.
As with our example, the contents of a paragraph element might be text but can also be other HTML elements, such as an anchor tag, <a>. The relationship between the anchor and paragraph elements is a parent-child relationship.
Content Types
HTML5 provides many elements for describing the metadata, content, and structure of an HTML document, and you will learn more about the meaning of specific elements throughout the following chapters.
When starting out with HTML, it can be easy to find the number and variety of elements overwhelming. That is why it may be helpful to think about HTML in terms of content types. We can categorize HTML elements as one of the following content types:
- Metadata
- Flow
- Sectioning
- Phrasing
- Heading
- Embedded
- Interactive
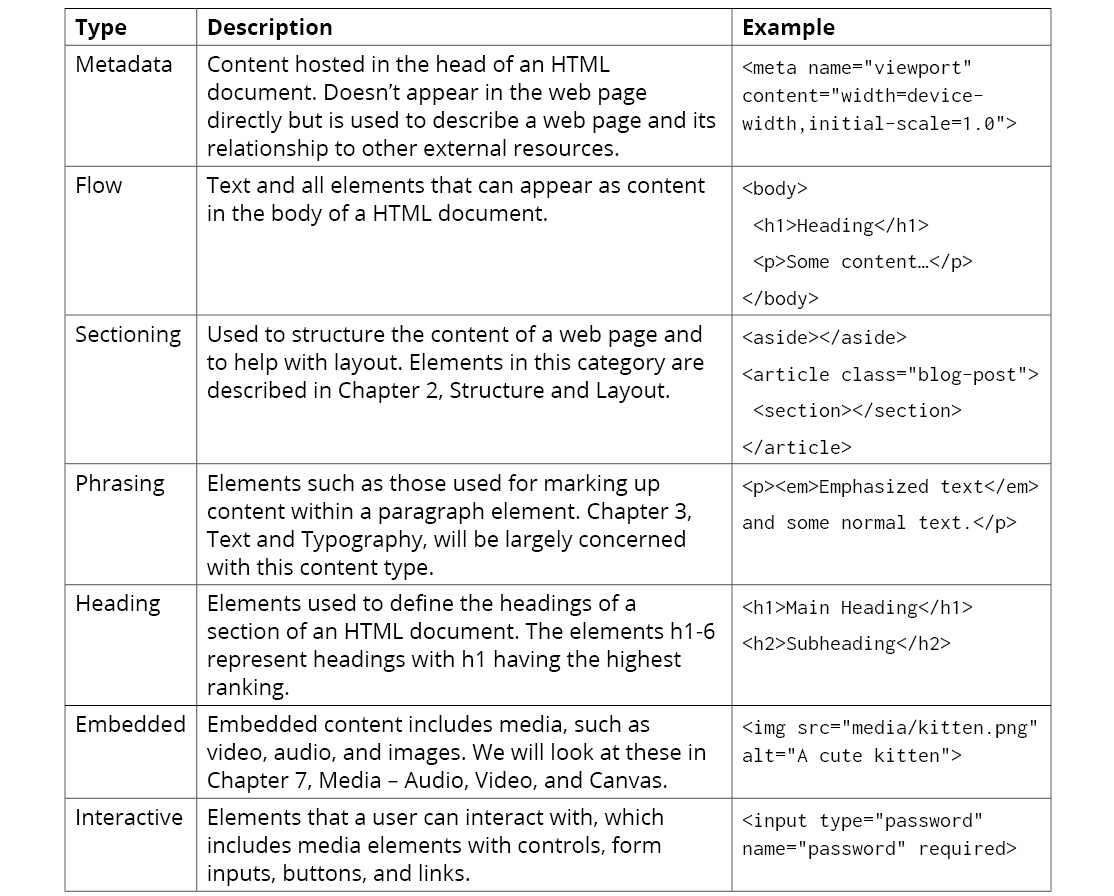
The following table has the description and example of different content types:
Figure 1.6: Table describing the different content types
To see how we can use these categories, we will introduce an HTML5 element and see how it will fit into these category types. We will look at the <img> element.
If we want to embed an image in our web page, the simplest way is to use the img element (for more on images, see Chapter 7, Media – Audio, Video, and Canvas). If we want to create an img element, an example of the code looks like this: <img src="media/kitten.png" alt="A cute kitten">.
We set the src attribute on the img element to an image URL; this is the source of the image that will be embedded in the web page.
Unless your image has no value other than as a decoration, it is a very good idea to include an alt attribute. The alt attribute provides an alternative description of the image as text, which can then be used by screen readers if an image does not load, or in a non-graphical browser.
An img element is a form of embedded content because it embeds an image in an HTML document. It can appear in the body of an HTML document as the child element of the body element, so it would be categorized as flow content.
An image can be included as content in a paragraph, so it is a type of phrasing content. For example, we could have inline images appear in the flow of a paragraph:
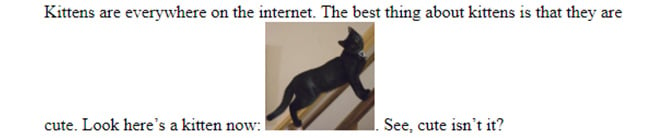
<p>Kittens are everywhere on the internet. The best thing about kittens is that they are cute. Look here's a kitten now: <img src="media/kitten.jpg" alt="A cute kitten">. See, cute isn't it?</p>
This code would render the following figure, with the image embedded in the paragraph and the rest of the text flowing around it:
Figure 1.7: Image with text flowing around it
In certain circumstances, an img element is a type of interactive content. For this to be the case, the image must have a usemap attribute. The usemap attribute allows you to specify an image map, which defines areas of an image that are treated as hyperlinks. This makes the image interactive.
An img element does not act as metadata and it does not provide a sectioning structure to an HTML document. Nor is it a heading.
There are lots more elements in the HTML5 standard. Elements can appear in more than one category and there is some overlap between the relationships of the categories. Some of these elements are very common and are used often, but some of these elements have very specific purposes and you may never come across a use case for them.
The content types can be useful for grouping elements into more manageable chunks, for getting an overview of the choices HTML gives you and the restrictions it puts on the content of an element, and for understanding the content types generally before we drill down into the uses of specific elements in later chapters.
For further reference, we can see where each available element is categorized in the W3C's documentation on HTML5: https://packt.live/2OvPGRi.
The HTML Document
An HTML document represents a hierarchical tree structure, rather like a family tree. Starting from a root element, the relationship between an element and its contents can be seen as that of a parent element and a child element. An element that is at the same level of the hierarchy as another element can be considered a sibling to that element, and we can describe elements within a branch of the tree as ancestors and descendants. This structure can be represented as a tree diagram to get a better idea of the relationship between elements.
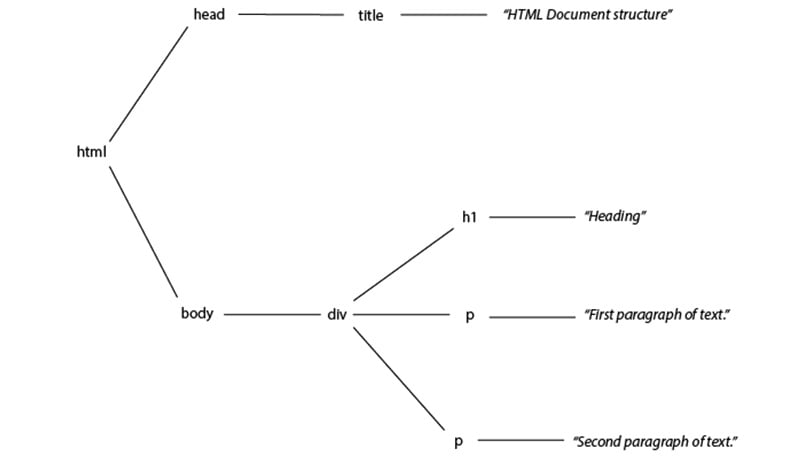
Take, for example, this simple HTML document:
<html>
  <head>
    <title>HTML Document structure</title>
  </head>
  <body>
    <div>
      <h1>Heading</h1>
      <p>First paragraph of text.</p>
      <p>Second paragraph of text.</p>
    </div>
  </body>
</html>
Here, we have an HTML element, the root of the document, which hosts a head element containing a title element, and a body element, containing some content including a div element with an h1 heading element and some paragraph elements. It can be represented as a tree diagram as follows:
Figure 1.8: A representation of the HTML document as a tree diagram
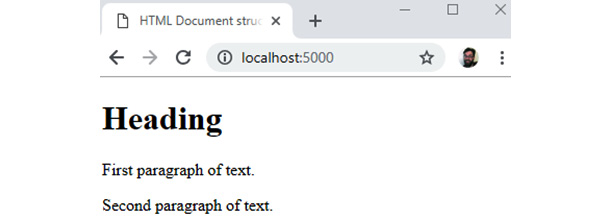
In the browser, this code would render the following web page:
Figure 1.9: HTML rendered in the Google Chrome web browser
The <html> element is the parent of <head> and <body>, which (as children of the same parent) are siblings. <body> has one child, a <div> element, and that has three children: an <h1> element and two <p> elements. The <h1> element is a descendant of the <body> element but not of the <head> element.
Understanding this structure will become more important when we look at CSS selectors and how we target parts of the HTML document later in this chapter.
The HTML DOM
We can also represent the HTML document as a Document Object Model (DOM). The DOM is an in-memory representation of our HTML document as a tree of objects. The tree is represented as a set of nodes and their connections to other nodes.
A node is associated with an object. The object stores properties, methods, and events associated with the HTML element. The node represents where that element sits in the document tree structure by storing references to its parent and child nodes.
When we want to change the document programmatically, as is often the case when we use JavaScript, we do so through the DOM. We can traverse the document programmatically and make changes to elements by changing properties on the objects.
As an example, we can use JavaScript's DOM API to create an anchor element, change properties on the element, and then add it to a paragraph with the parent class attribute:
<script>
  const anchorElement = document.createElement('a');
  anchorElement.href = '#';
  anchorElement.textContent = 'Click me!';
  const p = document.querySelector('.parent');
  p.appendChild(anchorElement);
</script>
The DOM represents the HTML document in a way that means we can traverse the tree and make changes to it programmatically. This allows modern web pages to be more than static documents.
We will mostly concentrate on the HTML and CSS parts of the web page but will see how we can use JavaScript to enhance and manipulate the HTML document in later chapters.
The Doctype Declaration
To let the browser, know which version of HTML to expect on our web page, we provide a doctype declaration. There are multiple versions of HTML and, at the time of writing, we are on version 5.2. Each version of HTML has a different declaration.
We will be working with HTML5 in this book so the appropriate doctype is as follows:
<!DOCTYPE html>
Note
The doctype declaration is not case-sensitive, so variations such as <!doctype html> and <!DOCTYPE HTML> are equally valid.
Without a doctype declaration, the browser can still try to parse an HTML document but it will do so in something called quirks mode. The effects of quirks mode can be different depending on the browser and whether the HTML document complies with the standard or not. This mode is there for backward compatibility and to handle old web pages and may cause your web page to render in unexpected ways. It is recommended to always add a doctype.
One of the nice things about HTML5 is that it really simplifies doctype declaration. Before HTML5, there were two commonly used variations of web markup – HTML4 and XHTML1 – and they both had strict, transitional, and frameset versions of their doctype declarations. For example, the HTML 4 strict declaration looked like this: <!DOCTYPE HTML PUBLIC "-//W3C//DTD HTML 4.01//EN" "http://www.w3.org/TR/html4/strict.dtd">.
The HTML5 doctype simplifies things and makes it a lot easier to get started creating a web page.


 Free Chapter