

Postman
A Postman is a handy tool for API testing. It has a user-friendly GUI that we can send HTTP requests through. It allows us to send requests with different HTTP methods (that is, GET, POST, PUT, and DELETE) and we can check the response from the server. With this tool, we can easily test our API by sending a client request and checking the HTTP response. We can also save our test cases and group them into different collections.
The Postman GUI
We assume you should have already installed Postman by following the steps in the preface. When you open Postman, you should see the screen shown in the following screenshot. The left-hand side is a navigation panel for you to navigate through your historical or saved requests. In Postman, your requests are going to be organized into collections, which is like a folder in the filesystem. You can put relevant saved requests in the same collection.
The top panel is for you to compose your request. As you have learned from the command-line testing tool, we can have different HTTP verbs (such as GET and PUT). We also need to put in an API endpoint to send the request to. For some requests, you may also need to pass in additional parameters. These can all be done in Postman.
The bottom panel shows the server response:
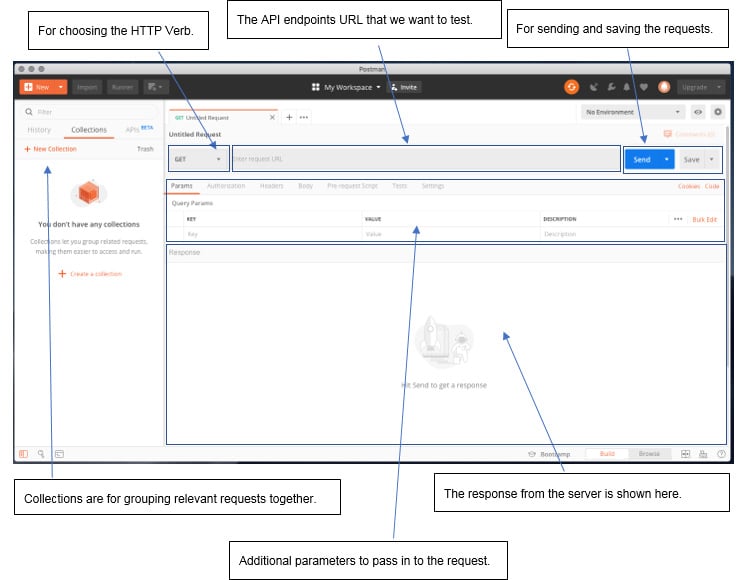
Figure 1.10: Postman interface
Sending a GET Request
Sending a GET request is simple; we just need to fill in the target URL:
- Select
GETas our HTTP method in the drop-down list. - Enter the request URL (such as
http://localhost:5000/API1). - Click the Send button.
Sending a POST Request
Sending a POST request, however, will take a bit more work, because very often, we will put extra data in the request. For example, if you want to send some JSON data to an API endpoint, you can do the following:
- Select POST as our HTTP method in the drop-down list.
- Enter the request URL (such as
http://localhost:5000/API2). - Select the Body Tab. Also, select the "raw" radio button.
- Choose "JSON (application/json)" from the right drop-down menu. Put in the JSON data to the Body content area:
{ "key1": "value1", "key2": "value2" } - Click the Send button.
Saving a Request
Very often, you will want to save your request for later use. This saving feature in Postman is particularly useful during regression testing. To save your request, you just need to click the save button, follow the on-screen instructions, and save it in a collection. Then you will see your saved request in the left navigation panel.
Note
You may need to open an account in Postman before you can save the request. Please follow the on-screen instructions accordingly.
If you want to learn more about Postman, click on the "Bootcamp" button at the bottom of Postman. You will see interactive tutorials showing you how to use Postman step-by-step on the screen.
Activity 1: Sending Requests to Our APIs Using Postman
Now that we have learned how to use Postman, we are going to test our application using Postman instead of the curl/httpie command-line testing tools. In this activity, we will be using this tool to test the CRUD functions in our web service:
- Create a request in Postman and get all the recipes.
- Use a
POSTrequest to create a recipe. - Create a request to get all the recipes.
- Send an update request to modify the recipe that we have just created.
- Send a request to get a specific recipe.
- Send a request to search for a recipe that doesn't exist.
Note
The solution for this activity can be found on page 286.
If your application passed the test, congratulations! It is a pretty solid implementation.
Exercise 4: Automated Testing Using Postman
In this exercise, we would like to show you how we can use Postman as a powerful automatic testing tool. An automatic testing tool allows us to repeatedly send requests to the APIs, thus achieve testing automation. Postman allows us to do this. We can save historical requests in a collection so that you can reuse the same test cases next time:
- Hover the cursor over the request; the Save Request button will appear:

Figure 1.11: Saving the request
- Click on the Save Request button, and you will see a dialog box popping up, asking for more information. Type in Get all recipes for the request name and click on Create Collection at the bottom. Then, type in Basic API as the collection name and tick to confirm. Click Save to Basic API:

Figure 1.12: Putting in information for saving the request
- The collection will then be created. Now, save our request to this collection for future use. We can also click on the Collections tab to see all the requests in that collection:

Figure 1.13: Creating the new collection
Now we have a bunch of saved requests in our collection. Next time, if we make any changes in our application, we can rerun these tests to make sure the previously developed APIs are still working fine. This is called regression testing in the developer community. And Postman is a simple yet powerful tool for us to perform such testing.
Activity 2: Implement and Test the delete_recipe Function
Now we have a basic understanding of how to implement the API. We have coded the create and update recipe functions. In this activity, you will implement the delete_recipe function yourself.
You have learned about both the command-line and GUI testing tools. You will test the application using these tools after the implementation. This is what you need to do:
- Implement a
delete_recipefunction inapp.pythat can delete a specific recipe. Create the API endpoint accordingly. - Start the application, make it ready for testing.
- Use httpie or curl to delete the recipe with
ID = 1. - Use Postman to delete the recipe with
ID = 2.Note
The solution for this activity can be found on page 291.