
In this last part of the chapter, we are going to take a look at image galleries. Image pop ups are a very good option, but when we need to show a number of images, galleries are a better option. This time, we are going to use a very new plugin available at http://extensions.joomla.org/extensions/photos-a-images/photo-gallery/10809, which will help us in building the gallery.
As always, we can also perform a search for "pPGallery" in the JED. After we download it, we need to go to Extensions | Install/Uninstall, select the file, and upload it.
Once we have it installed, we need to go to Extensions | Plugin Manager and enable the plugin. Now navigate to the Plugin Manager and look for Content pPGallery. Click on it to open its administrative panel.
First, we will enable the plugin—before we forget. And next, let's take a look at the parameters that the plugin provides, as shown in the following screenshot:
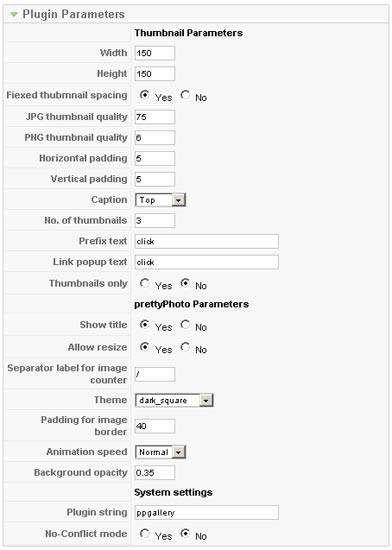
The parameters are listed as follows:
Width and Height—will define the height and width of the thumbnails that will be shown on the front page.
Fixed thumbnail spacing—will define the same amount of space between portrait images and landscape images.
Quality—sums up the next two parameters for JPG and PNG thumbnail quality. These are for defining the quality of the thumbnails. We can leave these parameters at their default values.
Horizontal padding and Vertical padding—are parameters that could also be defined in our CSS files. Defining these parameters here is also convenient.
Caption—is used if images have
alttags in them to show captions. Here we can define the position of those captions. We can leave this parameter at its default value as we are not going to use captions for now.No. of thumbnails—is used if we don't want to show all of the images until the gallery pop up is opened. We can enter the number of thumbnails that we need to show in this field. In this example we have entered 3.
Prefix text—is the text that will appear before the descriptions of the images.
Link popup text—is the text that will appear as links text in the images.
Thumbnails only—is used if we don't want to use the pop-up gallery, and if we only want to have the thumbnail images, we can select Yes in this parameter. For our example, leave this at its default value.
Next, you will find the parameters for the pop-up image gallery. You can try them out later and modify them as you wish. However, for now, leave them at the default values. I've separated the next two parameters because one of them will help us with the appearance, and the other with possible problems:
Theme—is used to change the style of the gallery.
No-Conflict mode—can be set to Yes if you are having problems with other libraries. For now, we can leave it at its default value.
In order to save the changes, click on the Save icon. Now, let's move on to the interesting part, that is, to try the gallery! Open any article in the Article Manager. For this example, we are going to use the one we created earlier in this chapter.
And here comes the magic; where we want the gallery to be created, place the following code:
{ppgallery}/stories/ppgallery{/ppgallery}
Here you can see that the {ppgallery} tag needs to be used.
Between the opening and closing tags, we will place the folder where our images are
placed. You can use any folder, but of course, you will need it to have images. In
the code bundle of the book, in the Chapter 1 subfolder, you can find another
subfolder named ppgallery. I have placed some images in there for
you to try. I hope you like them!
By default this plugin searches inside the images folder, and
so we need to place /stories/ppgallery (where
ppgallery is the sample folder where I have placed the images). You
will need to change these values in your own installation.
After saving these changes, and refreshing the frontend, you will see something similar to the following screenshot:
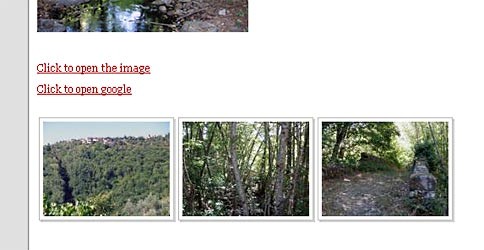
As you can see, three images are shown, and this can be changed by modifying the No. of thumbnails parameter in the plugin administration skin. Now, if we click on an image, a pop up will open, with the full-size version of that image, as shown in the following screenshot:

At the bottom of the image we can see some arrows. If we take a look at it, we can
now see that there are six images in total, though in the gallery we could see only
three of them. This is because the folder /stories/ppgallery has
six images, but we have selected only three in the parameters of the module to be
shown. In our article, only three images are shown (as indicated by the parameter).
However, in the gallery pop up all of the images can be viewed.
Note
If you encounter any problem while using this plugin, it may be due to one or more extensions using the jQuery library simultaneously, or if the jQuery library is loaded after our plugin is loaded. For example, consider the following sequence of events:
1. Load of the jQuery library.
2. Load of the pPgallery script.
3. Load of another instance of the jQuery library, used by another extension.
In this case, the gallery will not work. The gallery script needs to be loaded after the jQuery library is loaded because the gallery script extends the jQuery library. If another Joomla! extension then loads another jQuery instance, without the addition of the gallery script, it will end up with the removal of the gallery script that was previously added.
In order to solve this, try to find out which extension is interfering. For example, in our case, the module "Ninja Shadowbox" may be causing the problem. To solve it, we only need to change the parameter Include core JS Library to Don't include. It should now work perfectly.
As we have seen, this is a very easy-to-use plugin, and a very helpful one too. It will help us show a group of images or form a gallery in just a few clicks.
Again, I would like to show you some extensions that you can find in the JED:
Simple Image Gallery—is a very interesting option. Though it uses MooTools, I recommend you to check it out, as it offers some interesting options.
Art Pretty Photo—can show images from flicker, and also lets us create our own image thumbnails. We can even play videos with this plugin, which would be a very nice option too.