

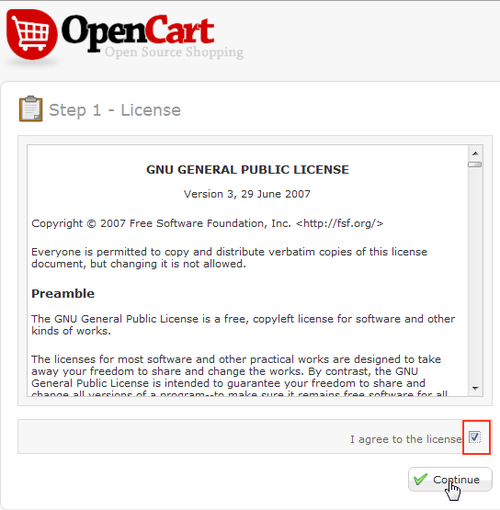
Let's browse the domain name where we put OpenCart files. In our example, it is http://yourwebsite.com/store. You should use your own OpenCart path. We will be redirected to a License screen automatically. Click Continue to start.
OpenCart will control several installation requirements, including PHP settings and extensions.
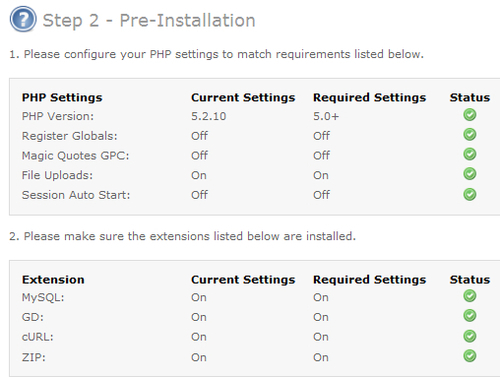
Then, the permissions of several files and directories are checked. If there are no errors, all we have to do is click the Continue button.

Tip
If the system check finds any serious error, it will stop the installation temporarily and will not let us go further until we solve the problem. If it is the case, please check the requirements list section and file permission settings again carefully. If there is a need to make changes on the PHP settings and extension, please contact your hosting provider.
In this step, we will supply the database connection information to OpenCart system. First, we should provide the previously created MySQL user and password for User and Password fields. Then, fill the MySQL database name in the Database Name field.
Finally, we should choose a Username, Password, and Email to be used to log in and manage the OpenCart system.
Let's ignore the Database Prefix option.
Tip
If we are allowed to create only one MySQL database for all applications being installed on hosting, it is a good idea to use Database Prefix option. It would put the shortened text in front of table names which will help us in differentiating tables in each application.
ocwould be a good prefix example. So, the tables would look likeoc_tablename."After filling in all the required fields, click on the Continue button.

Even though the following screen has informed us that we have finished, we actually have not!

For security purposes, we must delete the installation directory. Then, we should check the online storefront and administration screens to be sure that everything is working in the default settings.
Let's open cPanel file manager again and browse to /store folder. Let's find install folder. We will right-click on it and choose Delete from the menu.
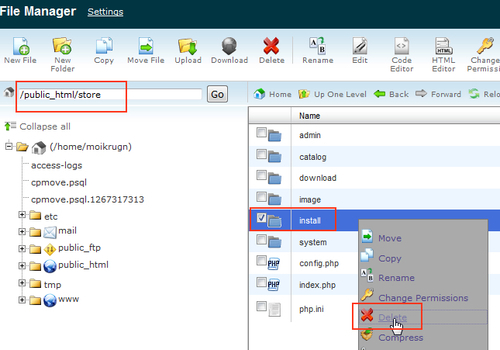
The next step is to confirm the deletion of the install folder. Let's click on the Delete File(s) button.

Let's browse to http://yourwebsite.com/store, the online shop storefront. We can see a pre-populated sample store that is similar to the following screenshot:

Let's browse to the OpenCart administration screen at http://yourwebsite.com/store/admin and log in by using our admin username and password.

We will see an administration screen similar to the following screenshot:
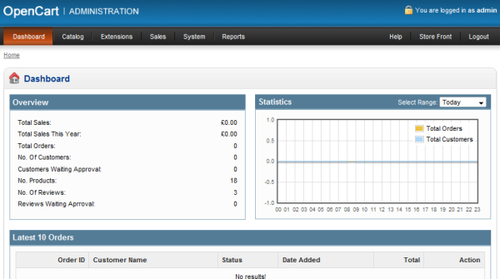
Congratulations! Our OpenCart installation is now complete.
We have completed the installation using OpenCart wizard. The steps included the approval of license agreement, system checks (php settings, file permissions), providing database connection information, and deleting the install folder after completion of install. Finally, there are checking the storefront and administration screens.
We have now a sample running OpenCart system.
Now, it is time for testing your skills on installing another instance of OpenCart at thehttp://yourwebsite.com/teststore folder. Later, will only be able to use this instance for testing purposes before applying some new things on the original store which we have together completed installing. Try to do the steps on your own without looking at the chapter sections at first. If difficulties occur, re-read the required chapter sections.