Book Image

Drupal 7 Theming Cookbook

By : Karthik Kumar
Book Image

Drupal 7 Theming Cookbook

By: Karthik Kumar

Overview of this book

<p>The greatest strength of Drupal lies in its design which, when employed correctly, allows developers to literally handcraft every aspect of a site, so that it looks and performs exactly how they want it to. While it is reasonably straightforward to download a Drupal theme and install it, doing anything beyond that is not. Using custom themes requires familiarity and experience with Drupal's theming system, especially if you want to easily administer and maintain your themes.</p> <p>Drupal 7 Theming Cookbook provides a plethora of recipes that enable Drupal template designers to make full use of its extensibility and style their site just the way they want it. It is a well-rounded guide which will allow users to take full advantage of Drupal's theming system.</p> <p>This cookbook starts with recipes which address the basics of Drupal's theme system, including regions and blocks. It then moves on to advanced topics such as creating a custom theme and using it to modify the layout and style of content. With the introduction of the Field API and the growing importance of Views and Panels in Drupal 7, chapters have been dedicated to each feature. You will also learn many techniques for dealing with Drupal&rsquo;s templating system, which will allow you create themes which surpass even the existing Drupal and contributed modules.</p>
Table of Contents (18 chapters)
Drupal 7 Theming Cookbook
Credits
About the Author
About the Reviewers
www.PacktPub.com
Preface

Uploading a new logo


Most websites incorporate a logo into their design, usually accompanying the site name in the header. For example, the Drupal logo or "Druplicon" in the following screenshot represents the default logo displayed for every core theme that comes packaged with Drupal:

These logos tend to play an important role in the branding and identity of the site and are frequently an important facet in the overall design of the theme. This recipe details the steps involved in changing the logo displayed in a theme.

Getting ready

The new logo should be in a suitable format and should balance quality with size. The rule of thumb usually followed is as follows:

  • PNG: For high quality images that contain transparencies

  • JPEG: For detailed photographic logos that do not involve transparencies

  • GIF: For simple line art

How to do it...

A custom logo can be added to a theme using the following steps:

  1. 1. Navigate to the admin/appearance [Home | Administration | Appearance] page.

  2. 2. Click on the Settings link accompanying the theme in question.

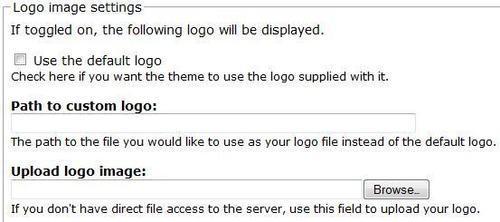
  3. 3. Look for the Logo image settings fieldset. Within the fieldset, uncheck the Use the default logo checkbox as we want to use a custom image:

  1. 4. Using the Upload logo image field, browse and select the logo file in the filesystem.

  2. 5. Finally, click on the Save configuration button below upload and save the changes.

How it works...

The uploaded file is saved in the Drupal filesystem and the path to the logo is registered as a configuration setting in the database. During display, rather than using the logo supplied by Drupal or the theme itself, this setting is loaded to embed the custom logo within the Drupal page. The following screenshot displays the theme with its default logo replaced with a custom PNG:

There’s more...

Besides specifying the logo file via a theme’s configuration page, there are other avenues that can also be pursued.

Directly linking to image files

Alternatively, instead of uploading the logo via Drupal, use the Path to custom logo textfield to point to an existing logo file on the server. This is often handy when the same image is being shared by multiple themes.

Yet another option is to simply place the logo file in the theme’s folder and rename it to logo.png. Provided that the Use the default logo field is checked, the theme will automatically look for this file in its folder and use it as its logo.

See also

In the next recipe, Uploading a new favicon, we will see how to go about adding a shortcut icon that adds to the identity of our site.