

This recipe details the steps involved in adding a block with custom content to the theme. Drupal blocks can either be declared using a module or, as we are doing here, added manually via the block administration interface.
For this recipe, we will be adding a simple welcome message in a custom block within a predetermined region. As with standard blocks, position matters!
The following procedure outlines the steps required to add a custom block to a theme:
1. Navigate to
admin/structure/block[Home | Administration | Structure | Blocks].2. If more than one theme is enabled, select the theme that we are adding our block to by clicking on its tab.
3. Click on the Add block link at the top of the page.
4. In the ensuing page, type a welcome message in the Block description textfield.
5. Next, if the block requires a title to be displayed above its content, add one via the Block title textfield. In this case, we do not need one as we are just looking to display a welcome message.
6. As displayed in the following screenshot, enter the welcome text into the Block body textarea:
Welcome to Mysite. Enjoy your stay!.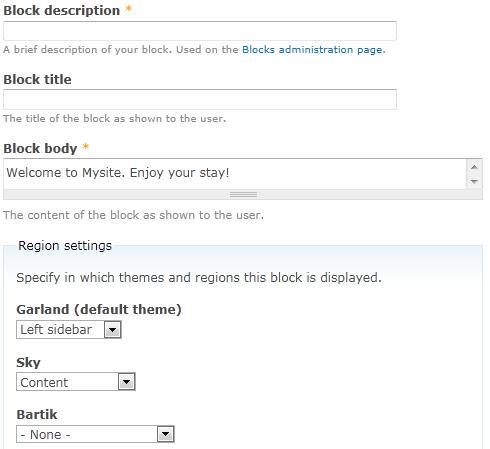
7. The Region settings fieldset lists all currently enabled themes. Optionally, choose the region where this block is to be displayed for each of them (or None if it is not to be displayed at all).
8. Finally, click on Save block to create the block.
Just as with standard blocks, Drupal maintains a table named block_custom which tracks all custom blocks including their content and input format. Once a custom block is enabled, it is added to the block table and tracked as if it was a standard block.
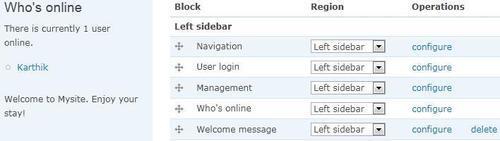
When created, a custom block appears in the block list and can be treated just like any other block. It can be dragged around different regions, have its visibility settings controlled, and so on. The following screenshot displays our newly created welcome block as part of the Garland theme:
Custom blocks are useful for more than simply embedding text strings.
Custom blocks can be very handy to not only add visible content, but also to execute short code snippets on specific pages provided the appropriate input format has been selected. For example, we could embed some custom JavaScript required only for a few specific page nodes, by adding it to a custom block—equipped with a suitable input format—which is set to be displayed only with the aforementioned page nodes.
That said, if a more optimal solution is available—such as using a module to hold our code—then it should be pursued instead of inserting code into blocks and thereby into the database.
Now that we have seen how to add and manage blocks, we can proceed to control it further by playing with its visibility configuration. The final three recipes of this chapter outline the steps required for Displaying a block only on the front page, Controlling block visibility based on user role, and Controlling block visibility based on node type.