Book Image

Haskell Cookbook

Book Image

Haskell Cookbook

Overview of this book

Haskell is a purely functional language that has the great ability to develop large and difficult, but easily maintainable software. Haskell Cookbook provides recipes that start by illustrating the principles of functional programming in Haskell, and then gradually build up your expertise in creating industrial-strength programs to accomplish any goal. The book covers topics such as Functors, Applicatives, Monads, and Transformers. You will learn various ways to handle state in your application and explore advanced topics such as Generalized Algebraic Data Types, higher kind types, existential types, and type families. The book will discuss the association of lenses with type classes such as Functor, Foldable, and Traversable to help you manage deep data structures. With the help of the wide selection of examples in this book, you will be able to upgrade your Haskell programming skills and develop scalable software idiomatically.
Table of Contents (13 chapters)

Getting started with Haskell

In this recipe, we will work with Glasgow Haskell Compiler (GHC) and its interpreter GHCi. Then, we will write our first Haskell program and run it in the interpreter.

We will use GHC throughout the book. GHC (https://www.haskell.org/ghc/) is the most widely used Haskell compiler. GHC supports Haskell 2010 language specifications (https://wiki.haskell.org/Definition). The current book is based on Haskell 2010 specifications. GHC supports an extensive range of language extensions.

How to do it...

We will install Stack, a modern tool to maintain different versions of GHC and to work with different packages. Perform the following steps:

  1. Install Stack. Visit https://docs.haskellstack.org/en/stable/README/ and follow the instructions for your operating system.
  2. Check that Stack works for your system by running the command stack --version at the command prompt.

Check the latest GHC version by visiting https://www.haskell.org/ghc/. Set up GHC on your box by providing the GHC version number:


  1. If you have already set up GHC on your box, then you will see the following output:

  2. Pick up your editor. You can set up your favorite editor to edit Haskell code. Preferable editors are Emacs, Vi, and Sublime. Once you have picked up your favorite editor, ensure that the executables for the editor remain in your path or note down the full path to the executable.

Let's create a new project, hello. Create the new project hello by running the following command in the command prompt in an empty directory:


Stack will select the latest package resolver. Stack will create a folder with the project name.
  1. Change to project directory (hello) and run stack setup. When run from the new project directory, Stack automatically downloads the corresponding GHC and sets it up.

  2. Compile and build the project:
  1. You can now run the project using the following command:
  1. You should see the reply someFunc printed on the console. It means that the program compilation and execution was successful.
  1. Inspect the hello project by opening an explorer (or file finder) and exploring the hello directory:
    • The project contains two main directories, app and src. The library code goes into the src folder, whereas the main executable producing code goes into the app folder.
    • We are interested in the app/Main.hs file.
  2. Now, we will set an editor. You can set the editor by defining environment variable EDITOR to point to the full path of the editor's executable.
  3. Run the GHC interpreter by opening the command prompt and traversing to the hello project directory. Then, execute the command stack ghci. You will see the following output:

Set an editor if you haven't done so already. We are using Vi editor:

      *Main Lib> :set editor gvim
  1. Open the Main.hs file in the editor:

    *Main Lib> :edit app/Main.hs

    This will open the app/Main.hs file in the window:

  1. Enter the following source in the editor:
      module Main where

-- Single line comment!
main :: IO ()
main = putStrLn "Hello World!"
  1. Save the source file and exit. You will see that GHCi has successfully loaded the saved file:
      [2 of 2] Compiling Main            
( d:\projects\hello\app\Main.hs, interpreted )
Ok, modules loaded: Lib, Main.
*Main>
You can also load the file by running :load app/Main.hs in the command prompt.
  1. Now, you can run the main function that we have defined in the source file, and you will see the Hello World message:
        *Main> main
Hello World!

Exit the GHCi by running :quit in the prompt.

  1. You can now rebuild and run the program by running the following commands:
      stack build
stack exec -- hello-exe

You will again see the output Hello World as shown in the following screenshot:


How it works…

This recipe demonstrated the usage of Stack to create a new project, build it, set up the corresponding GHC version, build the project, and run it. The recipe also demonstrated the use of the Haskell command prompt, aka GHCi, to load and edit the file. GHCi also allows us to run the program in the command prompt.

The recipe also shows the familiar Hello World! program and how to write it. The program can be interpreted in the following way.

Dissecting Hello World

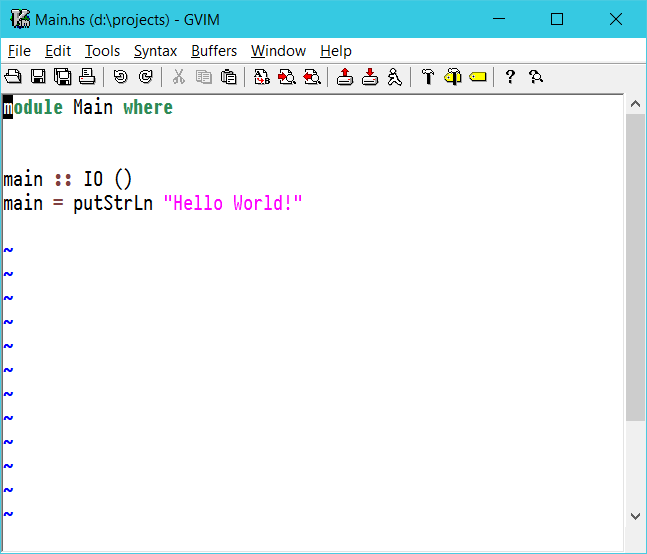
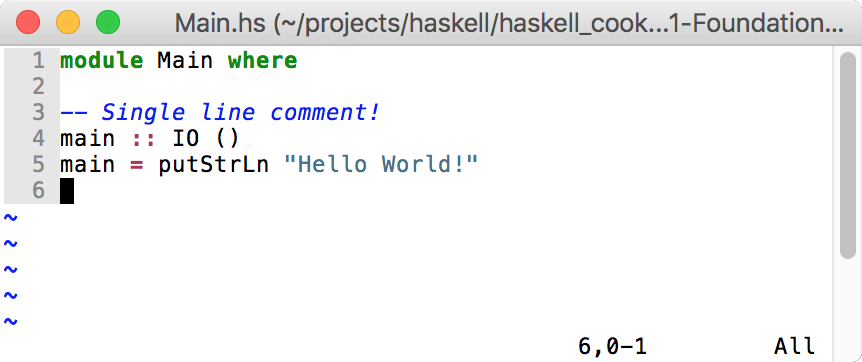
We will now look at different parts of the Main.hs program that we just created to understand the structure of a typical Haskell program. For convenience, the screenshot of the program is attached here:

The first line means that we are defining a module called Main. The source that follows where is contained in this module. In the absence of any specifications, all the functions defined in the module are exported, that is, they will be available to be used by importing the Main module.

The line number 3 (in the screenshot) that starts with -- is a comment. -- is used to represent a single-line comment. It can appear anywhere in the source code and comments on everything until the end of the line.

The next line is this:

    main :: IO ()

This is a declaration of a function. :: is a keyword in Haskell, and you can read :: as has type. IO is a higher order data type as it takes a parameter (IO is a special data type called IO monad; we will see more of it at the later). () is an empty tuple and is a parameter to IO. An empty tuple in Haskell is equivalent to Unit Type. One can say that it is equivalent to void in imperative languages.

Hence, main :: IO () should be interpreted as follows:

    main has a type IO ()

The next line actually defines the function:

    main = putStrLn "Hello World"

It simply means that main is a function whose value is equivalent to an expression on the right-hand side, putStrLn "Hello World".

The putStrLn is a function defined in Prelude, and you can look up the type of the function by entering the following command in the prompt:

Prelude> :type putStrLn
putStrLn :: String -> IO ()

Here, putStrLn has a type String -> IO (). It means that putStrLn is a function that, when applied and when the argument is of String type, will have the resultant type IO (). Note how it matches with our type declaration of the main function.

The function declaration in the source code in Haskell is not compulsory, and the Haskell compiler can figure out the type of the function all by itself by looking at the definition of the function. You can try this by again editing the source file and removing declaration.

To edit the same file again, you can just issue the :edit command without any parameter. GHCi will open the editor with the previously opened file. To reload the file again, you can issue the :reload command and GHCi will load the file.

Now, you can verify the type of main function by issuing :t main (:t is equivalent to :type). Verify that the type of main is IO ().

There's more…

If you visit the Stack website at https://www.stackage.org/, you will notice that Stack publishes nightly packages and Long Term Support (LTS) packages. While creating a new project, Stack downloads the latest LTS package list. It is also possible to provide the name of the LTS package explicitly by providing stack new –resolver lts-9.2.

In the project directory, you will notice two files:

  • <project>.yaml
  • <project>.cabal

The YAML file is created by Stack to specify various things, including LTS version, external packages, and so on. The .cabal file is the main project file for the Haskell package. The cabal is the tool that Stack uses internally to build, package, and so on. However, there are several advantages of using Stack as Stack also supports pre-built packages and manages cabal well. Furthermore, Stack also supports the Docker environment.