
While creating applications, you may come across a situation where you need to provide several options for the user to select from. That is, you want the user to select one or more than one option from a set of options. In such situations, you need to make use of checkboxes. Let's find out more about checkboxes.
Whereas radio buttons allow only one option to be selected in a group, checkboxes allow you to select more than one option. That is, selecting a checkbox will not affect other checkboxes in the application. Checkboxes are displayed with a text label as an instance of the QCheckBox class. A checkbox can be in any of three states: selected (checked), unselected (unchecked), or tristate (unchanged). Tristate is a no change state; the user has neither checked nor unchecked the checkbox.
The following are the methods provided by the QCheckBox class:
isChecked(): This method returns the Boolean value true if the checkbox is checked, and otherwise returns false.setTristate(): If you don't want the user to change the state of the checkbox, you pass the Boolean value true to this method. The user will not be able to check or uncheck the checkbox.setIcon(): This method is used to display an icon with the checkbox.setText(): This method assigns text to the checkbox. To specify a shortcut key for the checkbox, precede the preferred character in the text with an ampersand. The shortcut character will appear as underlined.setChecked(): In order to make a checkbox appear as checked by default, pass the Boolean value true to this method.
The signals emitted by QCheckBox are as follows:
clicked(): This signal is emitted when a checkbox is activated (that is, pressed and released) or when its shortcut key is pressedstateChanged(): This signal is emitted whenever a checkbox changes its state from checked to unchecked or vice versa
To understand the Check Box widget, let's assume that you run a restaurant where several food items, such as pizzas, are sold. The pizza is sold along with different toppings, such as extra cheese, extra olives, and so on, and the price of each topping is also mentioned with it. The user can select a regular pizza with one or more toppings. What you want is that when a topping is selected, the total price of the pizza, including the selected topping, is displayed.
The focus of this recipe is to understand how an action is initiated when the state of a checkbox changes from checked to unchecked or vice versa. Following is the step-by-step procedure to create such an application:
- Begin by creating a new application based on the
Dialog without Buttonstemplate. - Drag and drop three
Labelwidgets and threeCheck Boxwidgets onto the form. - Set the
textproperty of the first twoLabelwidgets toRegular Pizza $10andSelect your extra toppings. - In the
Property Editorwindow, increase the font size of all three labels and checkboxes to increase their visibility in the application. - Set the
textproperty of the three checkboxes toExtra Cheese $1,Extra Olives $1, andExtra Sausages $2. The default object names of the three checkboxes arecheckBox,checkBox_2, andcheckBox_3. - Change these to
checkBoxCheese,checkBoxOlives, andcheckBoxSausages, respectively. - Set the
objectNameproperty of theLabelwidget tolabelAmount.
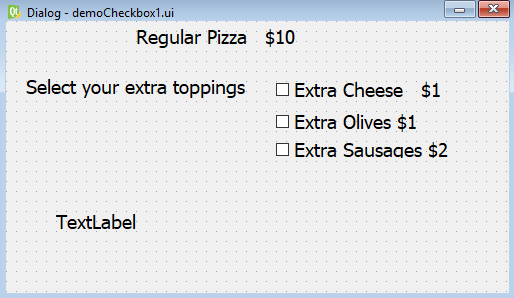
- Save the application with the name
demoCheckBox1.ui. Now, the form will appear as shown in the following screenshot:
The .ui (XML) file is then converted into Python code through the pyuic5 command utility. The Python code generated in thedemoCheckBox1.pyfile can be seen in the source code bundle of this book.
- Import the
demoCheckBox1.pyfile, as a header file in our program to invoke the user interface design and to write code to calculate the total cost of regular pizza, along with the selected toppings, through aLabelwidget when the user selects or unselects any of the checkboxes. - Let's name the program
callCheckBox1.pyw; its code is shown here:
import sys
from PyQt5.QtWidgets import QDialog
from PyQt5.QtWidgets import QApplication, QWidget, QPushButton
from demoCheckBox1 import *
class MyForm(QDialog):
    def __init__(self):
        super().__init__()
        self.ui = Ui_Dialog()
        self.ui.setupUi(self)
        self.ui.checkBoxCheese.stateChanged.connect(self.
        dispAmount)
        self.ui.checkBoxOlives.stateChanged.connect(self.
        dispAmount)
        self.ui.checkBoxSausages.stateChanged.connect(self.
        dispAmount)
        self.show()
    def dispAmount(self):
        amount=10
        if self.ui.checkBoxCheese.isChecked()==True:
            amount=amount+1
        if self.ui.checkBoxOlives.isChecked()==True:
            amount=amount+1
        if self.ui.checkBoxSausages.isChecked()==True:
            amount=amount+2
        self.ui.labelAmount.setText("Total amount for pizza is
        "+str(amount))
if __name__=="__main__":
    app = QApplication(sys.argv)
    w = MyForm()
    w.show()
sys.exit(app.exec_())The stateChanged() event of checkboxes is connected to the dispAmount function, which will calculate the cost of the pizza along with the toppings selected. In the dispAmount function, you check the status of the checkboxes to find out whether they are checked or unchecked. The cost of the toppings whose checkboxes are checked is added and stored in the amount variable. Finally, the addition of the amount stored in the amount variable is displayed via labelAmount. On running the application, you get a dialog prompting you to select the toppings that you want to add to your regular pizza. On selecting any toppings, the amount of the regular pizza along with the selected toppings will be displayed on the screen, as shown in the following screenshot:
