

In this exercise, you will download a sample layout provided by Esri. You'll then examine the layout to get a feel of the basic layout elements provided by Dojo. Finally, you'll make some changes to the layout.
Before starting this exercise, you'll want to make sure that you have access to a web server. If you don't have access to a web server or if a web server isn't already installed on your computer, you can download and install the open source web server Apache (http://httpd.apache.org/download.cgi). Microsoft IIS is another commonly used web server and there are many others that you can use as well. For the purpose of this exercise, I will assume that you are using the Apache web server.
A web server installed on your local computer will be referred to through URL as
http://localhost. This points to thehtdocsfolder underC:\Program Files\Apache Software Foundation\Apache2.2\if you've installed Apache on a Windows platform.On the Samples tab of the ArcGIS API for JavaScript site (https://developers.arcgis.com/en/javascript/jssamples/), search for
Layoutsin the search box to generate a list of available layout samples.Scroll down the list of search results until you see the Layout with left pane sample seen in the following screenshot. Click on this item:

Click on the Download as a zip file link to download the sample.
Create a new folder in your
htdocsfolder underC:\Program Files\Apache Software Foundation\Apache2.2\and name itlayout. Unzip the file that you downloaded into this folder. This will create a file calledindex.html, along with thecssandimagesfolders.Open a web browser and go to the URL
http://localhost/layout/index.htmlso you can see the current layout. You should see something similar to the following screenshot:
Open
index.htmlin your favorite text or web editor.Scroll to the bottom of the file until you see the
<body>tag.The highest level layout container is
BorderContainer. A<div>tag will containBorderContainerand all other child layout elements need to be located inside this<div>tag. Examine the following code. The highlighted section is the code used to define our top levelBorderContainer. Notice that the design has been set toheadline, which means that the top and bottom regions will be scrolled across the entire width of the screen:<body class="claro"> <div id="mainWindow" data-dojo-type="dijit.layout.BorderContainer" data-dojo-props="design:'headline'" style="width:100%; height:100%;"> <div id="header" data-dojo-type="dijit.layout.ContentPane" data-dojo-props="region:'top'"> <div id="title"> </div> </div> <div data-dojo-type="dijit.layout.ContentPane" id="leftPane" data-dojo-props="region:'left'"> <div data-dojo-type="dijit.layout.TabContainer"> <div data-dojo-type="dijit.layout.ContentPane" data-dojo-props="title:'Tab 1', selected:'true'"> Content for the first tab </div> <div data-dojo-type="dijit.layout.ContentPane" data-dojo-props="title:'Tab 2'"> Content for the second tab </div> </div> </div> <div id="map" data-dojo-type="dijit.layout.ContentPane" data-dojo-props="region:'center'"></div> <div id="footer" data-dojo-type="dijit.layout.ContentPane" data-dojo-props="region:'bottom'"> <span id="dataSource"> </span> </div> </div> </body>
Inside
BorderContainer, you will find several child layout elements defined with theContentPanedijit.ContentPaneis a very generic layout element that simply holds either text or additional layout elements, such asTabContainerorAccordionContainer.<body class="claro"> <div id="mainWindow" data-dojo-type="dijit.layout.BorderContainer" data-dojo-props="design:'headline'" style="width:100%; height:100%;"> <div id="header" data-dojo-type="dijit.layout.ContentPane" data-dojo-props="region:'top'"> <div id="title"> </div> </div> <div data-dojo-type="dijit.layout.ContentPane" id="leftPane" data-dojo-props="region:'left'"> <div data-dojo-type="dijit.layout.TabContainer"> <div data-dojo-type="dijit.layout.ContentPane" data-dojo-props="title:'Tab 1', selected:'true'"> Content for the first tab </div> <div data-dojo-type="dijit.layout.ContentPane" data-dojo-props="title:'Tab 2'"> Content for the second tab </div> </div> </div> <div id="map" data-dojo-type="dijit.layout.ContentPane" data-dojo-props="region:'center'"></div> <div id="footer" data-dojo-type="dijit.layout.ContentPane" data-dojo-props="region:'bottom'"> <span id="dataSource"> </span> </div> </div> </body>Tip
Notice that in the previous code example, each
ContentPanelayout element has a region that has been designed for each layout element. In this case, we have defined all of the available regions, with the exception of therightregion. This is illustrated in the following screenshot: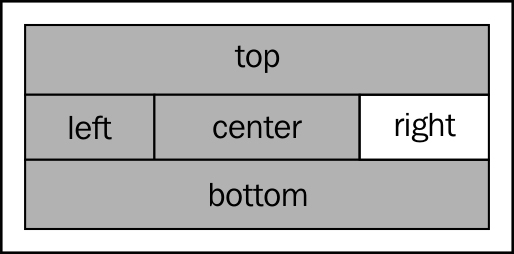
Next, examine the following highlighted code. The highlighted code defines the content for the
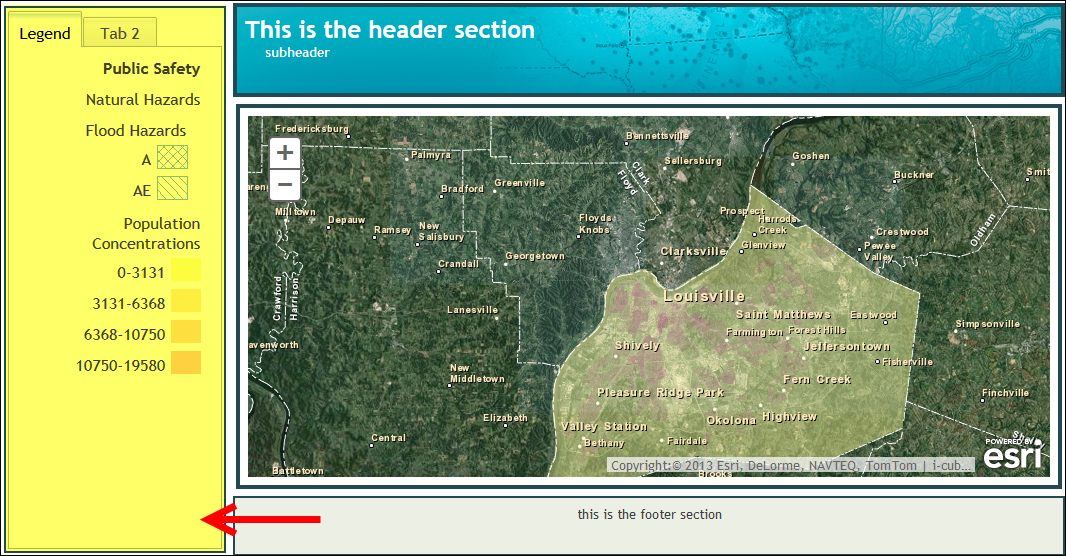
leftregion. A simpleContentPanelayout element is defined, which as I mentioned previously is a very simple container for other layout elements or text. Inside thisContentPane, we have created aTabContainerlayout element and assigned two tabs. Each tab is created asContentPane.<body class="claro"> <div id="mainWindow" data-dojo-type="dijit.layout.BorderContainer" data-dojo-props="design:'headline'" style="width:100%; height:100%;"> <div id="header" data-dojo-type="dijit.layout.ContentPane" data-dojo-props="region:'top'"> <div id="title"> </div> </div> <div data-dojo-type="dijit.layout.ContentPane" id="leftPane" data-dojo-props="region:'left'"> <div data-dojo-type="dijit.layout.TabContainer"> <div data-dojo-type="dijit.layout.ContentPane" data-dojo-props="title:'Tab 1', selected:'true'"> Content for the first tab </div> <div data-dojo-type="dijit.layout.ContentPane" data-dojo-props="title:'Tab 2'"> Content for the second tab </div> </div> </div> <div id="map" data-dojo-type="dijit.layout.ContentPane" data-dojo-props="region:'center'"></div> <div id="footer" data-dojo-type="dijit.layout.ContentPane" data-dojo-props="region:'bottom'"> <span id="dataSource"> </span> </div> </div> </body>A common scenario would be to create a tab container that holds a legend for the map, as seen in the following screenshot:
Now that you understand the basic concepts of creating layout elements, you can add content for the
rightregion. Add the following highlighted code:<body class="claro"> <div id="mainWindow" data-dojo-type="dijit.layout.BorderContainer" data-dojo-props="design:'headline'" style="width:100%; height:100%;"> <div id="header" data-dojo-type="dijit.layout.ContentPane" data-dojo-props="region:'top'"> <div id="title"> </div> </div> <div data-dojo-type="dijit.layout.ContentPane" id="leftPane" data-dojo-props="region:'left'"> <div data-dojo-type="dijit.layout.TabContainer"> <div data-dojo-type="dijit.layout.ContentPane" data-dojo-props="title:'Tab 1', selected:'true'"> Content for the first tab </div> <div data-dojo-type="dijit.layout.ContentPane" data-dojo-props="title:'Tab 2'"> Content for the second tab </div> </div> </div> <div data-dojo-type="dijit.layout.ContentPane" id="rightPane" data-dojo-props="region:'right'"> Content for right pane </div> <div id="map" data-dojo-type="dijit.layout.ContentPane" data-dojo-props="region:'center'"></div> <div id="footer" data-dojo-type="dijit.layout.ContentPane" data-dojo-props="region:'bottom'"> <span id="dataSource"> </span> </div> </div> </body>In the
cssfolder that you extracted earlier in the exercise, there is a file calledlayout.css. This contains the styling information for our application. Open this file in your text editor.Find the text
#rightPaneas seen in the following code example. Properties are defined for the background color, foreground color, border styling, and width of the region:#rightPane { background-color:#FFF; color:#3f3f3f; border:solid 2px #224a54; width:20%; }Recall that in the previous code block that you added, we gave
idofrightPaneto therightregion. The CSS section will style our pane by giving it a background color (white), foreground color, width, and border.Save the file.
If necessary, open your web browser and reload
http://localhost/layout/index.html, or simply refresh the page if you already have it opened. Now you should see new content for therightregion of the application. Currently, it only holds some text as the content, but you could easily add additional content, including user interface widgets (dijits). We'll do that in the next step when we addAccordionContainer.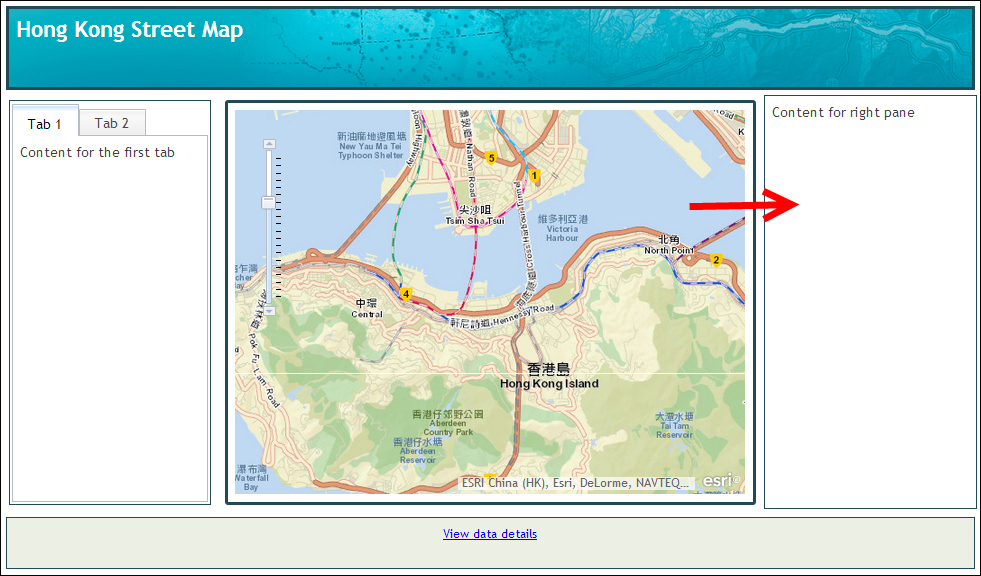
Next, we'll add
AccordionContainerto therightregion.First, add a reference to the
AccordionContainerresource, as seen in the following highlighted code:dojo.require("dijit.layout.BorderContainer"); dojo.require("dijit.layout.ContentPane"); dojo.require("dijit.layout.TabContainer"); dojo.require("esri.map"); dojo.require("esri.arcgis.utils"); dojo.require("esri.IdentityManager"); dojo.require("dijit.layout.AccordionContainer");Now, add
AccordionContainerinsideContentPanefor therightregion as well as the content for each of the panes. The highlighted code below should be added to theContentPaneyou created in step 14:<div data-dojo-type="dijit.layout.ContentPane" id="rightPane" data-dojo-props="region:'right'"> <div data-dojo-type="dijit.layout.AccordionContainer" > <div data-dojo-type="dijit.layout.ContentPane" title="Pane 1"> Content for Pane 1 </div> <div data-dojo-type="dijit.layout.ContentPane" title="Pane 2"> Content for Pane 2 </div> <div data-dojo-type="dijit.layout.ContentPane" title="Pane 3"> Content for Pane 3 </div> </div> </div>
Save the file.
Refresh your browser to see the new
AccordionContainerlayout element as seen in the following screenshot. In this exercise, you learned how to quickly create an application layout using Esri sample layouts.