
Organizations have several methods of accessing the Salesforce CRM application. Access can be gained from either the user interface (using a web browser), the API (for example, using an integrated client application or the Apex Data Loader), a desktop client (for example, Salesforce for Outlook), or from a mobile client application.
Whenever a login attempt is made to Salesforce using any of these preceding methods, the user's login request is authorized by the system using the following sequence of checks:
Does the user's profile have any login restrictions?
Does the user's IP address appear within the organization's trusted IP address list?
Has the user been activated from this IP address previously?
Does the user's web browser have a valid browser cookie stored from Salesforce?
If the user's login is from neither a trusted IP address nor a browser with a valid Salesforce cookie, the login is denied. To gain access to Salesforce, the user's identity must be confirmed by successfully completing the computer activation process.
Now, let's look at each of these login checks in more detail.
The login hour and IP address restrictions can be set for the user's profile. If these are set and there are login attempts from a user outside the specified hours or from an unknown IP address, access is denied.
If login hour restrictions are set for the user's profile, any login attempt outside the specified hours is denied. Login hour restrictions can be set on the required user's profile by carrying out the following steps:
Go to the Profile menu, by navigating to Setup | Manage Users | Profiles. Now, choose a profile, select the Login Hours link, and then click on Edit.
Set the days and hours when users with this profile can log in to Salesforce.com.
Navigate to Setup | Company Profile | Company Information, click on the Edit button, and select the required time zone from the Default Time Zone picklist.
The login hours that are set apply strictly to that exact time even if a user has a different personal time zone or if the organization's default time zone is changed.
To allow users to log in at any time, click on clear all times, as shown in the following screenshot:

To prevent users from accessing the system on a specific day (say, to carry out internal system maintenance), set the start time and end time to the same value, for example, Start Time to 8:00 AM and End Time to 8:00 AM (as shown in the Saturday and Sunday example settings in the previous screenshot).
If IP address restrictions are defined for the user's profile, any login attempt from an unknown IP address is denied.
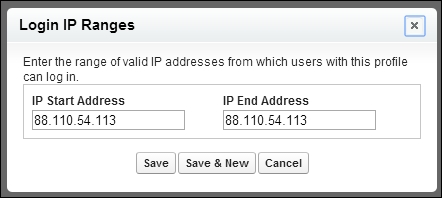
To restrict the range of valid IP addresses through the Profile menu, navigate to Setup | Manage Users | Profiles. Now, choose a profile, select the Login IP Ranges link, and then click on Add IP Ranges.
Enter a valid IP address in the Start IP Address field and a higher IP address in the End IP Address field.
The start and end addresses specify the range of IP addresses from which users can log in. To allow a login from a single IP address, enter the same address in both fields.
For example, to allow a login from only 88.110.54.113, enter 88.110.54.113 as both the start and end IP addresses, as follows:
This check is performed if profile-based IP address restrictions are not set.
If the user's login is from an IP address listed in your organization's trusted IP address list, the login is allowed.
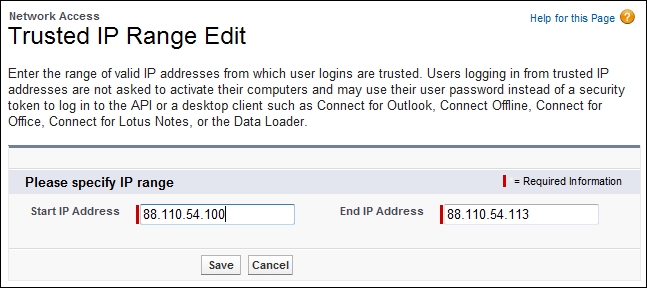
To go to the Trusted IP range settings, navigate to Setup | Security Controls | Network Access.
Click on New and enter a valid IP address in the Start IP Address field and a higher IP address in the End IP Address field.
The start and end addresses specify the range of IP addresses from which users can log in. To allow a login from a single IP address, enter the same address in both fields.
For example, to allow a login from only 88.110.54.113, enter 88.110.54.113 as both the start and end addresses, as shown in the following screenshot:
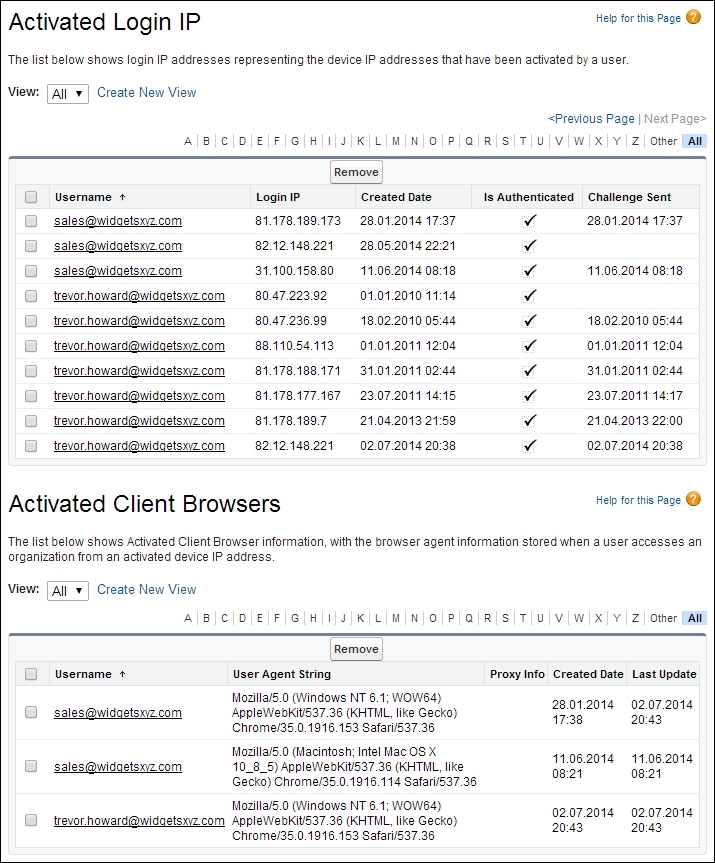
Each user has a list of IP addresses from which they've been activated. If the user has previously been activated from this IP address, then this IP address is added to the user's personal list and is never challenged again.
To view and remove the login IP addresses that have been recorded by your users, navigate to Setup | Security Controls | Activations. To remove Activated Login IP, click on the checkbox and then click on the Remove button, as shown in the following screenshot:
A cookie is a small file that contains a string of characters that are sent to your computer when you visit a website. Whenever you visit the website again, the cookie allows that site to recognize your web browser.
The browser will have the Salesforce cookie if the user has previously used that browser to log in to Salesforce and has not cleared the browser cookies.
So, if the user's login is from a browser that includes a Salesforce.com cookie, the login is allowed.
If the user's login is from neither a trusted IP address nor a browser with a Salesforce cookie, the login is denied and gets blocked, and Salesforce must verify the user's identity.
A trusted, genuine user can access the Salesforce CRM application using the following means:
User interface (using a web browser)
API (for example, using an integrated client application or the Apex Data Loader)
Desktop client (for example, Salesforce for Outlook)
To gain access through the user interface for the first time, the user is prompted to select how they would like to receive the verification code. Here, the verification code can be received by either an SMS or an e-mail, depending on whether the company-wide SMS-based identity confirmation option is enabled.
Note
For new organizations, an SMS text message is the default method for the computer activation process and can only be disabled by sending a request to Salesforce support. For existing organizations, the SMS text message activation can be enabled by you as the system administrator but, once enabled, it requires a request to Salesforce support to deactivate it.
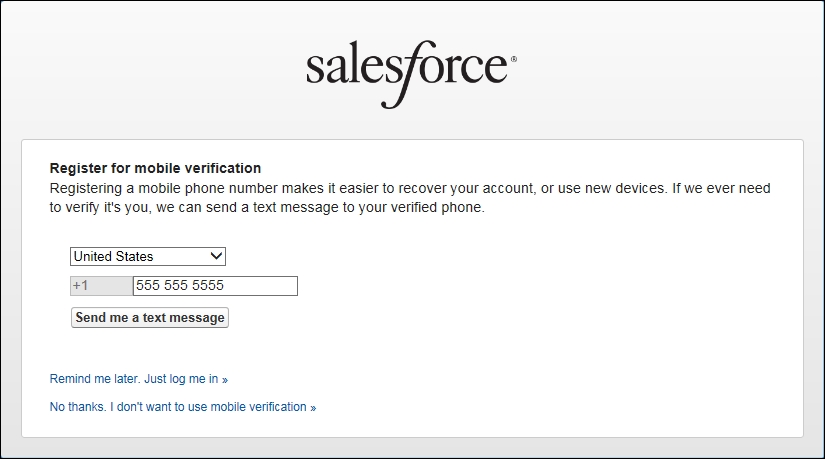
To receive the SMS text message verification code, set SMS-based identity confirmation to be enabled (this has enabled by default since the Spring of 2014). This feature enables users to receive a One-Time PIN(OTP) delivered via SMS. This is set by navigating to Setup | Security Controls | Session Settings and then enabling the Enable SMS-based identity confirmation option.
Once enabled, users must verify their mobile phone number before taking advantage of this feature. This will present the following screenshot:
To receive an e-mail verification code, users must have the Email-Based Identity Confirmation Option setting enabled on their profile or included as a permission set.
Note
The E-mail-Based Identity Confirmation Option is only available if the Enable SMS-based identity confirmation option is enabled.
Once enabled, users can click on the Email me a verification code button to send an activation e-mail to the address specified in the user's Salesforce user record, as follows:
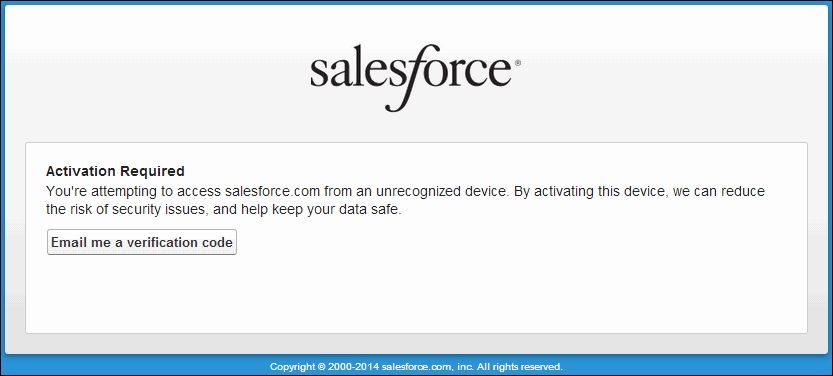
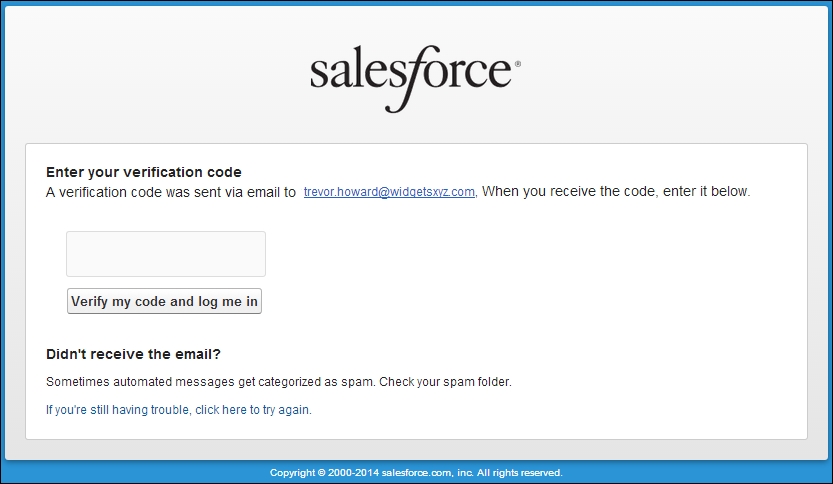
On clicking on the Email me a verification code button, a new screen is presented that allows you to enter a verification code, as shown in the following screenshot:
Salesforce sends the verification code e-mail to the e-mail address associated with the user's record in Salesforce. Here, the following screenshot shows you an e-mail example:
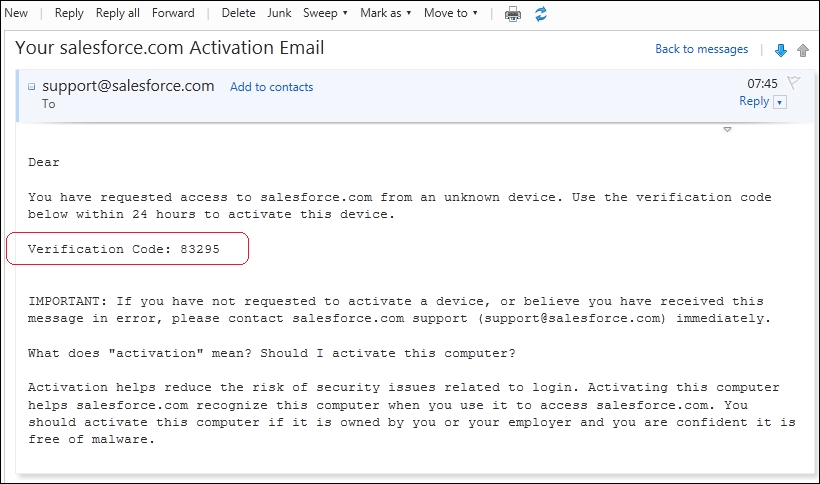
The e-mail instructs the user to enter the verification code into the browser to activate the laptop for login to Salesforce.
The activation code within the e-mail is valid for up to 24 hours from the time the Email me a verification code button was clicked on. After 24 hours, the activation link will expire and the user must repeat the activation process.
Confusion can occur if your company has remote users who connect to Salesforce away from the company network, such as from home or from public Internet connections. The remote users are likely to have dynamically assigned IP addresses set as their computer identity. Hence, whenever they attempt to log in, Salesforce will identify it as an unknown IP address, prompt for verification, and the remote user will have to click on the verification button.
The remote user will then have to access the e-mail associated with their Salesforce user record to retrieve the activation e-mail, and it is here that confusion can occur. If the remote user has to access a corporate web e-mail using a Virtual Private Network (VPN) connection, then clicking on the activation link might not work because the IP address that is being validated might now no longer be the same IP address that was used by the browser. This is because the VPN connection might most likely be using a web proxy.
Note
It is recommended that you establish a policy to ensure the user clicks on the verification button while they're connected to the VPN or check whether they can access non-VPN-based web mail (if this is permitted in your company) to ensure that the validated IP addresses are the same.
This is covered in more detail in the Session settings section in Chapter 2, User Management in Salesforce CRM.
To get access using the API or a desktop client (for example, using the Apex Data Loader), the user must add his/her security token at the end of the password in order to log in. A security token is an automatically generated key from Salesforce. For example, if a user's password is pa$$word, and their security token is XXXXXX, then the user must enter pa$$wordXXXXXX.
Users can obtain their security token by changing their password or resetting their security token via the Salesforce.com user interface by navigating to Your Name | My Settings | Personal | Reset My Security Token and then clicking on the Reset Security Token button.
When a user changes their password or resets their security token, Salesforce sends a new security token to the e-mail address associated with their Salesforce user record. The security token is valid until a user resets their security token, changes their password, or has their password reset by a system administrator.
Tip
Do not enter a security token within your password when accessing Salesforce from a web browser. It is recommended that you obtain your security token via the Salesforce user interface from a trusted network prior to attempting access from a new IP address.
When a user's password is changed, the user's security token is automatically reset. The user will experience a blocked login until they add the security token to the end of their password or enter the new password after you have added their IP address to the organization's trusted IP range.