

Having already completed the dashboard design, we need to start work on the dashboard itself. Here, we should do what's called a functional breakdown of the dashboard. This is a document where you can specify the components to be used on each section of the dashboard, and the queries and parameters to be set on each of the components.
It's also very useful if you add the estimated time that will be spent on each task so you can have a good idea of how much time will be needed to develop the dashboard. This is a great help in managing not only the work that was planned versus the work that has been completed, but also to give you an overall idea of the components, parameters, listeners, and queries to use. For each one of the queries, the breakdown should include the resulting columns and types.
You will spend some time creating the functional breakdown, but you will save time when developing the dashboard, as ideas will become clearer, you'll anticipate some problems, and some questions will be raised that need answers. You will also gain massive advantages from this if you are working on a team, as each team member will know what has to be done and how to achieve the goals.
Doing this breakdown will also give you an advantage when building the documentation for the project/dashboard, and also for the knowledge transfer at the end of the project. When doing the knowledge transfer to the customers, we need to ensure this information is the best, is complete, and is easy to understand. When delivering to a customer technical team, we should be able to do this in a complete and understandable way. The functional breakdown will help them understand how the dashboard works. So, everyone can take advantage of this document.
Once all the tasks are delivered to the team's different elements, the team should start the development of the back end and the front end of the dashboard. But they should always look back to the dashboard design and the functional breakdown and take these into account.
Tip
Don't forget the version control
Create or request a version control repository, and make sure that the team's elements have the proper access and rights to it. We will come back to version control later on in the book.
The time has come when you need to start creating your dashboard, but for this you need to install the CTools.
One of the first steps when developing a custom dashboard is to install the CTools. It's required that you already have Pentaho installed and well set up. There are three ways of installing the CTools:
Using Pentaho Marketplace
Using the
ctools-installer(this is only for earlier versions of Pentaho such as 4.5 and 4.8; it might work on Pentaho 5.x, but it is not recommended, and it will not work for 6.x)Manually
Starting from version 5.2, CTools comes already installed, so you can skip the installation process; however, it's important to know the process because sooner or later you may want to upgrade. The standard CTools, the ones that come installed with Pentaho and that were used during the writing of this book, do not allow you to edit or create a new CDE dashboard. But you can perform a few changes to make this possible. You just need to uncomment the <operation> and <overlays> code lines in the following files for the CDE and CDA plugins:
/cda/plugin.xml/pentaho-cdf-dd/plugin.xml
The plugins can be found in the pentaho-solutions/system folder of your Pentaho installation.
The first way, and definitely the easiest, is using Pentaho Marketplace. To follow this process, you need to make sure you have a Pentaho version that already includes Marketplace; otherwise you should download the files and install it first.
Pentaho Community Edition (CE) already comes with Pentaho Marketplace installed by default, which may not happen in EE. Starting from Pentaho 6.1 and above, the Marketplace should come already installed by default.
The first step is to check whether Marketplace is available in your Pentaho version. In the Pentaho User Console (PUC), you can click on the operational menu and check that you have an option available to execute Marketplace. If you have it already installed, you can skip the installation of Pentaho Marketplace; otherwise you will need to install it.
If I had to provide a definition of Pentaho Marketplace, I would say this: Marketplace is a graphical interface running on Pentaho itself that allows users to know what plugins are available and to install/uninstall them, at the same time giving developers the ability to publish their work and make solutions or utilities available to others that may solve a problem or add a new functionality.
Marketplace can be downloaded from http://community.pentaho.com/marketplace/plugins/. Depending on the version of Pentaho you are using, check it using PUC menu under Help | About, and download Marketplace for the version of Pentaho you are using. You will get a zip file, so unzip the file and, after stopping the Pentaho Server, copy the unzipped folder into your pentaho-solution/system folder. You will end up with a folder named marketplace in your system folder. Start the BA Server and you should have Marketplace already available to be used.
Upon launching Pentaho Marketplace, you should get an image like the following figure:
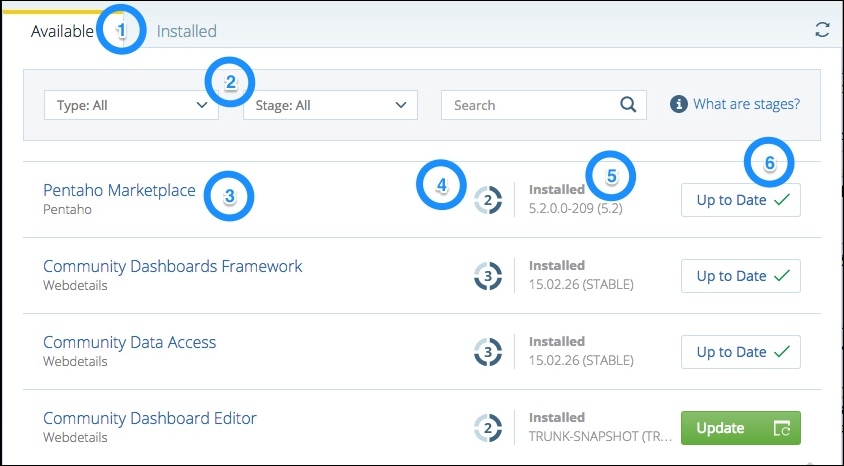
The numbers in the preceding screenshot are explained as follows:
The tabs on the top area of the frame let you filter the plugins by status. They are available in Marketplace (will show all plugins), or can be installed on your Pentaho server.
The drop-down selectors allows you to filter the plugins.
Each one of the rows represents a plugin. You can identify the plugin by its name and developer. You can get more information, or search for plugins online, at the Marketplace website (http://www.pentaho.com/marketplace/).
You can also identify the development stage of the plugin. The number and color identify the development stage. Depending on whether it's in a Customer Lane or Community Lane, there will be a blue or green color, where the number represents the stage in each group. To get more details on this, please visit the Marketplace page at http://www.pentaho.com/marketplace/.
The status can be one of two options, Installed and Available. A plugin that is already installed can then be updated.
Depending on the available actions, you will get different buttons such as:

Clicking on the row of a plugin will launch a dialog with the details of the plugin. This dialog will show the name of the plugin and the developer, version, license, and dependencies, action buttons, and description and, when scrolling down, some screenshots of the plugin may also be available:

It's important to know what version of the plugin we should install. This may be a standard version, a stable version, or a trunk version. The standard version is the version that comes installed with Pentaho 5.2 and above. This version lets you open dashboards or use each of the CTools, but with some limitations. For example, you will be able to open CDE dashboards, but you will not be able to create or edit them. To create or edit dashboards you need to install the stable version.
From the drop-down menu, you should select which version you want to install. Then, you should click on the action, which is Install or Uninstall. After clicking on Install/Uninstall, you will get a confirmation dialog and if you proceed, you will also get some feedback about the success of the request made as a number shown in previous screenshot:
From the dropdown, it will be possible to select the version.
From the buttons, it will be possible to install/uninstall it.
By selecting and installing another version, the files will be overwritten, so there is no need to uninstall the previous version. Note that after the process is completed, you need to restart the BA server.
The CTools installer, which should only be used for Pentaho versions earlier than 5.x, is a script that will download the proper version of the selected plugins, unzip the folder, and copy the files into the right folders. You can download it from https://github.com/pmalves/ctools-installer. When executed, the script will check whether there is a new version and will inform you about it. I advise you to always install the updates, as depending on the version of Pentaho you are using, you may need an upgrade, and it can make a big difference.
To make use of the script, you need to run it from the command line, and if you're running just the script with no options, you will get a list of changes in the script, as well as the usage. When running ./ctools-installer.sh, you will get something like:
Usage: ctools-installer.sh -s solutionPath [-w pentahoWebapPath] [-b branch]

-s    Solution path (eg: /biserver/pentaho-solutions)
-w    Pentaho webapp server path (required for cgg on versions before 4.5. eg: /biserver-ce/tomcat/webapps/pentaho)
-b    Branch from where to get ctools, stable for release, dev for trunk. Default is stable
-c    Comma-separated list of CTools to install (Supported module-names: marketplace,cdf,cda,cde,cgg,cfr,sparkl,cdc,cdv,saiku,saikuadhoc)
-y    Assume yes to all prompts
--no-update Skip update of the ctools-installer.sh
-n    Add newline to end of prompts (for integration with CBF)
-r    Directory for storing offline files
-h    This help screen
To successfully run the installer and install the plugins, you will need to provide the solution path using the –s options and specify the absolute path to your Pentaho Solutions folder or the path where you are running the script from.
Pentaho Web App folder is optional, and is only mandatory when installing the CGG plugin on versions previous to Pentaho 4.5. You will not need to specify this option otherwise.
You may also specify the branch to install CTools from. For that option, you may use a value of stable or dev, depending on what you want to install.
Tip
The stable version is the one to use
In some cases, you can use the development version. For example, if you need a bug fix or just to make use of new functionality, then you might want use the dev version; otherwise you should avoid it.
You will be asked something like:
Install CDF? This will delete everything in pentaho-solutions/system/pentaho-cdf. you sure? (y/N)
You should answer y when you want to install the referred plugin, or N if you don't want to install it. But you can also avoid this if you want to confirm the installation of all plugins. For this, add the option –y to the ctools-installer script. This will confirm the installation of all the plugins available for the selected branch.
Tip
Depending on the branch, the number of CTools to be installed will also vary
When using the Assume yes to all prompts option, make sure you know which ones are installed for the branch you are selecting. The number of plugins will be different depending on the branch you are selecting. When using dev on the branch option, it will include more plugins compared to the stable branch.
Sometimes, you don't want to install all the Ctools at once. For this, –c is available. This should be used followed by the abbreviation of each of the CTools names that you want to install without a prompt, separated by a comma. This gives you a way to automate the install of the CTools.
When you are behind a proxy, you may have some difficulties using the script. This blog post from Pedro Alves can help you overcome the problem: http://pedroalves-bi.blogspot.de/2014/07/using-pentaho-marketplace-over-proxy-or.html.
There is a new option that lets you use the installer to download the plugin, and later install the CTools in offline mode. To achieve this, you should use the option –r and specify the folder to use. If no folder exists, the script will create it and download the folders to it, but will not install them. When the folder you are pointing to with the –r option exists, then it will install the CTools using the files inside, without the need to download them. Note that you can copy the downloaded folder to another location/machine, and when pointing to the existing folder, the installer will use them. So the first time, you will need to run the script from a machine that is able to successfully download the CTools .zip files from the Internet. You can see what the options are by running the command:
./ctools-installer.sh
Here is an example of the syntax of a complete command to install the CTools:
./ctools-installer.sh -s pentaho-solutions/ -b stable -c cdf,cda,cde,cgg -r offlineCToolsFiles
This will create a folder and subfolders with the CTools files, or you can just install them from the specified location.
A manual installation of the CTools is also possible. For this, you should download the plugins yourself. Go to the Marketplace web page (http://www.pentaho.com/marketplace) where you can select your version of Pentaho and the plugin, and download it. Unzip the folders and copy them into the pentaho-solutions/system folder. When restarting the server, the plugins will be working properly. Just make sure you are downloading the version of the plugin that corresponds to your Pentaho version. Be careful with the versions you are installing, and make sure that all the dependencies are also installed, because some plugins are dependent on each other. For example, when installing CDE you also need CDF to be installed.