Book Image

TensorFlow 1.x Deep Learning Cookbook

Book Image

TensorFlow 1.x Deep Learning Cookbook

Overview of this book

Deep neural networks (DNNs) have achieved a lot of success in the field of computer vision, speech recognition, and natural language processing. This exciting recipe-based guide will take you from the realm of DNN theory to implementing them practically to solve real-life problems in the artificial intelligence domain. In this book, you will learn how to efficiently use TensorFlow, Google’s open source framework for deep learning. You will implement different deep learning networks, such as Convolutional Neural Networks (CNNs), Recurrent Neural Networks (RNNs), Deep Q-learning Networks (DQNs), and Generative Adversarial Networks (GANs), with easy-to-follow standalone recipes. You will learn how to use TensorFlow with Keras as the backend. You will learn how different DNNs perform on some popularly used datasets, such as MNIST, CIFAR-10, and Youtube8m. You will not only learn about the different mobile and embedded platforms supported by TensorFlow, but also how to set up cloud platforms for deep learning applications. You will also get a sneak peek at TPU architecture and how it will affect the future of DNNs. By using crisp, no-nonsense recipes, you will become an expert in implementing deep learning techniques in growing real-world applications and research areas such as reinforcement learning, GANs, and autoencoders.
Table of Contents (15 chapters)
14
TensorFlow Processing Units

Installing TensorFlow

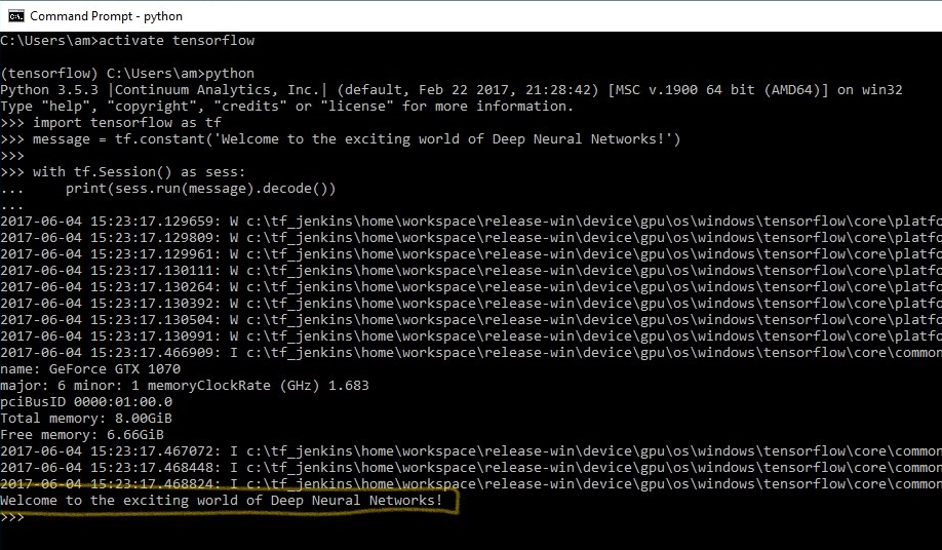
In this recipe, you will learn how to do a fresh installation of TensorFlow 1.3 on different OSes (Linux, Mac, and Windows). We will find out about the necessary requirements to install TensorFlow. TensorFlow can be installed using native pip, Anaconda, virtualenv, and Docker on Ubuntu and macOS. For Windows OS, one can use native pip or Anaconda.

As Anaconda works on all the three OSes and provides an easy way to not only install but also to maintain different project environments on the same system, we will concentrate on installing TensorFlow using Anaconda in this book. More details about Anaconda and managing its environment can be read from https://conda.io/docs/user-guide/index.html.

The code in this book has been tested on the following platforms:

  • Windows 10, Anaconda 3, Python 3.5, TensorFlow GPU, CUDA toolkit 8.0, cuDNN v5.1, NVDIA® GTX 1070
  • Windows 10/ Ubuntu 14.04/ Ubuntu 16.04/macOS Sierra, Anaconda3, Python 3.5, TensorFlow (CPU)

Getting ready

The prerequisite for TensorFlow installation is that the system has Python 2.5 or higher installed. The recipes in this book have been designed for Python 3.5 (the Anaconda 3 distribution). To get ready for the installation of TensorFlow, first ensure that you have Anaconda installed. You can download and install Anaconda for Windows/macOS or Linux from https://www.continuum.io/downloads.

After installation, you can verify the installation using the following command in your terminal window:

conda --version

Once Anaconda is installed, we move to the next step, deciding whether to install TensorFlow CPU or GPU. While almost all computer machines support TensorFlow CPU, TensorFlow GPU can be installed only if the machine has an NVDIA® GPU card with CUDA compute capability 3.0 or higher (minimum NVDIA® GTX 650 for desktop PCs).

CPU versus GPU: Central Processing Unit (CPU) consists of a few cores (4-8) optimized for sequential serial processing. A Graphical Processing Unit (GPU) on the other hand has a massively parallel architecture consisting of thousands of smaller, more efficient cores (roughly in 1,000s) designed to handle multiple tasks simultaneously.

For TensorFlow GPU, it is imperative that CUDA toolkit 7.0 or greater is installed, proper NVDIA® drivers are installed, and cuDNN v3 or greater is installed. On Windows, additionally, certain DLL files are needed; one can either download the required DLL files or install Visual Studio C++. One more thing to remember is that cuDNN files are installed in a different directory. One needs to ensure that directory is in the system path. One can also alternatively copy the relevant files in CUDA library in the respective folders.

How to do it...

We proceed with the recipe as follows:

  1. Create a conda environment using the following at command line (If you are using Windows it will be better to do it as Administrator in the command line):
conda create -n tensorflow python=3.5
  1. Activate the conda environment:
# Windows    
activate tensorflow
#Mac OS/ Ubuntu:
source activate tensorflow
  1. The command should change the prompt:
# Windows
(tensorflow)C:>
# Mac OS/Ubuntu
(tensorflow)$
  1. Next, depending on the TensorFlow version you want to install inside your conda environment, enter the following command:
## Windows
# CPU Version only
(tensorflow)C:>pip install --ignore-installed --upgrade https://storage.googleapis.com/tensorflow/windows/cpu/tensorflow-1.3.0cr2-cp35-cp35m-win_amd64.whl

# GPU Version
(tensorflow)C:>pip install --ignore-installed --upgrade https://storage.googleapis.com/tensorflow/windows/gpu/tensorflow_gpu-1.3.0cr2-cp35-cp35m-win_amd64.whl
## Mac OS
# CPU only Version
(tensorflow)$ pip install --ignore-installed --upgrade https://storage.googleapis.com/tensorflow/mac/cpu/tensorflow-1.3.0cr2-py3-none-any.whl

# GPU version
(tensorflow)$ pip install --ignore-installed --upgrade https://storage.googleapis.com/tensorflow/mac/gpu/tensorflow_gpu-1.3.0cr2-py3-none-any.whl
## Ubuntu
# CPU only Version
(tensorflow)$ pip install --ignore-installed --upgrade https://storage.googleapis.com/tensorflow/linux/cpu/tensorflow-1.3.0cr2-cp35-cp35m-linux_x86_64.whl

# GPU Version
(tensorflow)$ pip install --ignore-installed --upgrade https://storage.googleapis.com/tensorflow/linux/gpu/tensorflow_gpu-1.3.0cr2-cp35-cp35m-linux_x86_64.whl
  1. On the command line, type python.
  2. Write the following code:
import tensorflow as tf
message = tf.constant('Welcome to the exciting world of Deep Neural Networks!')
with tf.Session() as sess:
print(sess.run(message).decode())
  1. You will receive the following output:
  1. Deactivate the conda environment at the command line using the command deactivate on Windows and source deactivate on MAC/Ubuntu.

How it works...

TensorFlow is distributed by Google using the wheels standard. It is a ZIP format archive with the .whl extension. Python 3.6, the default Python interpreter in Anaconda 3, does not have wheels installed. At the time of writing the book, wheel support for Python 3.6 exists only for Linux/Ubuntu. Therefore, while creating the TensorFlow environment, we specify Python 3.5. This installs pip, python, and wheel along with a few other packages in the conda environment named tensorflow.

Once the conda environment is created, the environment is activated using the source activate/activate command. In the activated environment, use the pip install command with appropriate TensorFlow-API URL to install the required TensorFlow. Although there exists an Anaconda command to install TensorFlow CPU using conda forge TensorFlow documentation recommends using pip install. After installing TensorFlow in the conda environment, we can deactivate it. Now you are ready to execute your first TensorFlow program.

When the program runs, you may see a few warning (W) messages, some information (I) messages, and lastly the output of your code:

Welcome to the exciting world of Deep Neural Networks!

Congratulations for successfully installing and executing your first TensorFlow code! We will go through the code in more depth in the next recipe.

There's more...

Additionally, you can also install Jupyter notebook:

  1. Install ipython as follows:
conda install -c anaconda ipython
  1. Install nb_conda_kernels:
conda install -channel=conda-forge nb_conda_kernels
  1. Launch the Jupyter notebook:
jupyter notebook 
This will result in the opening of a new browser window.

If you already have TensorFlow installed on your system, you can use pip install --upgrade tensorflow to upgrade it.