

Leveling the print bed
Arguably the most important thing we can do to ensure high-quality 3D prints is to properly level the print bed. In this section, we will manually level our print bed by moving the extruder hot end to each corner and adjusting the bed using the leveling wheels.
Before we level the bed on our 3D printer, we should take note of the importance of having a perfectly flat build surface sitting on top of the bed. Having an uneven build surface makes the adhesion of the first layer difficult. Choosing the right build plate material will make the task of leveling out the bed much easier.
Glass is an extremely popular build surface due to its flatness. Borosilicate glass is often used for build surfaces due to its thermal properties as it can withstand great temperature variations without cracking.
Leveling the corners of the bed
Leveling the corners on the bed is the easiest way to level the print bed with relation to the nozzle. To ensure that this works, the surface of the build plate material (the glass plate for the Ender 3 V2) must be perfectly flat.
To begin the process, we will use the control panel again. We will first set the print head (extruder hot end) to the home position and then move it around the build plate. The following instructions are for the Ender 3 V2, while other Ender 3 printers or 3D printers with Marlin firmware will work similarly:
- Prepare a small rectangular piece of paper about 10 cm by 5 cm.
- Scroll to the Prepare menu and click on it. For other Ender 3 models, click on the control knob, navigate to the Prepare menu, and click on it.
- Navigate to the Auto Home menu option and click on it. Observe that the print head moves to the home position.
- Scroll to the Move menu option and click the control knob to select it.
- Scroll down to the Z menu option, click the control knob to select it, and dial in the value
20by turning the dial clockwise. Click to set it. Observe that the print head moves up 20 mm. - Scroll to the X menu option and click to select.
- Set the value to
20mmand click to set it. Observe that the print head moves 20 mm in the X direction. - Scroll to the Y menu option and click to select.
- Set the value to
20mmand click to set it. Observe that the print head moves 20 mm in the Y direction. - Slide the piece of paper under the print head:
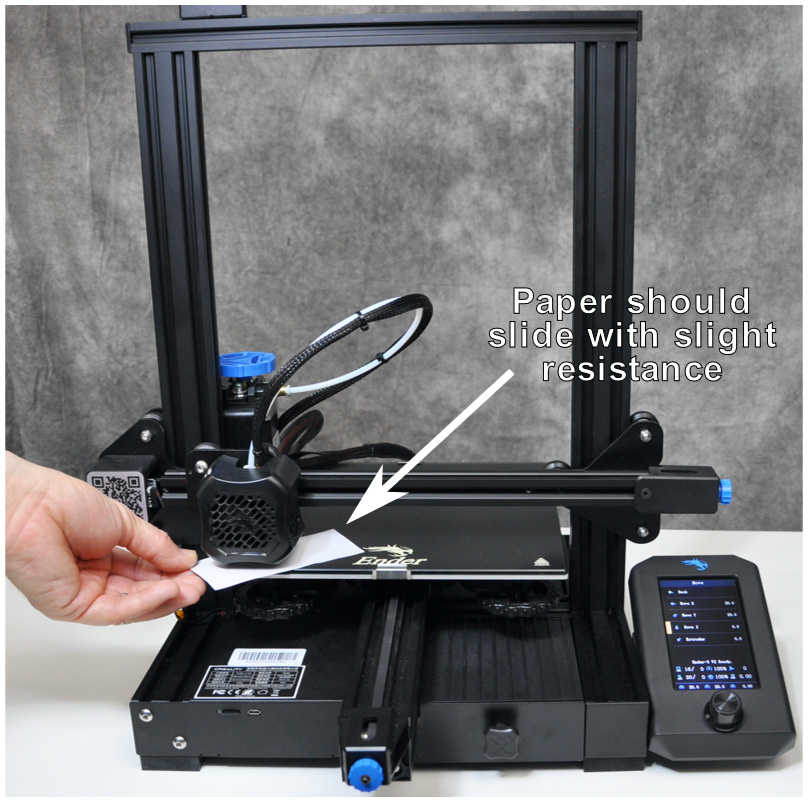
Figure 1.12 – Bed leveling
- Scroll down to the Z menu option, click the control knob to select it, and dial in the value
0by turning the dial clockwise. Click on the control knob to set this. Observe that the print head moves down and touches the piece of paper. - Using the leveling wheel closest to the point on the bed, turn the wheel to either lower or raise the bed so that the paper can move freely under the print head with a slight tug. The paper should not rip, nor move freely without a little bit of resistance (Figure 1.12). Use the graphic in Figure 1.13 to determine how to move the bed either up or down:
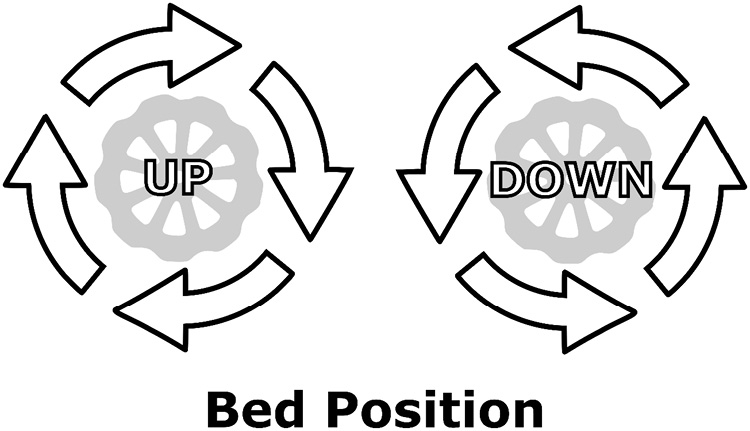
Figure 1.13 – Adjusting the bed position
- Repeat steps 6 to 12 with an x value of
180and y value of20. - Repeat steps 6 to 12 with an x value of
180and y value of180. - Repeat steps 6 to 12 with an x value of
20and y value of180. - Set the z axis to
20mm. - Select Auto Home to home the printer.
We have just leveled the bed by manually leveling the corners.
Mesh bed leveling
Our print bed should be leveled and ready to print after leveling the corners. However, in cases where it dips or rises between the corners, we have a few options we could apply to address this, as follows:
- Replace the build surface with a new one.
- Print using rafts (we will investigate this in Chapter 3, Printing Our First Object).
- Install mesh bed leveling on our Ender 3 V2.
Buying a new build surface like a new glass bed or PEI plate is an easy option to take as our build plates do get worn with use. There are many build surfaces for the Ender 3 to choose from.
However, if that option is not available, we can do what used to be common prior to glass beds, which is to print our parts on rafts. Basically, rafts are flat surfaces that are printed onto our bed before printing our part (a raft for the part, so to speak). Rafts fell out of favor when glass beds became popular, as rafts can sometimes be difficult to remove from the part and they waste precious material that will only be thrown out.
The third option we can explore (for the Ender 3 V2 only) is mesh bed leveling:
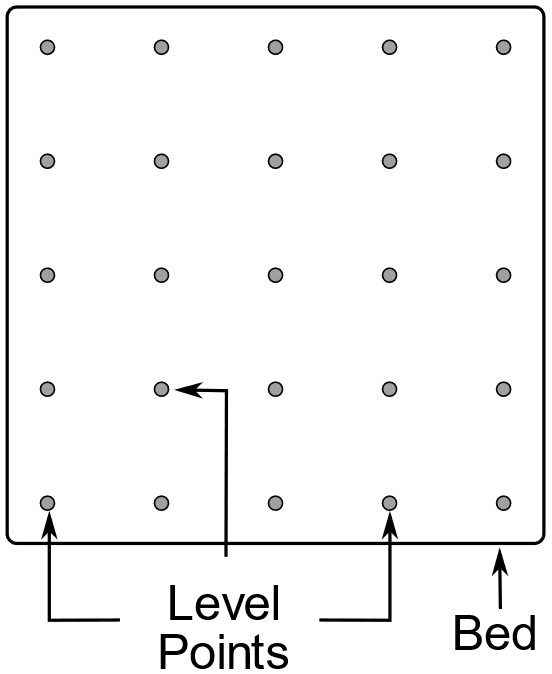
Figure 1.14 – Mesh bed leveling
As we can see in Figure 1.14, mesh bed leveling involves taking measurements at many points on the bed. These values are then used to calculate where to set the z axis on the print head as it moves around the bed.
To get mesh bed leveling on our Ender 3 V2 we must update the firmware. The firmware is the program that runs on the controller board of our 3D printer. The firmware may be updated in a couple of ways:
- By loading pre-compiled firmware onto a microSD card and installing it on our Ender 3 V2
- By loading and compiling the firmware source code using a program such as Arduino IDE
A Few Good Reasons to Update the Firmware
Upgrading the firmware on our Ender 3 V2 will give us extra features in addition to mesh bed leveling. Scrolling text for long filenames is added, as well as the ability to load files from subfolders and not just the root. A new main menu option called Level pushes Info to the last option under the Control menu. Also, a white border has been added when selecting menu options, making the main menu easier to see.
We will use the first option to install mesh bed leveling on our Ender 3 V2.
Updating the firmware
We can find a list of Ender 3 V2 firmware with mesh bed leveling at the following GitHub repository: https://github.com/Jyers/Marlin/releases.
To know which version of the firmware to download, we need to find out which board is installed in our Ender 3 V2 (please note that this is an upgrade for the Ender 3 V2 and isn't available with previous Ender 3 printers). To do this, complete the following steps:
- Remove the cover of the main controller board by removing one screw from the top and three screws from the bottom.
- Place the Ender 3 V2 on its side and observe the board number. See Figure 1.15 to find this:
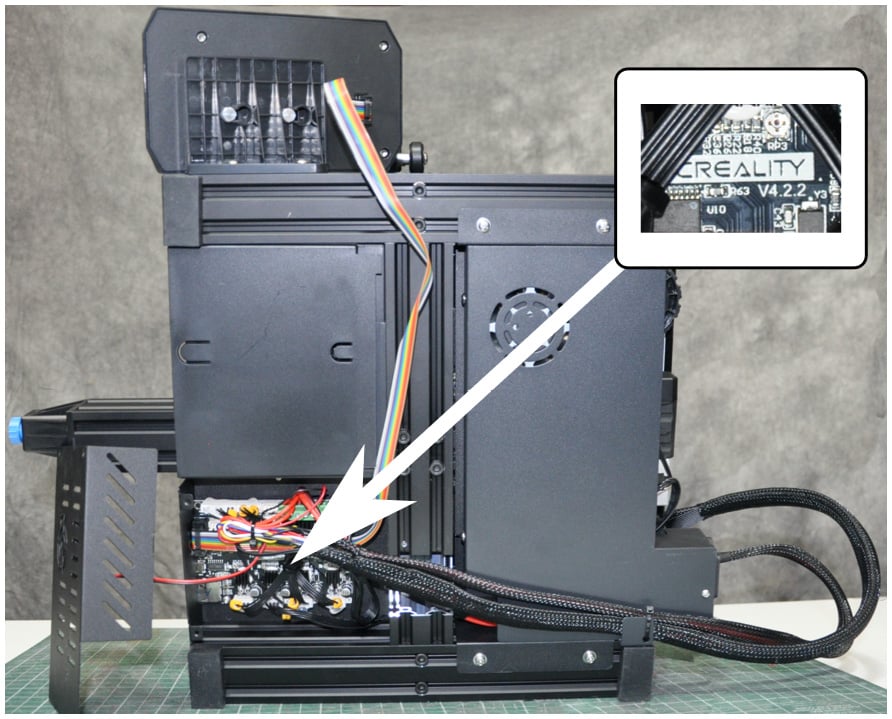
Figure 1.15 – Finding the board number on our Ender 3 V2
- For our Ender 3 V2 we can see that the board number is V4.2.2. Download the appropriate
.binfile from the website listed at the beginning of this section. For our printer, we will download theE3V2-ManualMesh-5x5-v4.2.2.binfile. - Be sure to download the correct
E3V2-ManualMesh-5X5file for the board version. We will be calibrating a 5x5 mesh. Load the.binfile onto a formatted microSD card. - Ensure that the Ender 3 V2 is turned off. Load the microSD card into the printer. Turn on the Ender 3 V2 and observe that the firmware has been updated. The Info menu option should be replaced by the Level menu option. There should be x, y, and z values for the print head displayed at the bottom of the display screen.
We are now ready to level the bed using mesh bed leveling.
Running mesh bed leveling
With the firmware installed, mesh bed leveling involves taking z-axis measurements at 25 points on the bed. At the end of the process, the mesh is saved and used when we 3D print.
To level our bed with mesh bed leveling, do the following:
- From the main menu navigate to the Level menu option and click the control knob.
- Observe that the print head moves to the home position before moving to the first mesh point.
- Slide a 10cm by 5cm piece of paper under the print head. The paper should slide under the print head with a slight tug.
- If the paper does not slide under the print head with a little resistance, then we must raise or lower the print head. Using the Microstep Up and Microstep Down options, adjust the print head accordingly by pressing and holding the control knob. Please note that up and down are opposite of what they were when we were leveling the print bed with the leveling wheels.
- Scroll up and click on the Next menu option when satisfied with the level. Observe that the print head moves to the next position.
- On the last measurement point there will be a menu option called Save Mesh. Scroll up to this menu option and click the control knob to save the mesh. Observe a double beeping sound indicating that the mesh has been saved.
- Ensure that the Leveling Active check box from the Level menu is checked.
We have now successfully leveled our print bed using mesh bed leveling.
Automatic mesh bed leveling
Some of us may have noticed a file called E3V2-BLTouch-5x5-v4.2.7.bin when we were downloading the firmware. BL Touch is an after-market sensor that we can add to our Ender 3 V2 series printer. We would use firmware such as this if we had an automated leveling sensor such as BL Touch installed on our printer.
How Often Do We Need To Level The Bed?
The bed of our 3D printer should not need leveling very often if we take care not to apply too much pressure to the bed when removing prints. The most common mistake many make is not letting the bed cool down to room temperature before removing the printed part. In most cases, the printed part will just slide off the glass bed once it has returned to room temperature.
Now that we have leveled our print bed, let's take a look at some of the material available for use in 3D printing.