
Designing applications for high availability
High availability ensures business continuity by reducing outages and disruption for customers even when some components fail in a distributed application. Let's look at some of the ways to achieve high availability.
In a scaled-out N-tier distributed application, we can add more servers to all the tiers, but I did not mention anything about Azure data centers, Azure regions, Azure Load Balancer, Azure Traffic Manager, Azure availability sets, Azure availability zones, or SQL Always On availability groups. Let's discuss each of these offerings from Microsoft Azure and see what benefits it gives to our distributed application to make it highly available.
Azure data centers
Azure data centers are physical infrastructures or buildings located all over the world where Microsoft Azure servers/VMs and services are managed.
Azure regions
An Azure region is a set of data centers connected through a dedicated low-latency network. Microsoft has 60+ Azure regions all over the world – more than any other cloud provider – from which customers can choose to deploy their applications.
Azure paired regions
An Azure paired region, as the name suggests, is a set of two regions and each region consists of a set of data centers connected through a dedicated low-latency network. The main benefit of going with paired regions is where there is a broader Azure outage affecting multiple regions, at least one region in each pair will be prioritized by Azure for quicker recovery. Planned Azure system patches and updates are rolled out sequentially to one region after another in paired regions to minimize outages or downtime in the rare case of bugs or issues with updates being rolled out.
Tip
You can read in detail about paired regions here: https://docs.microsoft.com/en-us/azure/best-practices-availability-paired-regions, which will help you understand the best practices, different regional pairs available across the globe for you to choose from, and their benefits.
Azure Traffic Manager
Azure Traffic Manager is a DNS-based load balancer to distribute traffic to internet-facing endpoints across global regions.
Traffic Manager provides a wide range of options to route traffic. Let's look at some of the frequently used routing options that can be configured in your Traffic Manager profile:
- Priority: This option enables you to set a primary service endpoint to which all traffic is routed and provides the option to configure backup endpoints that will take traffic when the primary endpoint is not available. This routing option is very useful in scenarios where you want to provide reliable services to your customers by having backup endpoints.
- Weighted: This option enables you to distribute traffic across a set of endpoints based on pre-defined weights. The weight is an integer and the higher the weight, the higher the priority. You can configure the same weight across all endpoints to distribute traffic evenly. This routing option is very useful in scenarios where you want to gradually increase the traffic to a new endpoint or provide specific weightage to certain endpoints when you are horizontally scaling up.
- Performance: This option enables you to distribute traffic to the "closest" endpoint for the user. The closest endpoint is not measured by geographic distance but based on the lowest network latency. Traffic Manager maintains a lookup latency table for the closest endpoint between different source IP address ranges and the Azure data center. This routing option is very useful in scenarios where you want to improve the responsiveness of your applications.
Traffic Manager provides endpoint monitoring and automatic endpoint failover as well. Let's look at important settings to be configured in your Traffic Manager profile for endpoint monitoring:
- Protocol: You can set HTTP, HTTPS, or TCP as the protocol that Traffic Manager can use to probe your endpoints' health. Please note that HTTPS monitoring just checks whether a certificate is present or not and doesn't check whether a certificate is valid or not.
- Port: You can set the port that Traffic Manager can use to send a request.
- Expected status code ranges: You can set success status code ranges in the format 200-299, 301-301. When these status codes are received as a response once a health check is done, Traffic Manager marks those endpoints as healthy. If you don't set anything, a default value of 200 is defined as the success status code.
- Probing interval: You can set an interval to specify the frequency of endpoint monitoring health check runs from Traffic Manager. You have options to set 30 seconds (normal probing) and 10 seconds (fast probing). If you don't set anything, a default value of 30 seconds is defined as the probing interval.
- Tolerated number of failures: You can set the total number of failures Traffic Manager can consider before making an endpoint unhealthy. You have options to set it between 0 and 9. A value of 0 means the endpoint will be marked as unhealthy for even a single failure. If you don't set anything, a default value of 3 is considered.
- Probe timeout: You can set the timeout value Traffic Manager can consider before making an endpoint unhealthy when no response is received. You can set the timeout value between 5 and 10 seconds when the probing interval is 30 seconds. If you don't set anything, a default value of 9 seconds is set for probe timeout.
A Traffic Manager probe initiates a GET request to the endpoint to be monitored using the protocol, port, and relative path given. If the probing agent receives a 200-OK response or any of the responses configured in the expected status code ranges, it marks the endpoint as healthy. If the response is different from any of the responses configured in the expected status code ranges or no response is received within the timeout period, the probing agent reattempts till the tolerated number of failures is reached. The endpoint is marked unhealthy once the consecutive failures count is higher than the Tolerated number of failures setting.
You can configure the routing and endpoint monitoring settings in your Traffic manager profile as shown in the following screenshot. The following are just sample values; you can set them based on your application's requirements.
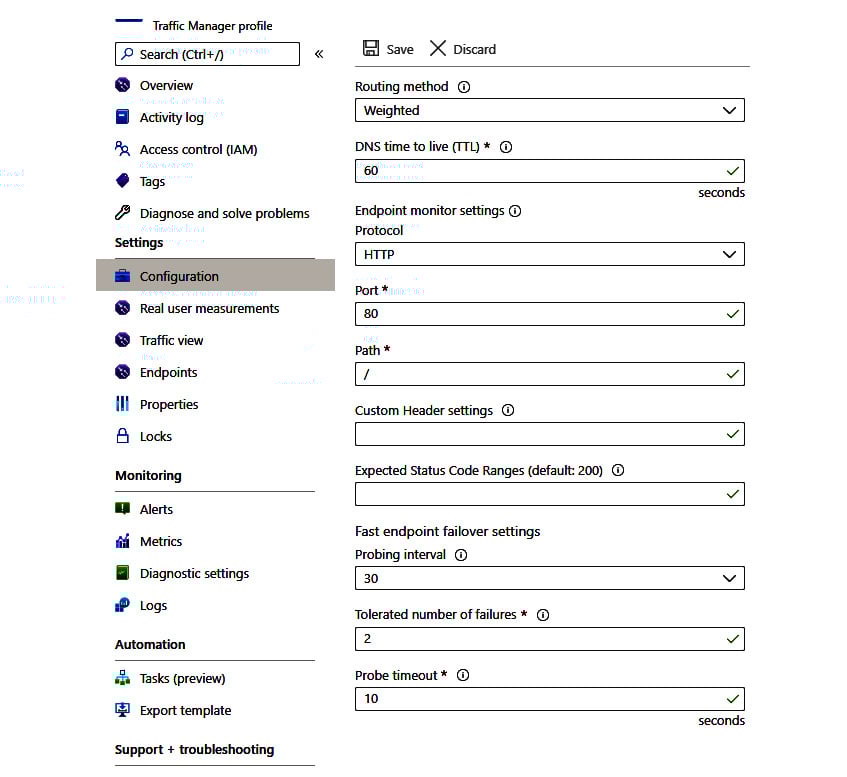
Figure 1.6 – Traffic Manager profile settings
Availability sets and availability zones
An availability set is a logical group of VMs within a data center in an Azure region and promises availability of 99.95%. They don't provide resiliency and high availability in the event of an entire data center outage.
An availability zone is made up of one or more data centers with independent power, cooling, and networking. It's a physical location within an Azure region and provides high availability (99.99%) even in the event of data center failures.
SQL Always On availability groups
SQL Always On availability groups were introduced in SQL Server 2012 to increase database availability. Availability groups support a set of read-write primary databases and one to eight sets of secondary databases to which we can fail over. These sets of databases are also called availability databases. Having primary databases and secondary databases in different Azure regions will give us high availability and resiliency against data center and Azure region failure. You can create a listener for an availability group and share that connection string for clients to connect to a database. Commit mode and failover are two important factors to consider in this list:
- Synchronous commit mode: In this mode, confirmations are not sent back to the client until the data is committed to a secondary database. In a way, this provides a 100% guarantee that every transaction that is committed on a given primary database has also been committed on the corresponding secondary database. Hence, this is the preferred option to sync data between databases within the same region but not for databases across regions due to latency.
- Asynchronous commit mode: In this mode, confirmations are sent back to the client as soon as the data is committed to the primary database without waiting to commit it to a secondary database. This mode is suitable when you want to reduce the response latency or in scenarios where primary and secondary databases are distributed over a considerable distance. Hence, this is the preferred option to sync data between databases across two different regions.
- Automatic failover: An automatic failover enables a secondary database to automatically transition to the primary database when the primary database becomes unavailable. Automatic failover is the preferred option when the primary database and secondary database reside within the same region with data always synchronized between the two databases. For cross region manual failover is the preferred option to avoid data loss as data is usually asynchronously committed.
Architecture for high availability
Let's extend the N-tier scaled-out distributed application to be highly available based on the options we discussed, as shown in the following screenshot.
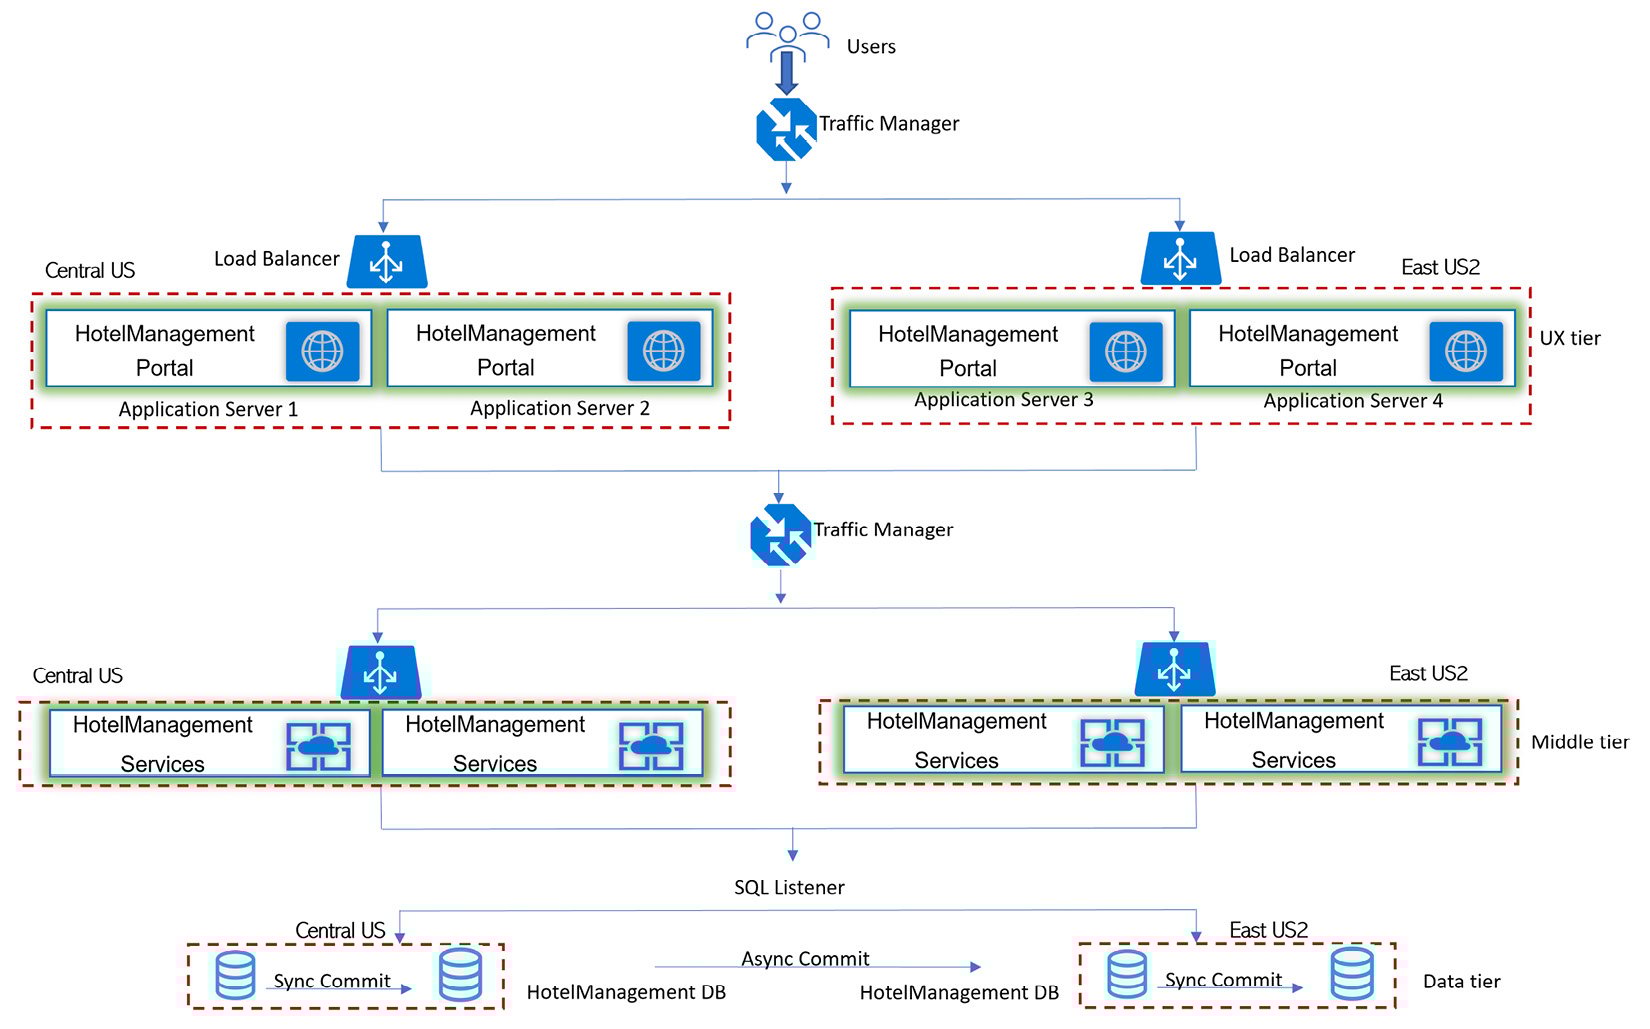
Figure 1.7 – N-tier distributed application scaled out and highly available
- Leverage Azure paired regions for high availability for your UX tier, middle tier, and data tier. One region will be the primary region and the other region will be the secondary region. If one region goes down, the other region will be available as a backup region. In this case, I have gone with the
Americanregions, with the primary region as Central US and East US 2 as the secondary region. You have regional pairs available in Asia, Europe, and Africa as well. Depending upon the customer's location base, you can select regional pairs appropriately. When you combine Azure Traffic Manager with Azure Load Balancer, you get global traffic management combined with a local failover option. - Leverage stateless services as any of the servers in your application can handle incoming requests and processes. Stateful services maintain contextual information during transactions and subsequent requests within a transaction need to hit the same server, hence designing for high availability and scalability becomes a challenge.
- Leverage Active-Active mode, which enables traffic to be routed to both regions and to load-balanced incoming requests. If one region becomes unavailable, it is automatically taken out of rotation. Active-Passive mode enables traffic to be routed to only one region at a time and would require manual failover to a secondary region when the primary region goes down, hence is not the right option for high availability unless your service is stateful and needs to maintain a sticky session where requests need to hit the same server every time for the active user session.
- Leverage deployment of multiple instances of your service in each region: The DNS names of these two instances are
eCommerce-CUS.cloudapp.netandeCommerce-EUS2.cloudapp.net. Create a Traffic Manager profile with the nameeCommerce-trafficmanager.netand configure it to use a weighted routing method across two endpoints,eCommerce-CUS.cloudapp.netandeCommerce-EUS2.cloudapp.net. Configure the domain nameeCommerce.comto point toeCommerce-trafficmanager.netusing a DNS CNAME record. - Leverage availability zones to get high availability (99.99%) and resiliency against data center failures. Each of the two endpoints
eCommerce-CUS.cloudapp.netandeCommerce-EUS2.cloudapp.netare configured to run on multiple servers within each region and all the servers run under the availability zone. - Leverage SQL Always On high availability set up with sync commit and auto failover between databases/nodes in the same region and async commit and manual failover across the regions, as shown in the following screenshot, which is a magnified view of the database from an architecture diagram. When the application connects to a SQL availability group listener, calls will be routed to the Node 1 (N1) part of Datacenter 1 (DC1), which is the primary region and primary read/write database.
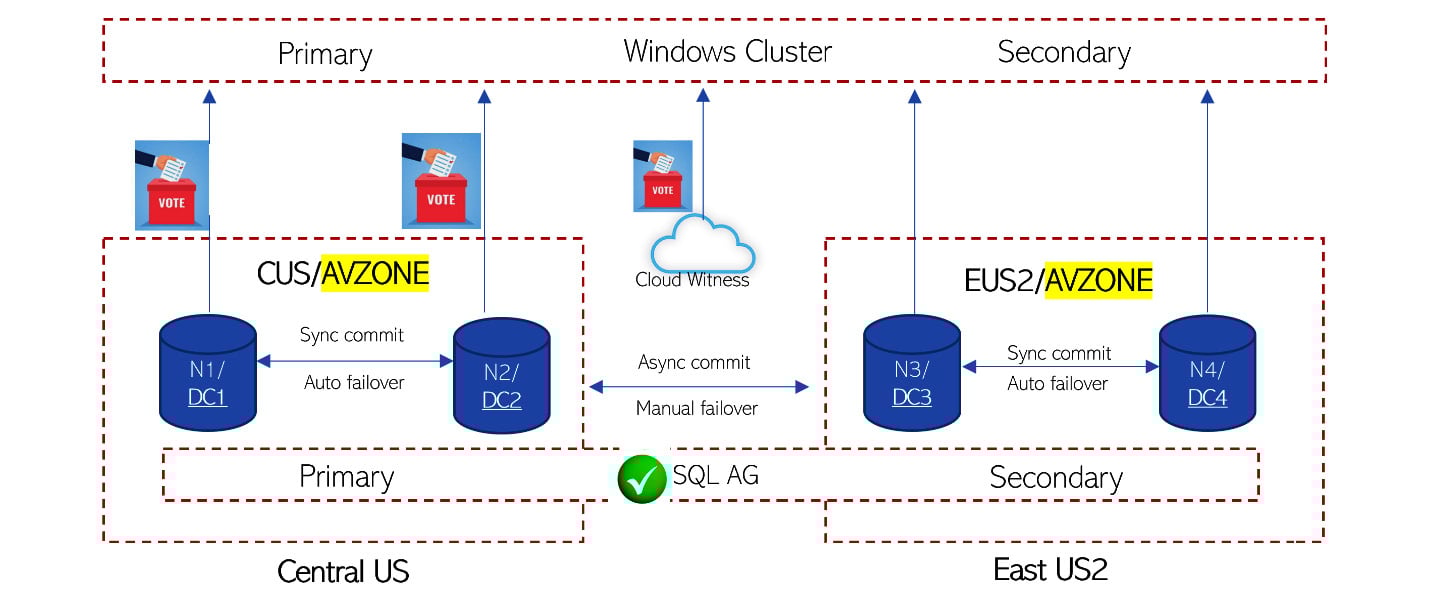
Figure 1.8 – SQL high availability setup
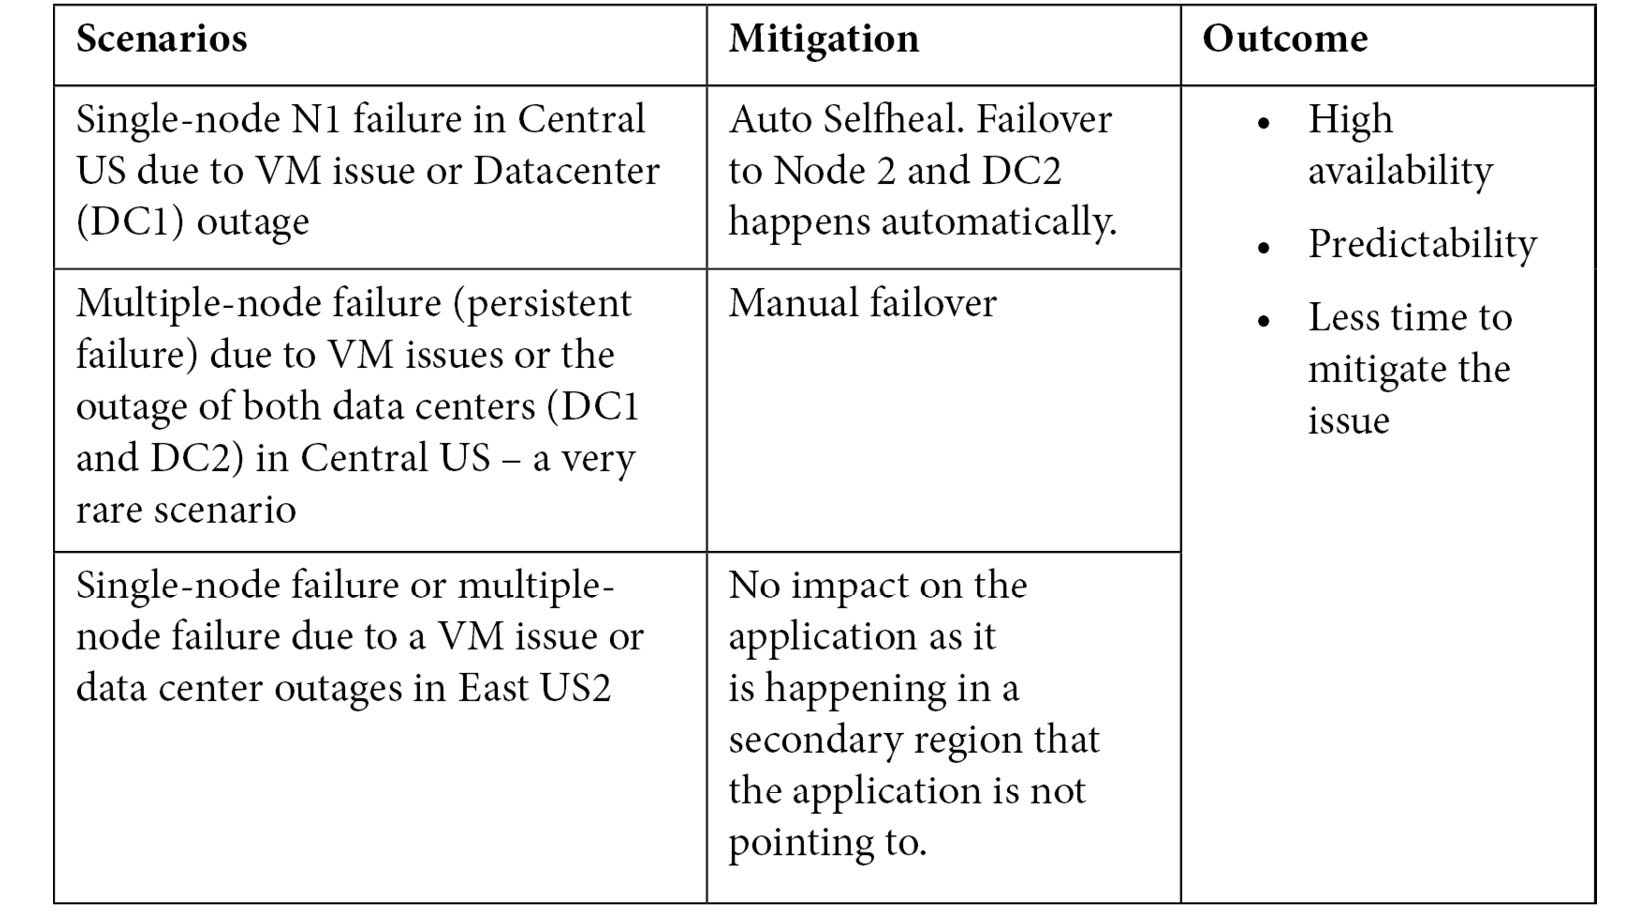
Let's look at two different scenarios when there is an outage and how this setup will help with high availability: