
Preparing your device
When bots are built, they need to be run on a device. This device can be a physical desktop, laptop, or even a virtual machine. We need to install and configure all devices that we may want to run a bot on. With this free edition of Automation Anywhere, we can add only one device.
To add a device, two stages are involved:
- Installing a Bot agent
- Enabling the extension
Let's go through each stage now.
Installing a Bot agent
The Bot agent is a small application that allows the device to communicate with the task bots. To install the Bot agent, follow these steps:
- Click on MY DEVICES from the left-hand menu bar, then click on the Add local bot agent icon:

Figure 2.7 – Adding a local device
- The connection wizard will pop up. Click on Connect to my computer:

Figure 2.8 – Connecting to a local device
- The wizard will start to download the Bot agent (into your default downloads folder) as shown in the following screenshot:

Figure 2.9 – Downloading a Bot agent to a local device
- Once the Bot agent has been downloaded, right-click on the downloaded file's icon and select Open:

Figure 2.10 – Installing a Bot agent on a local device
- This will initiate the Bot agent install wizard. Follow any onscreen instructions to install the Bot agent.
- Once it has been installed, you will notice a green tick in the Install bot agent step. This green tick indicates the successful completion of that task:
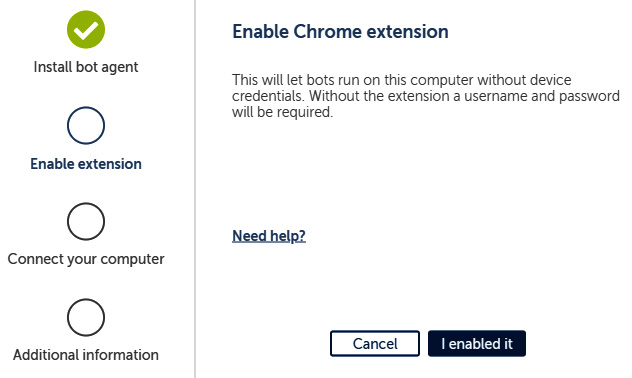
Figure 2.11 – Installation progress indicator
The wizard will automatically lead you into the next section for enabling the extension.
Enabling the extension
If you are using Google Chrome as your browser, Automation Anywhere will need to enable an extension for this. This allows Automation Anywhere to identify and interact with web-based objects for automating your bots. To enable the extension, you may need to download it from the Chrome Web Store. Follow these steps to enable the extension:
- Click on the I enabled it button shown in Figure 2.11. This will tell you whether the extension is already enabled or not:

Figure 2.12 – Enabling the extension
- Click on the Get the Automation Anywhere extension link to navigate to the Chrome Web Store:

Figure 2.13 – Chrome Web Store Automation Anywhere A2019 extension
- Click on Add to Chrome button and you will get the following prompt; click on Add extension:

Figure 2.14 – Extension installation prompt
- This will install and enable the extension. To view or disable the extension in Chrome, navigate to Settings | Extensions and the Automation Anywhere extension should be visible:

Figure 2.15 – The extension in Chrome
- Once the extension has been enabled, the progress indicator will be updated with further green ticks, shown as follows:

Figure 2.16 – The installation progress indicator
- Finally, to complete the installation, click on the Done button. You can give your workstation a nickname in the Nickname (optional) text box if you wish.
- Looking at My devices in Control Room, you will now notice your device listed:

Figure 2.17 – List of installed devices
- The Bot agent should now be successfully installed on your device. You will also notice a little green tick against your local device icon on the top pane:

Figure 2.18 – Local device status icon
We now need to configure the device so that Automation Anywhere can log in to it, even if no one is logged in to that device or if it's locked.