
In four easy steps, you can install and configure a XenApp 6.5 server farm, and be ready to publish hosted applications.
XenApp requires additional services to be installed. All of these can be on a single server for a proof of concept system, but in production environments, the services are often separated out. These are as follows:
A licensing server: The licensing server software can be installed onto Windows 2003 through 2008 R2, and additionally Windows 7. For XenApp, the licensing server provides concurrent users' licenses. The license server software ships on the XenApp installation DVD.
Microsoft SQL 2005/2008 or Oracle 11g database server: The farm database needs to be installed and managed on a database server. This can include SQL Express, if you do not currently have licenses for the full database server.
A Web Interface server: The Citrix Receiver will make its connection initially to the Web Interface server, which is a required component of the XenApp farm.
All of the previous components are included in the XenApp 6.5 installation DVD.
During the configuration of XenApp, you are prompted for the license server, and it is considered best practice to install it ahead of time. The license server can be shared with other Citrix products such as XenDesktop and XenServer; the minimum version number required for XenApp 6.5 is Version 11.9, which ships with the installation DVD. The license server will require the following TCP ports to be opened if currently blocked by firewalls:
8082: Web Console
7279: This is known as the
Vendor Daemon Port; end user licenses are checked in and checked out on this port27000: The XenApp servers will check the availability of the license server on this port
When purchased, licenses can be downloaded from the MyCitrix website at http://www.citrix.com/mycitrix. Your own MyCitrix ID can be linked to your company's licenses for management.
Note
Not only will you need concurrent user licenses for XenApp, but you will also require valid Remote Desktop Services licenses for each XenApp server that will host user sessions. Citrix licenses are concurrent user and RDS licenses are per user or per device.
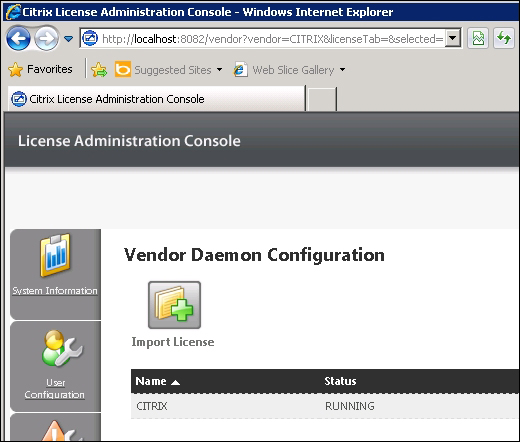
Installing the licenses is managed through a web console to the license server on port 8082. This can be seen in the following screenshot:
The XenApp 6.5 Server has to be installed on Microsoft Windows Server 2008 R2. The .NET Framework 3.51 is also required as is the Remote Desktop Servers role. Installing the XenApp Server from the integrated installer will add these roles and features if needed.
XenApp can be installed on physical or virtual machines. XenApp can run with as low an amount of resources as the operating system will allow, for example, 1 GB RAM; however, we would recommend scaling your server's memory and CPU to support the applications that you will be hosting on the server.
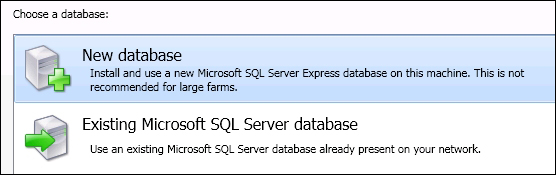
If you do not have an existing SQL Server infrastructure, it is possible to install SQL Express when creating the farm database. This will be achieved as the first XenApp Server is added to the farm. For the purposes of this book, we will use this method, although for a database with high availability and speed of access, a full standalone version of SQL is recommended. Using the integrated installer at the root of the XenApp 6.5 installation DVD, autorun.exe, we can start the installation, and choose to install XenApp Server from the first screen as shown in the following screenshot:

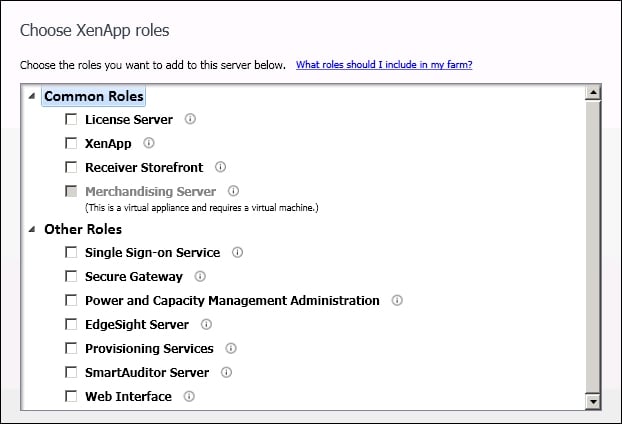
Continuing through the installation screens, we choose to add server roles. Choose the edition of XenApp that we have licensed (Platinum, Enterprise, or Advanced), read and accept the license agreement, and we arrive at the XenApp server role screen, as shown in the following screenshot:
From here, we will choose to install XenApp and accept the default subroles. The server will require a reboot once the installation is complete. Upon reboot, we are taken into the server configuration tool, where we first specify the licensing server, and create a XenApp server farm. In specifying the database server, we choose the option to create the database: do not misinterpret this. It will both install SQL Express and create the database, so always read the small print as shown in the following screenshot:
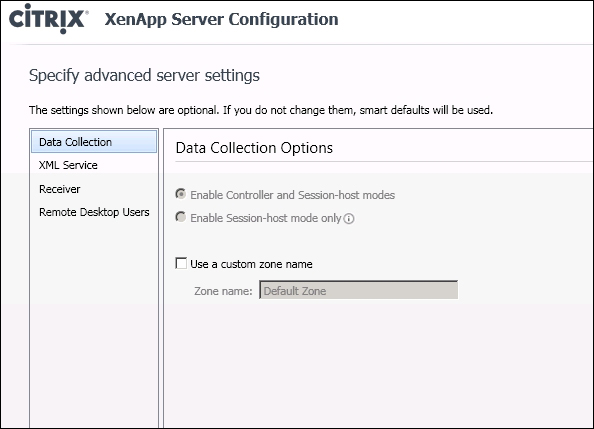
One major feature of XenApp 6.5 is that it allows for more control of the election of the Zone Data Collector (ZDC). The farm database holds the static information about the farm; this includes servers, administrators, and applications. Dynamic information is collated in the memory of the ZDC. A ZDC is elected for each zone and the ZDC maintains the list of users' sessions and XenApp server load. Prior to XenApp 6.5, every XenApp server would, by default, participate in the election process. To streamline the election process in 6.5, only XenApp servers with the session controller role mode can participate in the election. The first server in the farm has to have both the session controller and the session host mode, but subsequent servers could have just the session host role. As we have just one server in our farm, it must have both the modes, as can be seen from the following screenshot:
TCP ports that need to be open for XenApp include the following:
80: The Citrix XML Service
1494: ICA sessions
2512: This represents the IMA XenApp server-to-server communication
2513: This represents the AppCenter and PowerShell connections
2598: This represents the HDX session reliability allowing interruptions of the ICA session without re-authenticating
3389: This can be used for Remote Desktop Sessions using the Microsoft protocol but is less feature-rich than the ICA protocol
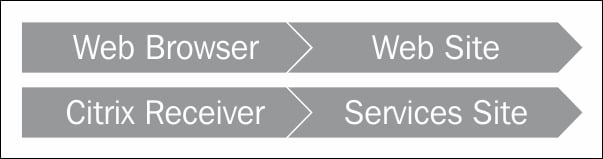
The Web Interface server is a required component of both XenApp and XenDesktop. With XenApp, no matter how the clients make their connection (either via the browser or direct from the Citrix Receiver), the initial connection request will go through the Web Interface. The Web Interface will authenticate users and communicate with the session controllers (known as the XML Brokers) to identify for users the most suitable XenApp server to host the ICA session.
The following illustration shows that connections made either through the web browser or the dedicated Citrix Receiver require the Web Interface server. The browser using the Web Site and Receiver requires the Services Site:
The Web Interface Version 5.4 can be installed on Windows Server 2003 R2 SP2 and higher, and this version ships with the XenApp installation DVD. The Web Interface server, like the license server, can be shared across farms and products.
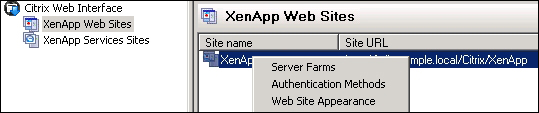
From the management console, Citrix Web Interface Management (which is installed along with the server) we need to add our XenApp server farm to the existing Web Interface sites, or alternatively, create sites that can be used for clients. The two sites that can be created are:
Web Site: To accept client connections from supported web browsers
Services Site: To accept client connections directly from the Citrix Receiver
Using an existing Web Site, we right-click on the Web Site and choose Server Farms from the context menu. In the subsequent dialog, we add the farm name and session controller addresses of servers in the farm. The right-click menu is shown in the following screenshot:
Note
Web Interface sites can be managed graphically via the management console we have just seen, or using the webinterface.conf configuration file. Although the GUI is the tool of choice for many administrators, the configuration file can be used to duplicate settings across more than one Web Interface servers.