Book Image

Microsoft System Center 2016 Orchestrator Cookbook - Second Edition

By : Michael Seidl, Steve Beaumont, Samuel Erskine (EUR), Andreas Baumgarten
Book Image

Microsoft System Center 2016 Orchestrator Cookbook - Second Edition

By: Michael Seidl, Steve Beaumont, Samuel Erskine (EUR), Andreas Baumgarten

Overview of this book

With Microsoft System Center 2016 Orchestrator Cookbook, you will start by learning how to efficiently install and secure System Center Orchestrator. You will then learn how you can create configuration files for SCO 2016. After initial installation and configuration, you will soon be planning and creating functional and fault-tolerant System Center runbooks to automate daily tasks and routine operations. Next you will delve into runbooks; you will learn how to create powerful and advanced runbooks such as Building your Runbook without a Dead End. You will also learn to create simple and advanced runbooks for your daily tasks. Towards the end of the book, you will learn to use SCO for other interesting tasks and also learn to maintain and perform SCO health checks. By the end of the book, you will be able to automate your administrative tasks successfully with SCO.
Table of Contents (8 chapters)

Installing a single server deployment

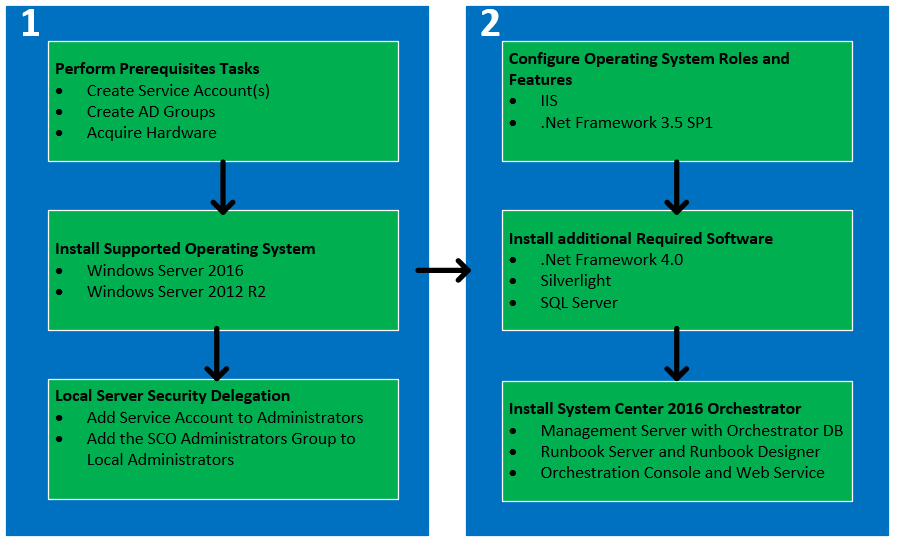
This recipe provides the steps required to install all the SCO roles on a single server. The single server deployment is appropriate for test and development environments. This deployment type will assist you with evaluation of the product, initial Runbook creation, and validation prior to deploying in your production environment. Though supported in production, you must plan to implement the multiserver deployment to provide flexibility and availability.

Getting ready

You must plan to review the Planning the Orchestrator deployment recipe before performing the steps in this recipe. There are a number of dependencies discussed in the planning tasks, which you must perform in order to be able to successfully complete the steps in this recipe.

The authors assume that you have access to all the installation media, and the user account performing the installation has administrative privileges on the server nominated for the SCO deployment.

How to do it...

The following figure provides a visual summary and order of the tasks you need to perform to complete this recipe:

The deployment will be implemented in an Active Directory environment and with the Windows Server 2016 operating system. Perform the following steps to deploy SCO on a single machine:

  1. In Active Directory, create the required and recommended user accounts and groups. In this example we will create the following groups:
    • Users: SCO_MGTSVCA and SCO_RBSSVCA
    • Groups: SCO_ADMINS and SCO_CON_USERS
  2. Install a supported Windows Server operating system, and join the server to the Active Directory domain in the scope of the SCO deployment.
  3. Add the two services accounts and the SCO Administrators group to the local Administrators group on the SCO server.
  1. On the SCO server, enable the following role and feature:
    • Role: Web Server (IIS) (default settings)—Note that the installation will enable this role for you if it is not found on the target server
    • Feature: .NET Framework 3.5 SP1—You must specify a source file for .NET Framework 3.5 SP1 in the case of Windows Server 2016, and ensure that the ISO for Windows Server 2016 is loaded
  2. Optionally install Silverlight. After the SCO installation, you will be prompted to install Silverlight if you run the console on the server.
  3. Install a supported version of Microsoft SQL Server. In our example, we will install Microsoft SQL Server 2016 standard edition. The following are the minimum options required for the installation:
    • Instance features: Database Engine Services
    • Share features: Management Tools—Basic
    • Collation: SQL_Latin1_General_CP1_CI_AS
    • Authentication Credentials: Windows Authentication (recommended)
  4. Insert or mount the SCO installation media on the server. Login with a user account with administrative rights.
  5. Launch the installation using the SetupOrchestrator.exe file. Click on Install under the System Center 2016 Orchestrator Setup section on the wizard page.
  6. On the Product Registration page, enter your Organization details and the Product Key (although the product key can be entered post installation, it is a best practice to enter this during the installation to reduce the risk of product evaluation expiry after the default 180 day period). Click on Next.
  7. Review the Please read this License Terms page, and accept to continue with the installation. Click on Next.
  8. On the Select features to install wizard page, ensure all the options are checked. Click on Next.
  9. On the Configure the service account page, type the user account you created for the Management Server service account and password. Click on Test to verify the details. Click on Next.
  10. On the Configure the database server page, type the server name, and if applicable, the instance of SQL where the Orchestration database will be created. Click on Test Database Connection to verify the connection to the database server. Click on Next.
  1. On the Configure the database page, ensure that New database is selected and the default name is Orchestrator for the database. Click on Next.
  2. On the Configure Orchestrator users group page, click on Browse… , and specify the Active Directory group you created for the SCO administrators role (SCO_ADMINS in our example). Click on Next.
  3. On the Configure the ports for the web services page, leave default options (81 and 82) or provide your custom options. Make sure you document the custom port if you change the default values. Click on Next.
  4. On the Select the installation location page, accept the selected installation location or specify a custom location. Click on Next.
  5. On the Microsoft Update page, select your preferred option. Click on Next.
  6. On the Help improve Microsoft System Center Orchestrator page, select your preferred options. Click on Next.
  7. Review the Installation summary page. Click on Install to start the installation.
  8. On successful installation, you are presented with final configuration options as follows:
    • Launch Windows Update
    • Visit System Center Orchestrator Online
    • When Setup closes, start the Runbook Designer

This completes the installation steps.

How it works...

Installing SCO in a single server deployment mode is very simple. The most important aspect is to plan and configure all the prerequisites before you start the actual installation.

The installation requires a number of options, which the wizard guides you throughout the process. The installation creates the Orchestration database and prepares it for use in your deployment. The account specified for the service account is granted the required permission in the database and on the local server.

The following screenshot shows the database permissions granted to the management server service account:

About service accounts

In our prerequisites, we created two service accounts—one for the management service and the other for the Runbook service. In a single server deployment, only one account is requested, which, in our case, is the Management Server service account. The Runbook Server service account will be used for additional Runbook Servers and is a best practice to separate the two accounts, as they are granted different rights in the database. An additional benefit of using two or more accounts is to reduce the risk of a single point of failure for all service components.

There's more...

There is one additional configuration you must perform post installation on the Management Server.

Enabling network discovery is applicable to the Orchestrator database Runbook Designer role. Perform the following steps to enable network discovery:

  1. In Control Panel, navigate to Network and Sharing | Change advanced sharing settings, and expand the domain profile and Turn on network discovery.
  2. Click on Save changes.

Enabling network discovery enables the auto-population of fields, which requires the selection of a computer name when creating Runbooks.

See also