

In the previous recipe, you learned how to create an HTTP trigger and accept the input parameters. Now, let's work on something interesting, that is, storing the input data into a persistent medium. Azure Functions gives us the ability to store data in many ways. For this example, we will store the data in Azure Table storage.
Persisting employee details using Azure Storage table output bindings
Getting ready
In this recipe, you will learn how easy it is to integrate an HTTP trigger and the Azure Table storage service using output bindings. The Azure HTTP trigger function receives the data from multiple sources and stores the user profile data in a storage table named tblUserProfile.
We will take the following prerequisites into account:
- For this recipe, we will use the same HTTP trigger that we created in the previous recipe.
- We will be using Azure Storage Explorer, which is a tool that helps us work with the data that's stored in the Azure Storage account. You can download it from http://storageexplorer.com/.
- You can learn more about how to connect to the Storage Account using Azure Storage Explorer at https://docs.microsoft.com/en-us/azure/vs-azure-tools-storage-manage-with-storage-explorer.
How to do it...
Perform the following steps:
- Navigate to the Integrate tab of the RegisterUser HTTP trigger function.
- Click on the New Output button, select Azure Table Storage, and then click on the Select button:
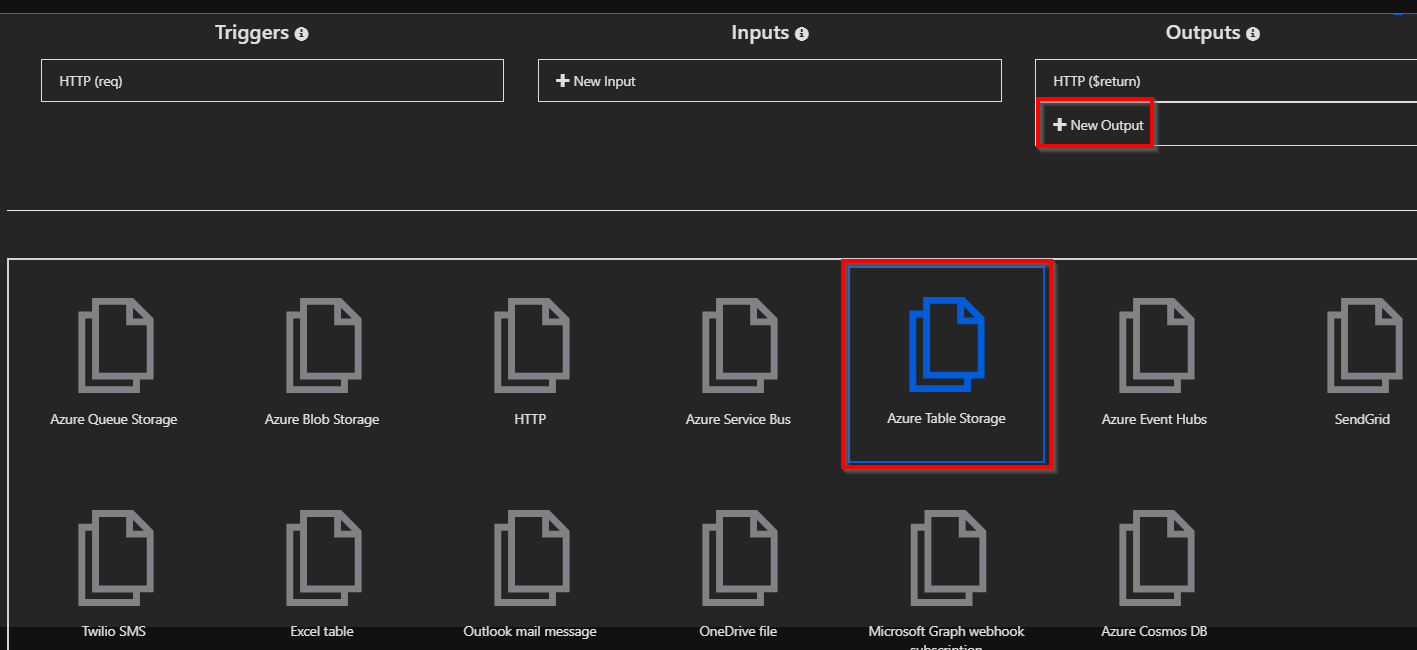
-
You will be prompted to install the bindings. Click on Install. This should take a take a few minutes. Once the bindings are installed, choose the following settings of the Azure Table storage output bindings:
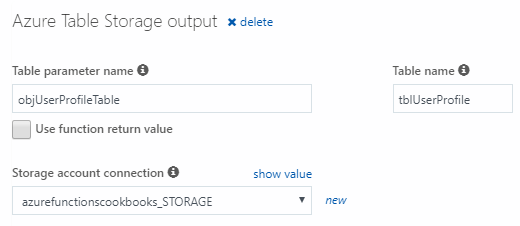
- Table parameter name: This is the name of the parameter that you will be using in the Run method of the Azure Function. For this example, provide objUserProfileTable as the value.
- Table name: A new table in Azure Table storage will be created to persist the data. If the table doesn't exist already, Azure will automatically create one for you! For this example, provide tblUserProfile as the table name.
- Storage account connection: If you don't see the Storage account connection string, click on new (as shown in the following screenshot) to create a new one or choose an existing storage account.
- The Azure Table storage output bindings should be as follows:
- Click on Save to save your changes.
- Navigate to the code editor by clicking on the function name and paste in the following code. The following code accepts the input that's passed by the end user and saves it in Table Storage:
#r "Newtonsoft.Json"
#r "Microsoft.WindowsAzure.Storage"

using System.Net;
using Microsoft.AspNetCore.Mvc;
using Microsoft.Extensions.Primitives;
using Newtonsoft.Json;
using Microsoft.WindowsAzure.Storage.Table;

public static async Task<IActionResult> Run(
 HttpRequest req,
 CloudTable objUserProfileTable,
 ILogger log)
{
  log.LogInformation("C# HTTP trigger function processed a request.");
  string firstname=null,lastname = null;
  string requestBody = await new     StreamReader(req.Body).ReadToEndAsync();
 dynamic inputJson = JsonConvert.DeserializeObject(requestBody);
 firstname = firstname ?? inputJson?.firstname;
 lastname = inputJson?.lastname;
 UserProfile objUserProfile = new UserProfile(firstname, lastname);
 TableOperation objTblOperationInsert =    TableOperation.Insert(objUserProfile);
 await objUserProfileTable.ExecuteAsync(objTblOperationInsert);
 return (lastname + firstname) != null
 ? (ActionResult)new OkObjectResult($"Hello, {firstname + " " + lastname}")
 : new BadRequestObjectResult("Please pass a name on the query" + "string or in the request body");
}

class UserProfile : TableEntity
 {
    public UserProfile(string firstName,string lastName)
    {
      this.PartitionKey = "p1";
       this.RowKey = Guid.NewGuid().ToString();
       this.FirstName = firstName;
       this.LastName = lastName;
    }
    UserProfile() { }
    public string FirstName { get; set; }
    public string LastName { get; set; }
 }
- Let's execute the function by clicking on the Run button of the Test tab by passing the firstname and lastname parameters in the Request body:
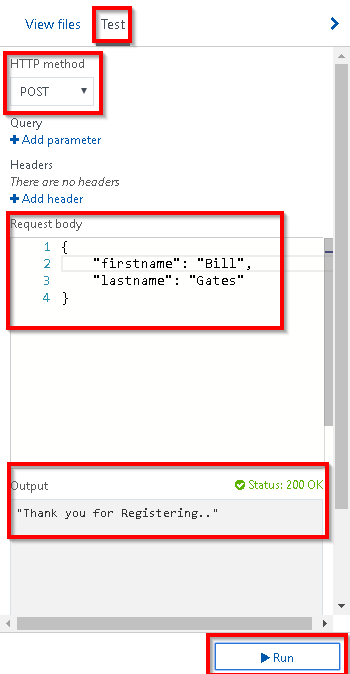
- If everything went well, you should get a Status 200 OK message in the Output box, as shown in the preceding screenshot. Let's navigate to Azure Storage Explorer and view the table storage to see whether the table named tblUserProfile was created successfully:

How it works...
Azure Functions allows us to easily integrate with other Azure services, just by adding an output binding to the trigger. For this example, we have integrated the HTTP trigger with the Azure Storage table binding and also configured the Azure Storage account by providing the storage connection string and the Azure Storage table name in which we would like to create a record for each of the HTTP requests that's received by the HTTP trigger.
We have also added an additional parameter for handling the table storage, named objUserProfileTable, of the CloudTable type, to the Run method. We can perform all the operations on Azure Table storage using objUserProfileTable.
The input parameters are not validated in the code sample. However, in your production environment, it's important that you validate them before storing them in any kind of persisting medium.
We also created a UserProfile object and filled it in with the values we received in the request object, and then passed it to a table operation.
You can learn more about handling operations on the Azure Table storage service at https://docs.microsoft.com/en-us/azure/storage/storage-dotnet-how-to-use-tables.
Understanding storage connection
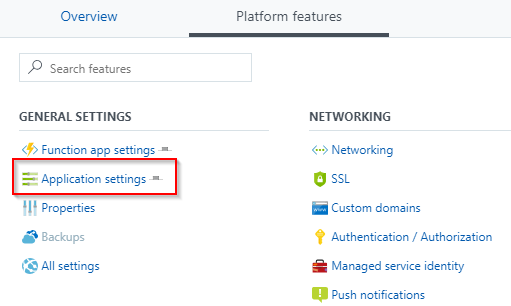
When you create a new storage connection (refer to step 3 of the How to do it... section of this recipe), new App settings will be created:
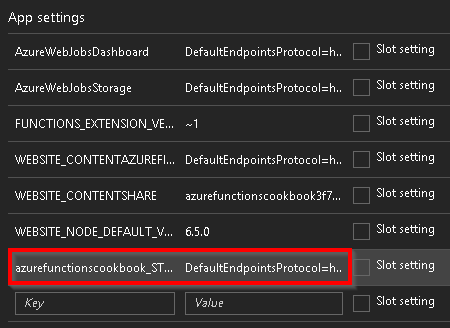
You can navigate to App settings by clicking on the Application settings menu, which is available in the GENERAL SETTINGS section of the Platform features tab:
What is the Azure Table storage service?
The Azure Table storage service is a NoSQL key-value persistent medium for storing semi-structured data.
You can learn more about it at https://azure.microsoft.com/en-in/services/storage/tables/.
Partition key and row key
The primary key of the Azure Table storage table has two parts:
- Partition key: Azure Table storage records are classified and organized into partitions. Each record that's located in a partition will have the same partition key (p1, in our example).
- Row key: A unique value should be assigned to each of the rows.
There's more...
The following are the very first lines of code in this recipe:
#r "Newtonsoft.json"
#r "Microsoft.WindowsAzure.Storage"
The preceding lines of code instruct the runtime function to include a reference to the specified library in the current context.