Book Image

Red Hat Enterprise Linux 8 Essentials

By : Neil Smyth
1 (1)
Book Image

Red Hat Enterprise Linux 8 Essentials

1 (1)
By: Neil Smyth

Overview of this book

Red Hat Enterprise Linux 8 is one of the most secure and dependable operating systems available. For this reason, the ambitious system or network engineer will find a working knowledge of Red Hat Enterprise 8 to be an invaluable advantage in their respective fields. This book, now updated for RHEL 8.1, begins with a history of Red Enterprise Linux and its installation. You will be virtually perform remote system administration tasks with cockpit web interface and write shell scripts to maintain server-based systems without desktop installation. Then, you will set up a firewall system using a secure shell and enable remote access to Gnome desktop environment with virtual network computing (VNC). You’ll share files between the Red Hat Enterprise Linux 8 (RHEL 8) and Windows System using Samba client and NFS. You will also run multiple guest operating systems using virtualization and Linux containers, and host websites using RHEL 8 by installing an Apache web server. Finally, you will create logical disks using logical volume management and implement swap space to maintain the performance of a RHEL 8 system. By the end of this book, you will be armed with the skills and knowledge to install the RHEL 8 operating system and use it expertly.
Table of Contents (32 chapters)
32
Index

15.7 Establishing a Secure Tunnel on Windows using PuTTY

A similar approach is taken to establishing a secure desktop session from a Windows system to a RHEL 8 server. Assuming that you already have a VNC client such as TightVNC installed, the one remaining requirement is a Windows SSH client (in this case PuTTY).

Once PuTTY is downloaded and installed, the first step is to establish a secure connection between the Windows system and the remote RHEL 8 system with appropriate tunneling configured. When launched, PuTTY displays the following screen:

Figure 15-3

Enter the IP address or host name of the remote host (or the external IP address of the gateway if you are connecting from outside the firewall). The next step is to set up the tunnel. Click on the + next to SSH in the Category tree on the left-hand side of the dialog and click on Tunnels. The screen should subsequently appear as follows:
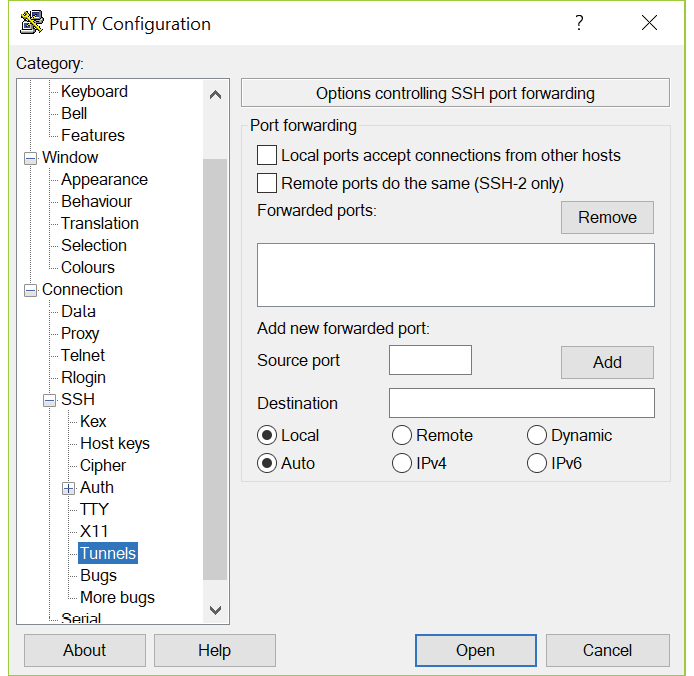
Figure 15-4

Enter 5901 as the Source port and localhost:5901 as...